Pages

Tuesday, June 29, 2010

What's Up Next?

Today we want to let you know all the stuff that is coming up here at Oh My Crafts.  We have new products, new ideas, and new deals, just for you!


First off, did you know that Oh My Crafts offers a Pay Later option through PayPal? Well we do!  

Bill Me Later through PayPal gives you the option of buying now, and paying later.  To use the Bill Me Later option, all you have to do is follow 3 easy steps:

1.  Start Shopping at your favorite PayPal Store.  Check out using the PayPal button as usual, and sign in to your PayPal account.

2. Change your Payment Method. Under "Payment Method", click "Change" then select "Bill Me Later" and update your billing information.

3. Complete Your Purchase! Answer two quick questions and accept the terms.  It's that easy!

Bill Me Later is subject to credit approval as determined by the lender, CIT Bank, Salt Lake City, Utah and is available to US customers who are of legal age in their state of residence.  You must pay with Bill Me Later to get the offer.  You will receive statement notifications and other Bill Me Later communications electronically at the email address you provide.  Any discounts will appear on your Bill Me Later statement within 1-2 billing cycles. 


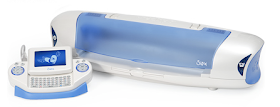
Next off, to show off our Twilight enthusiasm, we would like to introduce a new product from Sizzix: The Eclips!


The Eclips is an electronic shape-cutter that combines amazing artwork with craft-friendly intelligence!

Check out these features:
  • Easy to Carry - Only electronic shape-cutter of its kind, sporting a convenient handle - take it anywhere!
  • Economical - Unleash decorative borders for 6" and 12" projects, create even longer cuts with optional 24" cutting mats, and cut everything from vellum and paper to cardstock and chipboard.
  • Effective - Laser point image preview - see before you cut, and a quality blade with adjustable depth.
  • Electronic - High-resolution 3.6" LCD previews detailed shapes, easy on-screen navigation, and built-in material presets for accurate speed and pressure. 
  • Essential - Starter Cartridge loaded with shapes and alphabet. Remove and replace cartridges with power on. Change the cartridge, change the possibilities!
  • Easy - Intelligent handheld remote control guides you through every step. Select shapes to cut as solids, outlines, shadows, and borders.
  • Efficient - Easy keypay, just like a computer!  Ergonomic cradle allows tabletop use.
 Check out some projects from Sizzix made with the Eclips!


Watch for the Eclips coming soon to Oh My Crafts!


Also, tomorrow, Wednesday June 30th, in honor of the Eclips and the new Twilight movie Eclipse we are having a sale!   Check out the Eclipse Category for all things spooky and sparkly! 

Here are the coupon codes:

ECLIPSE20 - 20% off any order
FORKS3 - A bonus 3% off orders $75 or more


Lastly, we are going to be having a Fourth of July sale starting on the first!  Check back here as well as our Facebook page for more deals and steals!

Happy Twilighting!


Friday, June 25, 2010

It's an AmaaaZING Thing!


What is this interesting new thing we have going on at Oh My Crafts?  

It's the Zing Embossing Powder from American Crafts!


Zing Embossing Powder is an effective way of applying color and dimension to any project! All you have to do is apply embossing ink to paper using a stamp or marker, sprinkle with Zing Embossing Powder, gently remove excess powder and heat. It is the smoothest opaque finish available!  The options are endless with a variety of colors and four unique finishes - opaque, glitter, metallic and fluorescent.   

Here are some Zing-y projects from Lindsey to show off just how amaZing this stuff is!


This Kindred Spirit card is becoming one with the Zing Embossing Powder!  The Kindred Spirit title and the four stamped squares were all created with Zing. Too cute!


The Zing powder creates a unique raised effect once it is heated. Gotta love the texture!


Don't forget about this adorable Butterfly Embellishment from Jenni Bowlin!


Here's a fabulous "just because" card and envelope.  


All of the flowers were done created using the Zing Embossing Powder. Lindsey used both the opaque and glitter Zing powders to make the flowers really stand out. 


Zing Embossing Powder is especially cool to use with phrase stamps!  It gives your cards a little more dimension don't you think?


Get ready to blast off with this Zoom card!


The Zing powder is no ordinary embossing powder.  Look at how well Zing holds detail!


Don't forget, if you have any questions about these awesome cards you can always email Lindsey at lindsfill @ gmail.com.


Now, are you curious to see how the Zing Embossing Powder works? Here's a demo video from American Crafts!


On another note, this weekend only Oh My Crafts is offering two spectacular coupons!

SAVE22 - This coupon will save you 22% off orders that are $50 or more!  
SHIPFREE - This coupon will get you free US50 Standard Shipping!  
(Note: SHIPFREE does not apply outside the U.S.)


These coupons are good until Monday, June 28th.  Now isn't that a great way to start your weekend?


Happy embossing!
 

Wednesday, June 23, 2010

Stop, Crop, and Fold!


Remember the good old school days where you learned how to fold your paper in hot-dogs and hamburgers?  Well we wanted to help you revise your folding strategies with a few more easy to learn folds from Sizzix!

Click on the images below for large scale instructions (you may have to click twice to enlarge the pictures).

The Side Fold


The Top Fold


The Bottom Fold with Base


The Stand Up Fold


The Gate Fold


The Paper Dolls Fold


And last but not least, 
The Circular & Square Wreath Fold!


Check out www.ellisoneducation.com for more creative ideas and lessons!

Happy folding!

Tuesday, June 22, 2010

Get Ready to Rock with i-rock!


Check out what's new to Oh My Crafts: The new i-rock collection from Imaginisce!


And what is the i-rock you say?  It's a battery operated tool (3 AA batteries) that will permanently affix rhinestones, jewels, pearls, or mirrors to paper, fabric, or even furniture! It is so easy to use, the possibilities really are endless for this tool. Even better, is that there is no need for messy glue. 

It's so easy, even your husband can use it!

Check out these Simple Instructions:

1. Use jewel-setter stick or tweezers to place gem/studs in place with adhesive side down.
2. Holding the Tool perpendicular to the gem/stud, touch top of embellishment lightly, letting heat penetrate to melt adhesive on back.


3. When the point is on the embellishment, you can "feel" the adhesive melt. That "feel" tells you that it is time to remove the point from the gem/stud.

i-rock Tips:

1.Do not apply excess pressure to the Tool while on the embellishments. let the heat from the tool do the work.
2. Different surfaces, including fabrics, will require various lengths of time for embellishments to adhere securely. Always test first.
3. STUDS...they set the fastest and if you press down to hard the glue will gush
out the sides and it doesn't dry clear. We would recommend only heating those for about 3 seconds and do NOT press down on tip/stud.

(Please make sure you read ALL of the instructions before using the i-rock tool. You can find them included with the i-rock tool or HERE)


There are so many cool ways to use the i-rock in the crafting world. Check out some of these projects from Imaginisce!


Everybody’s dying to know “How do you make these stunning designs?” But you and I know the magic is a stencil… perfect placement every time!  OMC offers three unique stencils: Frames, Flowers, and Swirls!


Great thing about "heat setting" the gems is they don't fall off your page as easily as other traditional adhesive backed gems and you don't have the mess of trying to glue them in place.


Here's a video from Imaginisce with a demo on how to use the i-rock tool and embellishments to make a super cute Butterfly Card!


This awesome new tool is just the thing to put a little flair and style in your projects!  You can find all of the products in the i-rock collection HERE!

Join us Thursday on Facebook for a Q&A with Imaginisce!  We will have a discussion about the i-rock - anything and everything you want to know about what it is and what it does! Be there! Thursday @ 2:30 MST! 

Happy Rockin'! 

Friday, June 18, 2010

Just Me and My Dad

With Father's Day only a few days away, we wanted to give you some last minute project ideas from Sizzix!  


Show your dad just how much you care with an adorable Father's Day card!


INSTRUCTIONS:
Fold cardstock in half to form card base. Cut various strips of patterned paper and adhere to front of rectangular-shaped corrugated cardboard. Attach twill tape across front. Stitch around corrugated cardboard, if desired. Adhere entire piece to card front. Die-cut letters from Serif Essentials alphabet, Hearts and Hardware Findings from paper-covered chipboard. Embellish with Distressing Ink. Attach brads, clock piece and twine to die-cut pieces. Adhere to card front.


Do you have a favorite photo of you and your dad?  Why not display it in an appropriately described "Dad" frame?


INSTRUCTIONS:
Die-cut the letters from Sassy Serif alphabet from cardstock and chipboard. Apply Textured Impressions (Woodgrain & Burlap) and Texture Fades to the cardstock. Ink and Sand to highlight the designs. Adhere to chipboard letters. Adhere the letters together using hot glue or strong tape. Die-cut Bird (from Caged) from chipboard and Branch w/Leaves from paper. Add color with ink. Adhere to frame front and embellish with moss. Make two easel backs to support frame.


"Any man can be a father but it takes someone special to be a dad." -- Anne Geddes


Happy Father's Day!

Thursday, June 17, 2010

Red, White, and Blue!

With decorations, BBQ's, fun and games there is so much to do this holiday season.  Here are some more project ideas from Sizzix to help you celebrate in style!


Here's a cute Red, White, and Blue paper kit that has your Family in mind!


INSTRUCTIONS:
Fold cardstock in half to form card base. Emboss cardstock. Trim a piece of patterned paper to size and adhere to embossed cardstock. Stitch around patterned paper, if desired.  Mat embossed cardstock on cardstock and attach to card. Die-cut Phrase, Chill from cardstock, attach to card and embellish with glossy accents. Die-cut Star from patterned paper, Chalk Edges, attach to card and embellish with Glitter. Wrap ribbon around card and tie in a knot. Attach ribbon bow.


How about a darvelous door hanger to help people see your patriotic spirit!


INSTRUCTIONS:
Die-cut Album page from cardstock to form door hanger and ink edges. Die-cut Swirl from cardstock and attach. Die-cut Phrase, Happy from cardstock and attach. Die-cut Number and attach. Die-cut Phrase, Thanks trim away unnecessary letters and attach. Die-cut Pinwheel from double-sided patterned paper, assemble, secure with a Brad and attach. Embellish with button and Glitter. Add ribbon to hang.


** How to make a homemade pinwheel**


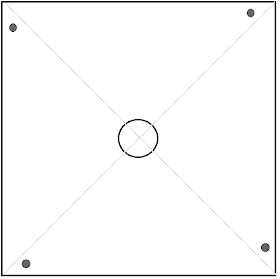
1. Print the pinwheel pattern provided. Cut the solid lines. Lay it on top of your patterned paper and lightly paste the corners down.
2. Cut-out the pinwheel on the solid lines only.
3. Cut the dotted lines from the four corners to the center circle. Try not to cut into the center circle.
4. Use the sharpened pencil to poke a hole through the four tiny dark circles.
5. Make the tiny holes on the four points meet at the center circle.
6. Push the ends of a paper fastener through the holes on the pinwheel. then push the fastener through the center circle.


And last but not least, an amaaaazing star wreath!


INSTRUCTIONS:
Die-cut Stars several times from Plain and Patterned Paper backed with chipboard. Adhere Stars together to form a wreath. Embellish with ribbon and Glitter!


Because there are so many ways to celebrate and show off your holiday spirit we'd better get started! Have fun crafting and don't forget to check out our Red, White, and Blue section for some awesome deals!


Happy creating, crafting, and celebrating!