Pages

Sunday, December 26, 2010

Christmas Layouts

Now that the Christmas festivities have ended, it's time to start thinking about scrapping all those wonderful Christmas memories.  To help you out we have some amazing Christmas layout ideas from OMC designer Lindsey!  Check them out!


This "Holiday Wishes" layout uses adorable holiday stickers to finish it's homemade look. 
Don't underestimate the effect a simple sticker can have! 


Letter stickers are a fun way to personalize your layout.  Mix and match or coordinate as you please!


Need a cute border to finish off your layout?  Try lining your picture or text box with buttons of varying sizes and shapes!


This "Home for the Holidays" layout uses different patterned papers on a simple background to keep the focus clear.  The horizontal tags help coordinate the patterned pages.
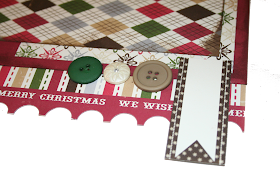


Buttons are always a fun embellishment to use in empty spaces to help create dimension on your layout.


This "Wish" layout incorporates
buttons, glitter, and simplicity to their full potential!  The clean lines of the patterned paper against the torn accent paper help keep this layout interesting to the eye.


To help the torn paper stand out, try inking the edge with an ink pad. 


Not satisfied with the border you have created?  Try writing your favorite quote or song lyrics around the edges!  This little personalization is a fun technique to use on cards and layouts alike.


Don't forget your glittery accents!  "The List" layout uses Zing embossing powder to create a background of glittery snowflakes.  This homemade background is just the thing when you can't seem to find just the right sheet of paper. Try making your own!


Using different colors of embossing powder and layering creates a very unique look.


What better way to say hello than with a holiday themed post card layout?
Embossing a sheet of paper with your favorite embossing folder and some ink creates a interesting background display for pictures. 


A simple flower embellishment completes the picture perfect layout!


We hope the layout ideas are flowing!  If you have any further questions about these layouts or any of Lindsey's projects, you can contact her directly at lindsfill@gmail.com.  Please include the name of the project in your subject title. 

Happy crafting!

Saturday, December 25, 2010

All Hearts Come Home for Christmas


We here at Oh My Crafts want to wish everyone 
a very Merry Christmas!


May the holiday season bring you safe travels, warm homes, 
and wonderful family memories for years to come :)


Friday, December 24, 2010

Weekend Craft: Neighbor Gift Pails

These small pails are just the right size for Christmas treats or any other special gift packaging you might need!


Decorate all the same or make each one an individual treasure – they are sure to please the recipient! Below are instructions for the snowflake pail.


SUPPLY LIST:

Any kind of electronic die cutting machine (Cricut, Eclips, Silhouette, Slice etc.)
For this project, we used Cricut cartridge: Winter Lace
Sky Blue Flake Vinyl 

White Tulle – generic
Blue rick rack – generic


Snowflake Gift Pail


INSTRUCTIONS:


1. Cut a variety of snowflakes in blue and silver in all sizes no larger than 2 ½”. Because the snowflakes can be delicate, be careful choosing very small sizes as they can be difficult to work with.
2. Weed and pick out centers. (See instructions included with vinyl.)
3. Apply transfer tape to snowflakes individually, burnish.
4. Transfer one snowflake at a time to pail, burnish.
5. Repeat process.
6. Make a small tag out of scraps of vinyl and cardstock, attach to handle.
7. Knot ribbons around handle by tag.
8. Fill and enjoy!


Happy crafting!


Thursday, December 23, 2010

Top Tips for Vinyl

Top Tips for Working with Oh My Crafts Vinyl

From decorating a card to adding your family mantra to a plate, vinyl lettering can be used for a number of creative tasks. This type of lettering is durable, easy to clean and inexpensive to apply. We have pulled together our Top Tips for Working with vinyl to help you be successful and have fun!

 
  • Always use the proper tools for the job. You wouldn’t try to hammer in nails with a screwdriver, would you? I didn’t think so. The three must-have tools for working with vinyl are a pick, spatula, and burnishing tool.
  • Have fresh or new Oh My Crafts Vinyl for your projects. The newer your vinyl is the better it seems to work.  
  • Prepare your surface. Make sure that the surface of your project that the vinyl will be attached to is clean and dust-free. You can use glass cleaner and a dry, soft cloth to remove any dust and dirt particles. Also, make sure that your work area is clean and well ventilated. 
  • Make sure the settings on your Cricut machine are set to handle vinyl. Adjusting your cutting depth may vary from one machine to another. Generally the cutting needle is set on 3, the pressure is on med, and the speed will need to be adjusted to slower speeds depending on the intricacy of the image.  
  • When cutting your image, adjust the depth of the cut so that only the vinyl is cut and the vinyl backing is still in tack. This will simplify removing the vinyl from the backing.  
  • Transfer paper is very important in moving or transferring your image from one location to another. Transfer paper also helps in aligning your letters and images before placement.  
  • On detailed projects, where you are layering items, use your pick to position and move the vinyl around.  
  • Success with vinyl projects is something that requires practice and patients. Try not to rush the cutting, transfer or applying of vinyl or you will end up with undesirable results.  
  • When cutting script letters, try to fit all the letters in your word on the same line to make it easier to keep letters aligned. If your word is sized too large, the word will break somewhere within the word and finish cutting the letters on the next line. Add a space (or break) after the word to help. For example, if you are cutting out the phrase, “Live, Laugh, Love,” adjust the size so that only one word is cutting per line. For horizontal or small projects, you can cut the whole phrase on one line.  
  • Have fun!
 
Click HERE to view all the OMC Vinyl options.
 

Happy vinyling!

Wednesday, December 22, 2010

Weekend Craft: Thank You Card

Thank You – Two simple words that can mean the world to someone!


What better way to celebrate the season of giving than with a handcrafted Thank You card. Remembering the kindnesses bestowed upon us will surely help keep the Christmas spirit within each of us.


SUPPLY LIST:

Paper: Hot Chocolate: Fancy Pants Designs
Stamp: The Right words: Unity Stamps
Embossing Powder: Zing-Brown Opaque finish: American Crafts
Distress Ink pad: Brushed Corduroy: Ranger Inks
Ribbon: Cream Dot: generic
Embroidery Floss: Cream: In stitches: Bazzill
Embroidery template: In stitches: Bazzill


"Thank You" Card 

INSTRUCTIONS:

1. Cut card base 5 ¼” x 3 ½” of red, white and brown polka dots. Ink edges.
2. Cut pull tag 3” x 4 ¼” of light green damask pattern. Punch hole in center and trim approximately 5/8” of each of the top corners to make angles. Ink edges.
3. Stamp sentiment and sprinkle brown embossing powder over ink and emboss with heat gun. Set aside.
4. Cut red snowflake paper 4 × 6” and fold in half. Pierce holes through layers using line template and stitch. Adhere to polka dot base.
5. Trim a band from light green damask paper 1” x 12” and punch a hole every inch. Ink edges. Thread cream ribbon through holes. Wrap band across red pocket. Overlap edges and adhere together on backside of card.


Happy crafting!

Tuesday, December 21, 2010

It's Present Time!

Here is the last update on our OMC Giving Tree! We were able to acquire all the items on our lists for the two families we were supporting this holiday season. Yesterday morning we loaded up the trucks and sent the gifts off to be wrapped and given to the families. We are all so grateful for the opportunity to participate in the Sub for Santa program. We also want to say THANK YOU! to all of you who donated.  With your help we were able to give these families a very special Christmas surprise.

 
We hope your holidays are filled with as much joy and gratitude as ours!

Friday, December 17, 2010

It's Time to Believe!

Looking for an easy craft project for the weekend?  Try this adorable "Believe" Banner created by OMC designer Lindsey!


SUPPLY LIST:


Sizzix : Bigz XL Die - Accordion Album
Doodlebug : Sugar Coating Glitter - Brown  
Prima : Vintage Lace Ribbon
Holiday Themed Paper
Bazzill
Cardstock: Java
Spray Adhesive

INSTRUCTIONS:

1. Chose paper to cut for the Sizzix Accordion die-cut.

 
2. Cut letters out of cardstock using the Opposites Attract cartridge,  size: 4 ¾". Attach one letter to each paper cut out.

3. Using spray adhesive, spray over cut out letters. Then sprinkle Doodlebug glitter over glued areas.


4. Using the Prima ribbon, tie the accordion pieces together.

Happy holidays and have a fabulous weekend!


Wednesday, December 15, 2010

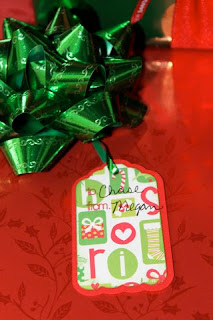
Weekend Craft: Fuss Free Gift Tags

Make your own holiday gift tags to match your gifts.


The finishing touch of a perfectly wrapped present is the tag. Choose from five different versions of gift tags that are easy to make and fuss free, too. The best part of tag making is that the tag can be made to match your gift. Teach the kids how to make them and you’ll be set for the holiday wrapping season. Enjoy!

 
SUPPLY LIST:

Any kind of electronic die cutting machine (Cricut, Eclips, Silhouette, Slice, etc.)
For this project, we used Cricut cartridge: Sentimentals
Christmas Paper Kit (this kit has lots of embellishments)
Card stock (our special Paper Packs are perfect for these tags)
Ribbon (narrow) your choice of colors
To/From stamp
Stamps: No Shakin' stamp
Ink pads: Seed Packet, Chilli Powder

 
CUTTING CHART for Cricut machines (click the image for a larger view):


1. Follow the chart above to cut each tag. If a direction given is inside <> these brackets, it means you need to use the alternate key.
2. Ink edges with matching ink pad.
3. Assemble layers if needed.
4. Stamp on smooth side of cardstock.
5. Adhere any stickers, if desired.
6. Place ribbon through hole.


ADDITONAL IMAGES:


Happy Crafting!

Monday, December 13, 2010

What's Happening Under the OMC Giving Tree

It's an OMC Sub for Santa update!

We're loving our Sub for Santa project here at OMC!  It's just the right thing to bring in that extra bit of holiday spirit.  More and more presents are being stacked under our Giving Tree each day from the OMC family. We've also received over $75 in Sub for Santa donations from our amazing customers!  We just want to say THANK YOU to all those who have donated to our Giving Tree this year, and to all those who are giving to others this holiday season.

Look what we have under our Giving Tree so far!


Look at these adorable Pillow Pets!  They are so cuddly and cute!  There is also a fun Toy Story themed book gift set for one of the little boys!


We aren't only giving toys away - we also have books, clothing, shoes, and more!


Make sure to check back next week for the next Sub for Santa update!

Happy holidays!

Friday, December 10, 2010

Decking the Halls at OMC!

Here's a cute idea for your holiday decor!  Using some simple craft blocks and some crafting supplies, you can make any room in your house a little more "Jolly"!


"JOLLY" Blocks

SUPPLY LIST:
Echo Park - Everybody Love Christmas paper pack
Cricut - Winter Woodlands Cartridge
Bazzill Modern Buttons - Avalanche, Lime Crush, and Candy Apple
Bazzill Circle Baubles - Clear and Ruby 
Bazzill Self Adhesive Jewels
Bazzill Cardstock: Pomegranate and Patch

1.    At your local hardware store, have them cut blocks 5"x5". Sand blocks to your liking and then paint with white craft paint.
2.    Take cardstock and cut JOLLY size 4 ½" with the Winter Woodlands cartridge. Alternate the colors of the letters.
3.    Cut five 4 ½" x 4 ½" squares out of the Everybody Loves Christmas paper in the paper pack.
4.    Using Glue Arts Adhesive, glue the paper squares in the center of the blocks. Next, glue the letters in the center of the paper squares.
5.    Take all embellishments and place on blocks as desired.


If you need a little more "Snow" for your holidays, try creating these adorable blocks!


"SNOW" Blocks

SUPPLY LIST:
Echo Park - Wintertime Paper Pack
BasicGrey - Snowflake Bling It On
Maya Road - Snowflakes Mini Chipboard Set
Jenni Bowlin Dye Ink Pad - Spiced Tin
Cricut - Winter Woodlands Cartridge (font)
Bazzill Cardstock - Arctic
Glue Arts Adhesives
White craft paint

INSTRUCTIONS:
1.     At your local hardware store, have them cut blocks 5"x5". Sand blocks to your liking and then paint with white craft paint.
2.     Take cardstock and cut SNOW size 4 ½" with the Winter Woodlands cartridge. 
3.     Cut four 4 ½" x 4 ½" squares out of the paper in the Wintertime paper pack.
4.     Using Glue Arts Adhesive, glue the paper squares in the center of the blocks.  Glue the letters in the center of the paper squares.
5.     Paint chipboard snowflakes and glue to the blocks.  Apply the Basic Grey bling on as well.


If you have any other questions, feel free to contact Lindsey at lindsfill@gmail.com. Please put the name of the project as your subject line.


Happy decorating!