Happy Camper Scrapbook Page by OMC Designer Whitney
Supplies Used:
Imaginisce : Happy Camper Paper Pack and Chipboard Stickers
Bazzill Basics : 12”x12” Cardstock - French Vanilla
Photos
Instructions:
Step 1: Select Photos and Paper
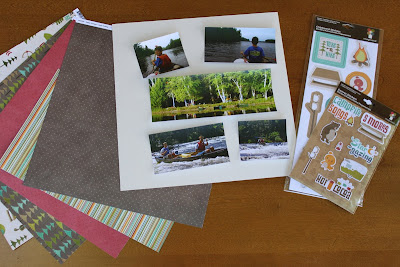
Selecting photos is often the hardest part during the scrapbooking process. To make it easier, choose pictures with a similar theme such as “canoeing,” “around the campfire,” “hiking,” etc… Alternatively, selecting the right paper is much easier. The Imaginisce ‘Happy Camper’ paper is perfect for any camping layout and offers coordinating embellishments!
Step 2: Enlarge, Crop, and Mat Photos
The 5 picture sizes for this page includes: two 2 ¾” x 3 ¼”, two 2 ¾” x 5” and one 3 ¼” x 8 ½”.
Mat the photos with Bazzill cardstock to add a focal point and create balance.
Step 3: Design Background
Use the Imaginisce paper to create a simple background with a canoe strip and a 3” strip of lined paper at the bottom and a 1 ½” strip of lined paper at the top of a 12x12 sheet of brown cardstock.
Step 4: Add Journaling
Over time, photos might lose their meaning without a brief explanation, so be sure to either type or hand-write a short journal entry.
Step 5: Adhere and Embellish
Adhere the photos, text, and any embellishments to the background page. A simple chipboard sticker can do just the trick to complete the page!
Happy crafting!
Pages
▼
Saturday, July 30, 2011
Friday, July 29, 2011
Tips & Techniques!
Tips & Techniques for the new Laliberi Jewelry Products!
Learn how to use their products with helpful tips and techniques from their world class designers that are sure to inspire!
Learn About Jewelry Pliers
Flush Cutters
A precision tool for trimming findings and beading wire.
Chain Nose Pliers
Flat nosed pliers are used to bend wire and findings. Use as a companion tool with Round Nose pliers.
Round Nose Pliers
Conical shaped pliers are used for shaping wire and findings. Use as a companion tool with Chain Nose pliers.
Learn to Create a Dangle
Learn to Connect with Jump Rings
Learn to Use Crimp Beads
Thanks to Laliberi & EKSuccess Brands for the info!
http://www.eksuccessbrands.com/laliberi/creative/tips.htm
Happy crafting!
Thursday, July 28, 2011
Give Thanks 4 Girls!
Give Thanks 4 Girls Layout by OMC designer Lindsey!
Here's a fun layout idea for your favorite girls in your life!
Supplies Used:
Lifestyle Crafts : Thanks Folding Card
Bazzill Basics : Jaybird Street 12"x12" Assortment Pack
Bazzill Basics : 12" x 12" Grasscloth Cardstock - Berry Blush
Bazzill Basics : 12" x 12" Paper Multi-Packs - Fancy Pants Beach Babe
Slice : Basic Shapes 3 Design Card
Slice : MS+ Vintage Findings Design Card
EKSuccess : Ek Tools - Bubbles Edger Punch
Basic Grey : Buttons & Brads
Copic Marker : Sketch - Neutral Grays
The Vintage Findings Design Card is great for making tags and banners!
Use buttons and brads from Basic Grey for the inside of flowers to add dimension and a little extra cuteness!
Don't forget to do some journaling to help you remember the memory you are capturing.
Use EKSuccess Punches to create a fun bordered background for photos and other mementos!
Happy crafting!
Wednesday, July 27, 2011
Thanks for Coming
Thanks For Coming Gift Box created by OMC designer Lindsey
Supplies Used:
Bazzill Basics - Jaybird Street 12x12 Assortment Pack
Spellbinders : Ribbon Tags Trio Three
Spellbinders : Grand Calibur Machine
Faber-Castell : Stamper's Big Brush Pen - Cold Grey III
Beacon Adhesives : Fabri–tac Glue
Lifestyle Crafts : Fresh Start Cutting Dies - Fry Box
Martha Stewart : Fringe Scissors
Clearsnap : Colorbox Archival Dye Cat's Eye - Wicked Black
Unity Stamp Company : Harvest of Memories
Black Felt Tip Marker
Instructions:
1. Cut out the Fry Box using your favorite paper in the Jaybird Street pack (the print you want showing should face up). Assemble the box as instructed.
2. Using the Fringe Scissors from Martha Stewart, cut paper fringe for the inside of the box out of a coordinating sheet of paper.
3. Cut out a tag using the Ribbon Tags Trio die. Cut a strip of paper 1"x12" and lace it through the cut outs on the tag. Using the Harvest of Memories Stamp set, find the "give Thanks for all things" stamp. Using the Wicked Black ink pad, ink only the words "Thanks" and "for" and stamp at the top of your tag. Using your black marker, write in "coming" underneath the other two words. Wrap the tag around the belly of the box creating a belly band. Glue the edges of the paper strip together to hold the tag in place.
4. Cut a belly band to size to wrap around your candy favor.
TIP: Stamp on your phrase before wrapping the belly band around the box.
Happy crafting!
Monday, July 25, 2011
It's Worth Remembering
Worth Remembering Boxes Created by OMC designer Whitney
Supplies Used:
Petersen-Arne : Craft Pedlers Paper Mache Set Box Round Small Kraft set of 3
Bazzill Basics : Worth Remembering 12”x12” Assortment Pack
Bazzill Basics : Worth Remembering Pretty Buttons
EKSuccess : Harmony Hotfix Assortment
Oh My Vinyl : Cloud White and Cherry Red
Sizzix : eclips Cartridge - Flowers & Phrases
Sizzix : Originals Die - Frame and Medallion
Tulle
Instructions:
1) Cover each box with a different patterned paper from the Worth Remembering Assortment Pack.
TIP: Use the Martha Stewart Circle Cutter to cut the circles for the tops of the lids quickly and precisely.
2) Add embellishments such as the EK Success crystals and red and white vinyl flowers cut from the eclips cartridge.
3) Die cut a frame and medallion and add a Pretty Button to the top. Tie tulle through the button and tie together at the top.
Happy crafting!
Saturday, July 23, 2011
Who Loves the Seaside?
Supplies Used:
Twelve Timbers : Knob Boards Natural (unfinished)
eclips : Vacation and Valentine’s Day & Happy Heart Cartridges
Oh My Crafts : My Color Acrylic Paint - Bright White
Oh My Crafts : Vinyl - Admiral Blue and Transfer Tape
Instructions:
Step 1: Paint
Paint the boards with white acrylic paint and let dry. It might take a few coats.
Step 2: Cut
Cut out the following with the Eclips Machine and blue vinyl:
Cartridge | Image | Size (height) |
Vacation | Transport: Anchor | 4 1/2" |
Valentine's Day & Happy Heart | Happy Heart Font: "OH! I DO LOVE TO BE BESIDE THE SEASIDE!" | 1 1/2" |
Step 3: Apply
Apply the anchor to the right side of the board at a slight angle. With scissors, trim the anchor where it hangs of the top board and apply the rest to the bottom board.
Apply the phrase to the board using transfer tape.
Happy crafting!
Thursday, July 21, 2011
Travel Bingo Card
Travel Bingo Card Created by OMC Designer Lindsey!
Supplies Used:
OMC Vinyl : Turquoise Blue, Admiral Blue, Tangerine, Ivy, Celadon, Key Lime Pie, Cherry Red
Bazzill Basics : Desert Marigold Cardstock
Eclips Machine
Sizzix : eclips Cartridge - Vacation
Instructions:
Sizes of Cuts:
Cars: 1.5”
Canoe: 1.5”
Plane: 1.25”
Trailer: 1.5”
Log Cabin: 1.5”
Route 66 Sign: 1.7”
1. Cut out each image twice using the Vacation cartridge and your choice of vinyl colors.
2. Cut "ARE WE THERE YET?!", "BINGO", and "free space". Attach the first two sayings to the top of your cardstock sheet, and the "free space" phrase to the center of the sheet.
3. Cut four strips, ¼" each, and attach along the sides to create a border around the page.
4. Attach the first row of vinyl images followed by the last row. This will help you determine the spacing for the center row of images.
TIP: Using Transfer Tape will help you align the vinyl images as straight as possible!
5. Repeat steps 2-4 to create a second bingo board. Make sure to mix up the order of the images and enjoy!
Happy crafting!
Tuesday, July 19, 2011
Life is Good
Life is Good Cards Created by OMC designer Whitney
Supplies Used:
Tim Holtz : Stamp Set - Sketch Elements
K&Company : Abrianna 12x12 Designer Paper Pad
Tim Holtz : Distress Ink Pad - Mustard Seed, Crushed Olive, Vintage Photo, Victorian Velvet
Prima : Paloma Collection - Madeline
Spellbinders : Nestabilities - Reverse Wonky Rectangles
White Cardstock
Instructions:
1. Die cut 3 Wonky Rectangles with Abrianna designer paper and ink the edges with vintage photo.
2. Die cut 1 smaller Wonky Rectangle with white cardstock and ink the edges.
3. With a flourish stamp, stamp the flourish on the white rectangle twice. First with yellow and the second time with green. When stamping the second time, slightly misalign the stamp so there is a slight shadow of the first stamp that shows through. This gives your stamp a little more visual depth and interest.
4. Adhere rectangles to white 7”x5” paper “as if cards were falling.”
5. Adhere a prima flower over the flourish
6. Stamp “Life is Good” with Victorian Velvet ink pad.
Happy Crafting!
Monday, July 18, 2011
Love Note Contest WINNERS!
Happy Summer Dayz!
Summer Dayz Butterfly Book Created by OMC designer Lindsey
Supplies Used:
Maya Road : Butterfly Chipboard Book
Doodlebug : Striped Buttons - Bright
Pom-Pom Ribbon
Tattered Angels : Glimmer Glaze
Jenni Bowlin : Acrylic Paint Dabbers
Echo Park : Summer Days
Instructions:
1. Cut out patterned papers from the Summer Days paper pack to fit half of the pages of the album and attach them. For the remaining pages, color them with the Tattered Angels Glimmer Glaze and allow to dry.
2. Ink each album page edge with the Paint Dabbers according to which color looks best with the paper (the colors used for this album are Lemon Drop, Spice Tin, and Chicken Feed).
3. Cut out all picture mounts you wish to use and attach them to the pages.
4. Mount the stickers you choose on foam squares first, then attach to the album pages.
5. Add ribbon, buttons, and any other embellishments to finish off the album.
Happy Crafting!
Sunday, July 17, 2011
It's That Simple!
It’s That Simple: Side by Side Card created by OMC designer Whitney
Supplies Used:
Bazzill Basics : Jaybird Street 12”x12” Assortment Pack
Bazzill Basics : Jaybird Street Chipboard Titles
Bazzill Basics : 12”x12” White Cardstock
Martha Stewart : Double Edge Punch - Double Loop Hearts Trim
Sizzix : Movers & Shapers Magnetic Die Set 2 Pk - Mini Hearts Set by Tim Holtz
Instructions:
1) Cut and Punch
a. Cut white cardstock at 5 ¼”x 10 ½”
b. Cut patterned paper at 4 ¾” x 4 ¾”
c. Cut solid paper at 4 ¾” x 3 ¼”
d. Die cut 9 small hearts
e. Punch 4 ¾” long trim
f. Punch out sentiment from Chipboard pack
2) Fold
a. Fold white cardstock in half
b. Fold 6 of the 9 hearts in half
3) Adhere
a. Adhere one side of a folded heart to an unfolded heart. And repeat for the other side. Use this technique to create 3 hearts.
b. Adhere the patterned paper, solid paper, 3 hearts, trim, and sentiment onto the card.
Happy crafting!