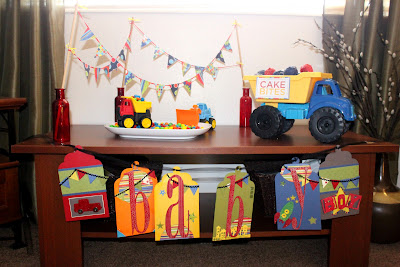
Supplies Used:
Sizzix : Album, Tags
Sizzix : Townscape
Sizzix Bigz XL Die : Album, Scallop Circle
Tim Holtz : Grunge Paper
Tim Holtz : Grungeboard Alphabet
Mark Richards : Mosaic Crystal Stickers - Lime Green
Fancy Pants : To the Moon
Fancy Pants Bazzill : To The Moon/Beach Bum Coordinating Paper Pack
Maya Road : Boys Keychain Set
Tattered Angels : Glimmer Mist - Scarlet
Jenni Bowlin : Paint Dabber - Chili Powder, Seed Packet and Lemon Drop
Jenni Bowlin : Ink Pads - Chicken Feed, Spice Tin, Lemon Drops, Chili Powder, and Seed Packet
Tim Holtz : Distress Crackle Paint - Clear Rock Candy (and paintbrush)
Tim Holtz : Distress Ink Pad - Black Soot and Fired Brick
We R Memory Keepers : Wide Shimmer Eyelets - Black and Yellow
We R Memory Keepers : Crop-a-Dile
We R Memory Keepers : Corners-Blue
We R Memory Keepers : Main Squeeze
We R Memory Keepers : Main Squeeze Corner Attach Plates
Stickles : True blue and Crushed Olive
Cuttlebug Embossing Folders : Herringbone and Polka dots
Slice : Little One (cut star and shadow)
Tombow : Mono Multi Liquid Glue
3L Foam Squares
Black Tulle
Black Ribbon
Instructions:
1. Cut banner tags out with Sizzix Album, Tags and Bazzill cardstock primary colors.
2. Distress with same color ink pads (Jenni Bowlin has great coordinating colors).
3. With grungeboard “B-a-b-y” letters, spray with red Glimmer Mist. Let Dry and then darken embossed segments by distressing with dark red stamp (Tim Holtz Fired Brick).
TIP - You can cut and emboss your own letters with grunge paper if you don’t have the precut grungeboard alphabets.
4. Die cut 3 circles using Sizzix Album, Scallop Circle, with lined paper.
5. Cut one circle in half following the lines of the paper.
6. With red ink pad, distress all the circle borders.
7. Set aside for later.
Tag 1
1. Truck
2. Paint Truck (from Maya Road Boys Keychain) with red paint dabber then cover with crackle paint. Let dry.
TIP - Pour crackle paint onto separate surface, so red paint will not contaminate entire bottle of crackle paint.
3. Attach black eyelets with Crop-a-Dile.
4. Adhere truck to grey paper, crop rectangle around truck.
5. Adhere to cream paper, crop closely to edges.

Tag B
1. Adhere pre-cut circle at the top.
2. Adhere mini-banner diagonally, over circle.
3. Attach Main Squeeze corners to bottom edge using Main Squeeze and the Corner Plates.
4. Adhere “b.”
5. Add dots with stickles on the letter “b” and next to the Main Squeeze corner plates.

Tag A
1. Adhere precut semi-circle at the bottom of the tag.
2. Adhere mini-banner to the top.
3. Using stickers from the paper pack, stick 3 stars to tag.
4. Adhere “a.”

Tag B
1. Adhere circle to bottom right corner, with some hanging off the edge. Trim that extra paper off and discard.
2. Adhere mini-banner to top of page.
3. Die cut Townscape out of grungeboard and paint with yellow dabber. Let dry and add crushed olive stickles to the bottom. Trim off one house and trim the bottom so the ground is thinner. Adhere to bottom of tag.
4. Stick 3 large mosaic tiles on the upper-right side of tag.
5. Stick 3 small mosaic tiles to the bottom left of tag.
6. Adhere “b.”

Tag Y
1. Adhere precut semi-circle to top of tag and trim the excess that hangs off.
2. Adhere mini-banner to top of tag
3. Adhere stars, and add rub-ons.
4. Paint rocket body (from Maya Road Boys Keychain) with green dabber. While wet, press on green Sparkly Fluff. Paint rocket wings and exhaust pipe with red dabber. While wet, press red Sparkly Fluff onto rocket. Let dry. Attach yellow eyelets for windows. Adhere to tag.
5. Adhere “y.”

Tag 6
1. Adhere mini-banner with pop-up foam over the banner paper that was previously set aside from Tag 1.
2. With “BOY” letters, ink with red stamp pad and then immediately sprinkle Red Glitter embossing powder while ink is still wet. Heat to set.
3. Cut star 2 ¼ “ with Slice “Little One” cartridge in patterned yellow paper. Add a shadow with blue polka dot paper.
4. Attach star to bottom tag.
5. Attach “BOY” with pop-up foam squares.
6. Finish by attaching tags with black tulle.

Banner
1. From 12x12 patterned paper, find the banner strip and cut out.
2. Layer on top of 12x12 blue paper.
3. Cut at the same length of tag and set aside leftovers for last tag.
4. Make mini-banner to go on each tag:
- Start with varying colors, cut at 1 ¼ x 12”.
- With strips, cut triangles so the base is 1 ¼ “ long.
- Emboss flag triangles.
- Adhere black ribbon across the top. - Use pop-up foam to attach mini-banner over the banner on the paper.
TIP - Add ink with a stamp pad to an embossing folder and then emboss paper to add additional depth and interest. When done, rinse folder off with water to clean.

Happy crafting!


1 comment:
so cute...may have to make this for my son's Court of Honor! in May!
Post a Comment