Showing posts with label gift box. Show all posts

Noel Necklace Gift Box

Tuesday, December 11, 2012

Noel Necklace Gift Box
Created by OMC Designer Jill

Supplies Used:
Bazzill Cardstock : Black, Green, Dark Red,and Kraft
Martha Stewart Punch : Pine Needles Trim
Tim Holtz : Distress Ink Pad - Vintage Photo, Fired Brick, Mowed Lawn
Tim Holtz : Stampers Anonymous - NOEL
Oh My Crafts : SVG Cut - Necklace Box
Stickles Glitter Glue : Diamond, Cinnamon 


Instructions:
1. Cut out a necklace box with Bazzill Black Cardstock. Put the box together. You will need a small amount of adhesive.

2. Punch out 2 strips of Pine Needles Trim and glue together to give you one long band.
3. Wrap the band around the box and glue the ends together to make a belly band for your box. This is a band that has the ability to slide off your box.
4. Once the band is on your box, very carefully use the Cinnamon Stickles on the branches and let dry!
5. Stamp the word NOEL onto a piece of Bazzill Kraft paper using a blend of Fired Brick, Mowed Lawn and Vintage Photo Distress Ink.
6. Freehand cut around the stamped image.
7. Adhere this to a Red piece of cardstock with 3D foam and free hand cut around this.
8. Now attach this to your belly band on your box and carefully use the Diamond Stickles on the word and decorative edge. Let Dry!
9. Once everything is dry you can slide the belly band off and on your box….add a beautiful necklace and give to someone special!

Happy crafting!

Happy Thanksgiving Box

Friday, November 16, 2012

Happy Thanksgiving Box
Created by OMC Designer Lindsey
 

Supplies Used:
Sizzix : Bigz XL Die - Box w/ Ornate Window

Kraft Paper

Inkadinkado : Harvest Dinner Stamp

Canvas Corp : E-Flute 12"x12" Open Stock

Archival Ink : Brown

Distress Ink: Rusty Hinge


Instructions:

1. Cut out the box and ink all of the edges. Take a leaf stamp and stamp over the whole box. Put the box together.

2. Take the ornate shaped piece that was cut out of the box, ink the edges, and stamp "Happy Thanksgiving" on it.

3. Stamp a leaf shape, cut it out and adhere on top of the ornate shape piece.

4. Cut a strip of E-Flute and wrap it around box. Glue the ornate shape onto the wrap.

5. For the opening, cut a piece of acetate or some clear packaging into a square shape, and glue under the lid.

6. Fill with treats or a gift!

Happy crafting!

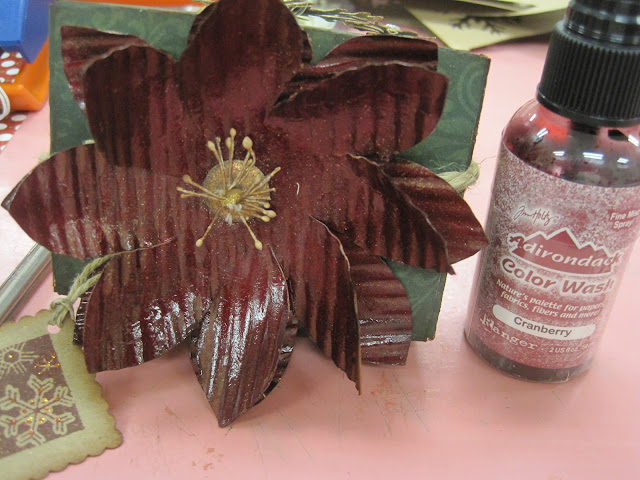
12 Days of Christmas - Day 1 Poinsettia Take Out Box

Thursday, November 8, 2012


Welcome to the Oh My Crafts 12 Days of Christmas! We want to help you use your scraps to wrap up your Christmas in style. For the next twelve days, we'll have great ideas for boxes, gifts, and gift toppers. We hope you enjoy!

Poinsettia Take Out Box
Created by OMC Designer Jill


Supplies Used:
Sizzix : Bigz - Box, Take Out Carton
Sizzix : Flower #2 Die
BoBunny : Rejoice Paper - Jubilee
Bazzill Basics : 12x12 Cardstock - Kraft
Tim Holtz : Adirondack Color Wash - Cranberry
EKSuccess : Snowflake Punch
Inkadinkado : Winter Fun Inchie Bundle Stamp
We R Memory Keepers : Glitter Brads - Neutral

Inkssentials: Glossy Accents
Ranger Ink : Stickles Glitter Glue - Diamond
Tim Holtz : Distress Ink Pad -Vintage Photo
Floss / Jute / Twine
Fiskars: Crimping Tool
 

Instructions:
1. Using the Bo Bunny Rejoice Paper, cut out a Sizzix Take Out Carton. Fold and glue together. Ink the edges of the box with Tim Holtz Distress Ink Vintage Photo.
2. Using the Bazzil Kraft Paper, cut out 2 flowers with the Sizzix Flower #2 die.


3. Send the cut out flower through a crimping tool.

4. Color the paper with Tim Holtz Adirondack Color Wash Cranberry. Let Dry.

5. Cut into the center of the flower slightly to give the petals more movement.
6. Paint the glossy accents onto the front of your flower with your finger. As it is drying, bend the ends of the petals inward to curl them.

7. Place your two flowers on top of each other and secure together with the large brad from the We R Memory Keepers Neutral Glitter Brad Collection. I pulled the pollen off an old flower to give the brad a more realistic look
8. Punch out large snowflakes using the EK Snowflake. Punch out the small snowflakes with EK punch Snow Flurries. Ink the edges and slightly glitter with Stickles.

9. Tie the box up with jute.
10. Attach the snowflakes onto the sides of the box
11. Adhere the flower securely with Inkssentials Glossy Accents.
12. Cut out a small square tag and stamp with the Inkadinkado Winter Fun Inchey stamp.
13. Tie the tag onto your box.
14. Share with a friend!

Happy crafting!

Halloween Goodies and Treats!

Tuesday, October 30, 2012

Halloween is only ONE DAY away! Are you ready for the tricks and treats and all the festive fun?! Well, in case you aren't, here are some last minute project ideas to start the holiday out right!

First we have a spooky Halloween Layout! This layout has all the right elements to preserve your spook-tacular memories!


Next we have some terror-rific Halloween Boxes (complete with wiggly bats!). Can you imagine the delicious Halloween treats that could be put inside these boxes?


Last but not least, we have some scare-tastic Halloween Pockets! These pockets are great for all sorts of Halloween gifts and invitations.


We hope you all have a frightfully fantastic (and safe!) Halloween!

Happy crafting!

Halloween Pillow Box

Monday, September 10, 2012

Halloween Pillow Box
Created by OMC Designer Lindsey

Supplies Used:
Sizzix : Bigz Pro Die - Pillow BoxStampendous : Royal Purple Glitter Glass
Martha Stewart : Carnival Paper Pack
Martha Stewart : Carnival Cling Rubber Stamps
Doodlebug : Haunted Manor Paper, Twine
Doodlebug : Buttons Pack - Orange
Tim Holtz : Distress Ink Pad - Black Soot
LifeStyle Crafts : RosetteDeco Petite Wire : Apple, Black
Adhesive


Instructions:

1. Cut out the pillow box, put together using adhesive, and ink the edges. Rip 2 strips of the bat paper, leaving the white torn edges. Wrap the strips around the pillow box, then wrap twine around the strips.
2. Pick three different prints of paper, then create three rosettes, one larger than the other two. Ink the edges of all three rosettes. In the center of the smaller two, glue buttons down. On the largest, trace a line of glue along the edges, then sprinkle the glass glitter onto the glue and allow to dry completely. Stamp a bat stamp onto a piece of paper, cut out the shape. Trace the shape onto a piece of glitter paper, and cut out. Attach the two bat shapes together, then adhere to the center of the largest rosette. Glue the three rosettes in a cluster on top of the strips of bat paper and twine.
3. Cut 3 strips of the green wire, wrap around a pen, and glue the ends under one of the rosettes. Cut 3 longer strips of the black wire, wrap around something that has a wider width, then glue under the rosettes.
5. Cut the "Trick or Treat" statement out of the Doodlebug paper, and use it to create a tag. Adhere to the pillow box.

Happy crafting!

Simple Gift Box

Friday, August 3, 2012

Simple Gift Box
Created by OMC Designer Lindsey

An adorable little box that is perfect for any gift or party favor!

Supplies Used:

Sizzix : Bigz Pro Die - Box w/Scallop Lid

Studio Calico Paper Pack

Tim Holtz : Distress Stain - Walnut
Punch Tool
Adhesive Tape

Instructions:

1. Cut out the box shape using the Bigz Pro Die and a patterned piece of paper.
2. Cut out the lid in a contrasting piece of patterned paper.
3. Ink the edges of both the box and the lid.
4. Put the box and lid together using adhesive tape.
5. Add a punch border around the box that will peek out from under the lid.
6. Add a tag and any embellishments to the lid of the box.

Happy crafting!

LinkWithin

Related Posts with Thumbnails