Vinyl Contest Winners!

Friday, April 29, 2011

Here are our 8 VINYL BLOG CONTEST WINNERS!

jasper said...

I have been using vinyl on 12X12 Ceramic Floor Tiles...make wonderful gifts. Wish I knew how to attach a photo here to show them to you!

CLM-cindylu2u said...

I love all the fabulous colors and the differnt buying options, makes it soo easy to choose what you want!! Just finished decorating huge easter eggs with vinyl, they were so cute!!

Amber S said...

Well, I love it for home decor obviously! It is so easy to create seasonal decorations that remove easily. It is also great for cutting intricate designs for cards and other crafts because the adhesive is already attached! Love that. Plus, the colors and prices are great too!

Sonya said...

I love your color selection! I LOVE the quality of your vinyl! I had to use a different brand because I ran out of yours in the middle of a project and was on a deadline! I was cursing that other brand the whole time! I even told my daughter not to use it--to use only OMC brand! Thanks!
 
Karenduch said...

I decorate wine bottles and vases with the vinyl and have made signs for the dishwasher and my daughters door...
 
Pam AKA: picnic said...

Wow, glad to find this blog, haven't used my vinyl enough, but with your great demos, think I will be doing alot more.. thanks for the great posts,

Crystal said...

I love that I can make personalized car decals. My family doesn't have ordinary names and we can't find pre-made "anything". Now, I cam make them using vinyl.
Crystal
 
 Dac said...

I just used vinyl for the first time last week. I love it's versatility! Can't wait to learn more from this "I made it with vinyl" blog!! OMC ROCKS!

 
Winners, please send your shipping info to contest@ohmycrafts.com to claim your random prize pack from OMC. Stay connected for more fun contests and chances to win!


Happy crafting!

Live, Love, SCRAP!

Thursday, April 28, 2011

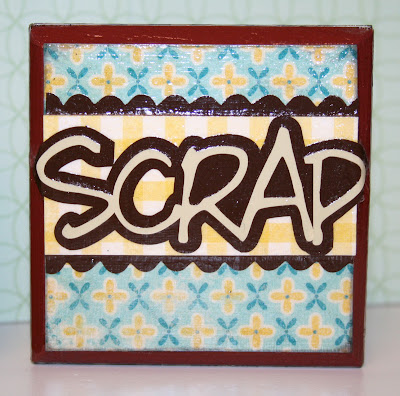
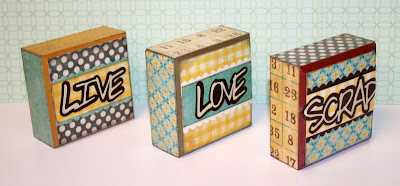
“Live, Love, Scrap” Blocks by OMC designer Whitney!


Supplies Used:

Twelve Timbers Blocks (quantity: 3)
My Mind’s Eye : Stella Rose Hattie/Gertie: “Family” Paper Pack
Oh My Vinyl : Walnut and Maize
Sizzix : On the Edge Die - Mini Scallop and Pinking by Tim Holtz
Tim Holtz : Distress Ink Pad - Pumice Stone
Silhouette Digital Craft Cutter
Mod Podge


Instructions:

1. With pencil, trace blocks on patterned paper, cut, distress edges and adhere onto blocks.


Tip: These blocks have painted beveled edges. Cut the patterned paper so it only covers the faces of the cubes, so the finished product shows off the beveled edges.


Tip: When adhering the paper to the blocks, make sure to adhere the paper completely. If not, the Mod Podge will cause the paper to lift off the block leaving unwanted waves and bubbles.


2. Using the Silhouette machine, prepare saying, “Live, Love Scrap” on computer. For this project, the font was Segoe Script, with an enlarged “L”, overlapped and welded letters cut with pale yellow (maize) vinyl.

3. On the Silhouette, copy and paste your finished “Live, Love Scrap” and with that copied image create a shadow at .8. Cut with dark brown (walnut) vinyl.
4. Layer the saying on top of its shadow.
5. Cut 3 strips of patterned paper the same width as the blocks and apply vinyl saying on each strip.
6. With dark brown vinyl, die cut 6 mini scallops and adhere across the top and bottom of the strips. Adhere to center of block.
7. Finish with a few layers of Mod Podge.


Happy crafting!

Spring is in the Air

Wednesday, April 27, 2011

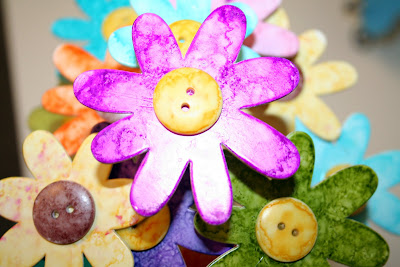
Chipboard flowers never wilt and they always look great. This fun little bouquet of daisy like flowers is perfect to brighten any corner of your house or office. Even better, make this sweet bouquet to give to a friend or your mother so they know you are thinking of them.


Supplies Used:


Doodlebug : Plain & Simple
Chipboard Flower Bouquet, Petite Prints, green
Tim Holtz : Alcohol Inks – at least 8 colors (more if blending colors). 
     Colors used: Sunset, Peach, Purple Twilight, Eggplant, Raspberry, Wild Plum, Shell Pink, Pink Sherbet, Lemonade, 
     Sandal, Sunshine Yellow, Hazelnut, Lettuce, Pesto, Pool, Stream, Blending Solution and Ink Applicator.
Tattered Angels : Misting Mat

Clearsnap : Smooch Spritz – Green
Oh My Crafts : Oasis Blue Vinyl
Provo Craft : Cricut Expression, Cartridge: Songbird

Making Memories : Ribbon spool – orange
Marvy : Heat Emboss Tool (optional)


Flowers:


1. Ink one small and one large flower (drop a few dots of color on felt pad and dab quickly using an up/down motion) in each of the eight colors chosen on misting mat. Wipe excess ink off mat before it dries. If it does dry, a little Windex will remove the ink.
2. Set aside to dry. Repeat with a new color and new felt pad until all flowers are colored.

 
Buttons:

1. Ink button centers in Sunshine Yellow and Sandal. Let dry.
2. Ink edges of buttons.


Grass:


1. Separate white grass on mat and mist with Smooch Spritz. Let dry.
2. Turn over and spray remaining white pieces until desired level of green is reached.


Vase:


1. Trim a piece of Petite Prints to 9⅞”. It may be necessary to trim an additional amount from paper so that if fits just below the lip of the vase.
2. Curl paper around into a tube and insert in vase. Adjust paper as needed.
3. Follow directions that come with kit for inserting flower stems.


Vinyl:


Cutting Chart

Cartridge
Object
Size
Speed
Pressure
Blade depth
Songbird
Spring Flowers
3/4 inch
Medium
Low
4

 
1. Cut out phrase using chart above.
2. Weed around letters and pick out centers.
3. Trim piece of transfer tape to
size of phrase. Remove backing and apply to phrase. Burnish.
4. Gently lift transfer tape and phrase from liner.
5. Apply to vase and burnish.


Ribbon:

1. Tie ribbon around vase and arrange tails.

TIP: Make sure stems and grass are completely dry before handling. Use heat emboss tool to warm up stem if a bent stem is desired. Be careful not to heat too much – remove heat and bend into shape.


Happy crafting!

Who's Ready for a Vinyl Contest?

Monday, April 25, 2011

How many of you know that we have a new OMC blog dedicated specifically to our OMC vinyl projects? Check it out at ohmycraftsvinyl.blogspot.com!


For today's contest, we'd like you to hop on over to the OMC Vinyl Blog and leave us a comment about your favorite thing about OMC Vinyl! Do you have a favorite color? A favorite project to make? Leave a comment along with your name and we'll randomly pick eight winners to win some fun stuff from OMC!


Happy vinyling!

Don't Just Crop - RACE for the Cure!

Sunday, April 24, 2011

Looking for a way to help sponsor the cure for breast cancer?  Well look no further!  We here at OMC are helping Monique Griffith to promote a series of events to help raise money to find the cure.  Monique has worked with Oh My Crafts at several of our events in the past and has taught many classes for us.  Take a look at the events!


On May 1st, Monique and her design team will be hosting the 2nd Annual Crop for the Cure, which is an all-day Cricut "Swarm".  They have 54 ladies participating in the event and all the proceeds go towards their fundraising efforts for the Race for the Cure event they are participating in on May 7th.  They will also be having a silent auction to raise funds. Several companies and individuals have donated items for the silent auction including Tim Holtz, Provo Craft, My Pink Stamper, and Cricut Magazine! The design team is very excited about the silent auction, and could certainly use more donations. If you have any questions or would like to be involved in the Crop for the Cure event, contact Monique directly at moniquegriffith @ yahoo.com 


As we mentioned, Team Monique is doing the Race for the Cure 5K walk on May 7th in Sacramento, CA. Last year Team Monique had 48 members, but this year they are striving to reach 100 members on their team! Monique personally finished treatment a couple of months ago. She went through chemo, double mastectomy and radiation for stage 3 Inflammatory Breast Cancer. This is Monique's way of helping to make a difference in the fight against breast cancer, especially since 1 in 8 women will be diagnosed with it in their lifetime. Click on the button bellow to find out more information and read about what Team Monique is doing to support the Susan G. Komen Foundation. You can also donate to or even join their team! 


Happy crafting!

Happy Earth Day!

Friday, April 22, 2011

To help celebrate Earth Day we'd like to present the “You Simply Shine” Card by OMC designer Whitney! She created this card using recycled craft packaging to show how we can help save our environment even when crafting.


Supplies Used:

Leftover plastic packaging (from Cricut Cartridges, Spellbinders, Sizzix, or any clear plastic packaging you might have)
Crate Paper : Toy Box Collection Kit
Unity Stamp : Giving It All Meaning
Unity Stamp : Shine On!
Clearsnap : Color Box Ink Pad- Glacier Lake and Mudslide
Bazzill Basics : In Stitch’z Kit and Yellow Floss
We R Memory Keepers : Crop-a-Dile: Corner Chomper
We R Memory Keepers : Crop-a-Dile: Eyelet and Snap Punch
American Crafts : Mini Brads - White
Bazzill Cardstock : Pale Yellow and White
Teal Tulle


Instructions:

1. Cut 6x11 ½” patterned paper, distress with teal ink, and fold in half.
2. In the center of white cardstock, cut out a 2” circle, discard the circle and keep the negative. Poke 6 holes coming out from the center for each rays of the sun. Stitch with yellow floss.

Tip: When poking holes, leave enough room from the inside of the circle so the paper doesn’t rip when you add the floss.

3. On pale yellow paper cut out a 2 ½” circle and stamp Giving it all Meaning with brown ink onto the circle. Adhere to the back of the white paper so it fills in the empty circle.
4. Trim a square around the sun and round the corners with the Crop-a-Dile Corner Chomper. Distress with teal ink pad.
5. Stamp a sentiment from Shine On, on smooth white paper with teal ink. Trim rectangle around the sentiment and round the corners with Crop-a-Dile. Add a pale yellow border and distress edges with teal ink. Punch two holes, one on each side and weave tulle through. Hide the tulle ends behind the bottom of the sun paper.
6. Adhere the paper with the sun and sentiment onto card base.
7. Cut 6x5 ¾” of leftover clear packaging and assemble over the entire card front with 4 white brads, one in each corner.


Happy crafting!


Full of Easter Spirit!

Thursday, April 21, 2011

Easter Basket and Card by OMC designer Whitney!


Easter Basket Supply List:
 

Napco : 6” Easter Basket: Green
Bazzill Basics : Half the Edge - Pirouette
Bazzill Basics : In Stitch’z Floss - Jelly Beans
Bazzill Basics : Buttons - Modern Avalanche, Modern Petunia, Modern Evening Surf, Modern Lime Crush
Doodlebug : Essentials: Bunny Hop Collection Pack
Doodlebug : Easter Egg Stickers (included in Bunny Hop Pack)
Doodlebug : Petite Prints - Dot-Grid 
Glue Arts : Exclusive Embellishment Kit
Making Memories : Pink Ribbon

Easter Card Supply List:

Doodlebug : Limeade brads (included in Bunny Hop Pack)

Our Craft Lounge : Crafty Cling Rubber Stamps - Hippity Hoppity
Jenni Bowlin : Dye Ink Pad - Chewing Gum
Bazzill Basics : Half the Edge - Intense Kiwi
Making Memories : Charms - With Love – Silver Keys
Doodlebug : Sugar Coating Glitter
Quickie Glue Pen
Tombow : Mono Multi Liquid Glue
Slice : Design Card - Spring (“Easter” printed at 4 inches)
Sizzix & Tim Holtz : Ticket Strip
Cricut Cartridge : Stretch Your Imagination


Basket Instructions: 
 
1. Cut two 2” strips of diamond paper from Bunny Hop Collection Pack.  

2. Cut two 1 ½” strips of pink polka-dot paper from Dot-Grid Pack and adhere strips to diamond strips in the center. 
3. Adhere the two strips together to make one 2”x24” strip. The circumference of the basket is 21 ¼”, so trim off 2” to leave ¾” for overlapping. 
4. On the top border of the polka-dot paper, use the dots to design a sewing pattern. This project was done by counting three rows down and punching a hole in every other dot. On the dot skipped, go directly up onto the diamond paper, and poke holes in every other dot again. Sew with a light green floss to form a zigzag pattern. 
5. Adhere egg stickers to the strip 2 ¼” apart from each other. You will need 7 stickers.  
6. In between the stickers, adhere a line of three jewels (also from the Bunny Hop Collection Pack) or Bazzill buttons. 


7. Cut two Just the Edge mini scallop borders in half the long way, leaving four borders. Adhere to the bottom of the entire strip and trim off excess.  
8. Adhere strip to basket under the rim.  
9. Cover handle with a sheer pink ribbon using ribbon adhesive (from OMC’s Exclusive Embellishment Kit). 
10. Tie ribbon at the base of the basket handle


Card Instructions:
 

1. Cut 5 ¼” x 8 ½ “ of smooth white paper and fold in half. 
2. Cut 5”x 1 ¾” green with white polka-dot paper (Bunny Hop Collection Pack) and adhere to base of card leaving 1/8” white border. 
3. Adhere Just the Edge scallop border to top of green polka-dot paper and trim excess. 
4. Cut “easter” from Spring Slice Design Card at 4” of pink paper and apply pink glitter over every letter except “a.” Over the “a” adhere an Easter egg sticker (Bunny Hop Collection Pack). Adhere on right side above scallop border. 
5. Die cut one ticket from Sizzix Ticket Strip out of white paper (or use Stretch Your Imagination at 1” to cut the same shape) 
6. Stamp “EGGspecially for you” and egg border with pink ink onto ticket. 
7. Adhere to green polka-dot paper and trim around white paper, leaving small border 
8. With key charm, tie floss around it and attach it with a brad to the ticket. Adhere ticket to upper left corner.


Happy crafting!


CONTEST 4/20/11 It's all about EGG DECOR! Extended Contest

Wednesday, April 20, 2011

Post  a picture of your EGG DECOR! Get creative, use your inks, vinyl, paper and what ever else you can find in that craft room. Please make sure in your post include what products from Ohmycrafts.com you have used to decorate your eggs! 8 lucky winners will be randomly selected on MONDAY the 25TH (extended) to win some adorable paper/embellishment prize from us :) Happy Egg Decorating!

Nesting Place Cards

Place cards are fun way of decorating your table for that most special meal with family and friends. These cute little nests are filled with tiny eggs and grass that are handmade.


Supplies Needed:


Viva Décor:
Pearl Pens, assorted colors
Bazzill: Cardstock, assorted colors
Doodlebug: Petite Prints, green
Faber-Castel: Journaling Pitt Artist Pens, brown
Sizzix: Big Shot
Spellbinders: Nesting Ovals, small
Martha Stewart: Fringe Scissors
 
Tattered Angels: Misting Mat  
General Craft: Small nests, paper clips, invisible tape


Eggs:


1. Gently squeeze with steady pressure a small amount of the pearl onto the misting mat, shaping into an egg as you go. Keep the tip at an angle while piping out the egg.
2. Dry at least 2 hours before trying to remove.
3. With a crafting spatula, gently lift from mat when dry.


Grass:


1. Cut grass from petite prints with fringe scissors. Crumple strands up tightly and shake loose.  

2. Divide equal amounts of grass for each nest. Press into bottom of nest.


Name Card:


1. Die cut a Spellbinders nesting oval die and then emboss (follow directions with die for the kind of die cutting tool you have).  

2. After embossing, write name across tag using the brown journaling pen with a chisel tip.  
3. Unbend a small paper clip half way and tape to back of tag and insert bottom of clip into grass.


TIP: Make sure eggs are completely dry before removing from mat. Pipe small dots around border of tag with pearl pens for more decoration.


Happy crafting!


Flower Tree

Tuesday, April 19, 2011

Looking to make a fabulously springy craft but don't have a lot of time?  Try making this adorable Flower Tree!  This flower tree was made using the Mother's Day Bouquet Cricut cartridge, some bright springy paper, colorful brads, a foam ball, a small pot, and the new paper mache eggs from Petersen Arne!


Glitter always makes a project more noticeable.  We covered the foam ball with our favorite glitter to get that extra pop!
Simply spray the ball with adhesive and dust on the glitter. It may take a couple coats, but the end product is dazzling!


Aren't these flowers just adorable?  Cut the different shaped flowers out of the Mother's Day Bouquet cartridge in your favorite paper.  Layer them on top of each other and push a fun-colored brad through the middle to hold them together.  Layering the different colored papers is a great way to add fun dimension to your project. 


Attach the flowers to the foam ball either by pushing the brads into the foam or adhering the flower to the ball with your favorite glue adhesive. Tip: Try placing the flowers where you'd like them to sit on the foam ball before adhering.  That way you get an even look all the way around!


Don't like dying eggs at Easter time? Try using paper mache eggs! The pre-made eggs from Petersen-Arne are perfect for covering with your favorite paper to make your Easter decorations just that much cuter. Simply cover the eggs with glue (we'd recommend Hodge Podge) and then cover with paper.  It may take several coats to cover the eggs completely but the results are egg-specially cute!


Happy crafting!

It's Easter Time!

Saturday, April 16, 2011

"Easter Egg Wagon" by OMC designer Lindsey!


Supplies Used:

Petersen-Arne : Paper Mache Eggs
Tissue Paper - White
Bamboo Forks
Tattered Angels : Glimmer Mist - Flower Power, Blue Skies, Pink Bubblegum, Yellow Daisy, Popsicle, White
Modge Podge
Easter Grass
Cricut : Flower Power Cartridge
Our Craft Lounge : Hippity Hoppity Stamp
Rangers Ink : Stickles Glitter Glue - Diamond
Napco : Wagon - Green
Copic Markers : Assorted Easter Colors
Faber-Castell : Mix & Match - Reds & Greens
Tsukineko : VersaColor - Black Ink


Instructions:

1. Cut strips of tissue paper. Apply the Modge Podge to the eggs and attach the strips of tissue paper.
2. Once the tissue paper is dry spray the individual eggs with the Glimmer Mist. You may need to apply several coats.
3. Place the Easter grass into the wagon.
4. Arrange the eggs in the wagon.
5. Stamp the bunny onto white cardstock, cut out, and then color with both the Copic Markers and Faber-Castell Mix & Match.


6. Cut a 2.25" x 2.75" piece of paper, ink the edges and stamp the "Eggstra Special Easter Wishes" saying onto the paper using the markers. Add detail to the saying using the markers and the Stickles.


7. Color the bamboo forks with the markers. Attach the bunny and the "Eggstra Special" saying to the forks.

8. Place forks with attachments into the wagon among the eggs.


Happy crafting!

To Love & Cherish

Wednesday, April 13, 2011

"To Love & Cherish" Wedding Card by OMC designer Whitney


Supplies Used:


Imaginisce : To Love and Cherish: Paper Pack
Imaginisce : Roly Rosies- Neutrals
Imaginisce : Petal Roller
Imaginisce : I-rock Tool
Imaginisce : Glam Rocks- Mirror
Spellbinders : Nestabilities - Fleur De Lis Squares
Bazzill Basics : White and Dark Red Cardstock
Oh My Vinyl : Cherry Red, Ebony, Transfer Tape
Cricut Cartridge : Tie the Knot
Martha Stewart : Scoring board
Tsukineko : Versafine Ink Pad - Onyx Black


Instructions:


1. Cut 5 ¾” x 12” of black pin stripe paper and score at 3” and 9.” Fold flaps along scored lines toward each other.
2. Cut 5 ¼” x 5 ¼” red cardstock and distress edges black. Cut in half and adhere to front of card.
3. Die cut and emboss largest Fleur De Lis Square from Spellbinders with black and white polka dot paper. Cut in half from one corner to the next. Adhere like a diamond on top of red paper.

Tip - Spellbinders can be used with the Spellbinders Grand Caliber machine, Provo Craft’s Cuttlebug machine, and Ellison’s Big Shot machine. For instructions, watch Ustream video below.

4. Roll 1 large and two small black Imaginisce flowers with the petal roller. Adhere petal portion to base of flower so the rolls stay together.


Tip - Start with the outside of the flower and roll toward the center so you are left with a base to glue the flower on. Hot glue works best.

5. With I-rock tool, and small flourishes template, adhere mirror glam rocks to each side of card so they look like flourishes.


6. Adhere two small flowers on the left flap and one large flower on the right.

7. For inside of card: Cut 5 ¾” x 6” of smooth white paper and adhere to inside center of card.


8. With the Tie the Knot Cricut Cartridge, set at 1 ¾”, medium pressure, and high speed, cut “Celebrate” out of black vinyl and the flourish with red vinyl. Use transfer tape to adhere to top of white paper and finish by embellishing with I-rock.


You can watch the USTREAM video on how to make this class below!


Happy crafting!


Watering Can with Flowers

Polka dots and spring flowers just go together especially when combined with this cute little watering can! A little bit of paper and some wire, a few die cuts and this charming spring decoration can be sitting in your windowsill.


Supplies Needed:


Napco:
Watering Can
Doodlebug: Easter Paper Kit, Petite Prints

Bazzill: Cardstock
Faber-Castell: Stampers Big Brush Pen assorted colors to match or ink pads
Tombow: Mono Liquid Glue

Sizzix: Big Shot
Lifestyle Crafts: Die Cuts: Blossoms, Bloom, Leaves

Spellbinders: Donna Salazar, Carnation Creations

Martha Stewart: Fringe Scissors

Target: Dollar Spot: Gardening ties  

General Craft: Floral Styrofoam,


Flowers:


1. Choose paper color combinations. Cut each 12 x 12 paper in half.
2. From each flowers style, cut the design with the Big Shot tool in two different papers using all flowers in the design. Ex: from the blossom die cut once in a solid and once in print.
3. You will need approximately 14 flowers. Each flower will have at least 2 layers some will have 3 layers. Ink edges if desired.
4. Layout flower combinations and make sure you have enough flowers. You may need to cut more.
5. Assemble flowers. Embellish center with rhinestone or brad. Trim from scrap green cardstock, a strip of paper ¼ x 1”. Bend cardstock around finger and flatten out the ends so that it looks like a fastener that goes around a pipe. Glue the flat edges to the back of the flower.
6. Cut the rubber wire in different lengths for stems. Coil around finger and then stretch out with a straight part at the bottom of the stem (it needs to fit into the Styrofoam).
7. Place upper end of stem through loop on the back of the flower and twist to hold flower in place.
8. Cut out a few leaves and score down the center of leaf. Bend the edge of the leaf enough to curl around the stem and glue in place. From the sticker sheet, remove some of the glittery leaves and place on a darker green cardstock (the same one that you cut the loops from) and trim around them leaving a tiny border. Attach the same way as above.
9. Insert bottom of stem into Styrofoam and arrange flower in place. Slightly lift the second layer of flower to give dimension. Arrange flowers.

10. Cut grass from double sided green paper using the fringe scissors. Crumple strips of paper and then shake out loosely. Place over Styrofoam base.


TIP: Use a narrow hex or allen wrench to poke hole in the Styrofoam before inserting stem.


Happy crafting!

LinkWithin

Related Posts with Thumbnails