Supplies Needed:
Doodlebug Design: assorted card sets
Copic Markers: V17, V05, Y02, Y06, YG13, B02, B05, RV02, RV06, YR04,E00, 110, T2
Faber-Castell: Pitt Artist Pen—Silver
Elizabeth Craft Designs: peel-off stickers—Thanks-Silver; Big Butterflies-Silver; Fantasy Flowers-Silver, Lady With Parasol-Silver;
Be Creative tape sheets
Glitter Ritz: Cool Highlights
Bazzill: Simply Smooth White Cardstock
Imaginisce: I-rock, Glam Rocks—mirror
Glue Arts: Glue Glider Pro
3L: foam squares
Hawaiian-style Card

1. Choose peel-off sticker design and gently lift off liner. Remove backing from tape sheet and adhere sticker to sticky side of adhesive.
2. Remove second liner and adhere to smooth white cardstock. Trim around design leaving a small border of about ½” around the flower. (This cuts down on amount of glitter used.)
3. Fold a piece of copy paper in half and place flower peel-off on top. Carefully sprinkle glitter over flower. Be generous with glitter. Fold one half of the paper over the glittered design and rub glitter into adhesive. Open paper and brush off glitter. Lightly rub off excess glitter until none remains. Use the fold to pour the remaining glitter back into the jar.
4. Either tip on the Copic markers will work to color in the glitter. Use very light pressure to color in the space; hardly any amount of pressure is needed. As the ink touches the glitter, it quickly spreads across the surface. For very small tight areas, the brush tip will work best. For large areas, the chisel tip is best. After finishing with a color, be sure to gently wipe the glitter off the tip of the marker on a paper towel.

5. Once the flower is colored in, carefully trim as close to the design edge as possible.
6. Mount flower with foam squares on a white 2 ½” square at a slight angle. Then attach the 3D piece to center of card.
7. Use an I-rock to embellish card front with mirror glam rocks as desired.
8. Make one more small flower piece for front of envelope. Use the same steps as above to make flower.
Floating Butterfly Card

1. Follow steps 1-5 above except do not remove second liner. Sprinkle with glitter as before and color butterfly.
2. Once the design is colored in, remove the second liner and place directly onto card. This application gives a more translucent look to the design.
3. Select two circles the same size from the peel-off sheet. Separate the circles from their centers and place in top corners of card with the open circle on top and its center just below.
4. For the inside of the card, select from the Thank You Peel-Off Stickers, a sentiment and design to place in the center of card.
5. Make one more flower for the center back of envelope flap. Remember not to mount design on card stock.
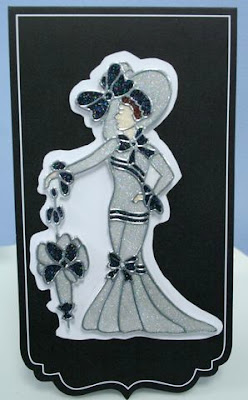
My Fair Lady Card

1. Repeat steps 1-5 from Hawaiian Card.
2. Turn glitter image over on white piece of smooth cardstock and trace the outer edges of lady to create a shadow of her.
3. Trim about ⅛” larger than pencil tracings. Turn over and check to make sure shadow fits. Adhere shadow directly to center of black card base. Mount lady with foam squares to shadow.
4. Make a glitter bow for back of envelope flap. Using the silver Pitt pen, draw a box around front of envelope about 1/16” in from edge. Trace around bracket on backside if desired.
Tip: When removing a peel-off, try to leave all of the negative pieces in place. The pieces can be removed with a special transfer tape and also used as a design.
Happy crafting!


6 comments:
These are gorgeous, thanks so much for the how to!!
wow the cards are so beautiful. I cant wait to try it. I am already thinking of Christmas cards with the stained glass look.
nancyiaggiscerations.blogspot.com
Gorgeous technique!
those are soooo pretty!!
wish ou would do a video ! I'm a visual person. Just can't get it if I don't see it.
Angela
Something of a beginner...I'm not sure exactly what is used to make the silver "leading" around the colors.
I do have trouble disentangling instructions that are full of brand names when I'm not sure of their uses. Any help would be appreciated, the results are quite lovely.
Thanks!
Post a Comment