Showing posts with label halloween. Show all posts

What is That?!

Wednesday, October 31, 2012


HOW TO ENTER:

Post a comment with your guesses as to what Items "A" thru "I" are. Make sure to guess on every picture shown below in order to qualify.
We also have the contest on Facebook and Pinterest, so participate there for EXTRA chances to win!

Two lucky winners will be randomly selected to win an awesome embellishment variety pack!

Contest Starts: October 31, 2012 @ 12:01 AM

Contest Ends: November 2, 2012 @ 11:59 PM


ITEM A


ITEM B


ITEM C


ITEM D


ITEM E


ITEM F


ITEM G


ITEM H


ITEM I


Good luck and happy crafting!

Halloween Goodies and Treats!

Tuesday, October 30, 2012

Halloween is only ONE DAY away! Are you ready for the tricks and treats and all the festive fun?! Well, in case you aren't, here are some last minute project ideas to start the holiday out right!

First we have a spooky Halloween Layout! This layout has all the right elements to preserve your spook-tacular memories!


Next we have some terror-rific Halloween Boxes (complete with wiggly bats!). Can you imagine the delicious Halloween treats that could be put inside these boxes?


Last but not least, we have some scare-tastic Halloween Pockets! These pockets are great for all sorts of Halloween gifts and invitations.


We hope you all have a frightfully fantastic (and safe!) Halloween!

Happy crafting!

Happy Halloween Wood Blocks

Monday, October 29, 2012

Happy Halloween Wood Blocks
Created by OMC Designer Sandy

Supplies Used:
Adams and Co Blocks: 30-inch Multi Wood Block Set
Authentique Paper: Enchanted or any Halloween paper
We R Memory Keepers: Sweetheart Ink - Black
OMC: Black Vinyl, Transfer Tape
Designer Cuts: Happy Halloween
Slice: Brayer
General Craft Supply: Mod Podge (glossy or matte)

Instructions:
1. Choose pattern of paper for each block, trim to fit each block.
2. Ink edges of paper with black ink.
3. Down load letters and cut out, pick and weed. Apply each letter using transfer tape to paper.
4. Apply an even layer of Mod Podge one block at a time and place paper to fit. Bray over paper to ensure a smooth fit (this helps to prevent air bubbles). Let dry.
5. Apply second coat of Mod Podge to all sides of blocks.
6. Add embellishments if desired.

Happy crafting!

Skeleton Shadow Box

Thursday, October 25, 2012

Skeleton Shadow Box
Created by OMC Designer Lindsey

Supplies Used:
Sizzix : Bigz Pro Die Box w/ Lid #2
Lifestyle Crafts : Skeleton Die
Bazzill Basics : White Cardstock
Twine / Floss
Tim Holtz Stamp : Apothecary
American Crafts : Pebbles - Candies Black

Martha Stewart : Carnival Paper Pad

Instructions:

1. Cut out the base of the box using paper from the Carnival Paper pad. Assemble and ink the edges.
2. Cut the skeleton shape out of white cardstock and assemble. Use twine or floss to hang the skeleton inside the shadow box.
3. Stamp the "Happy Halloween" phrase on orange cardstock, then cut out. Ink the edges. Attach to the bottom of the shadow box and add the black Candies.

Happy crafting!

Tombstone Halloween Decor

Tuesday, October 23, 2012

Tombstone Halloween Decor
Created by OMC Designer Lindsey

Supplies Used:
Spellbinders : Nestabilities - Nested Tombstones
Bazzill Basics : Cardstock: nor' easter, black, smokey white and saltillo
Tim Holtz : Stamp Sets - Mini Halloween 3 Set, Apothecary and Mini Halloween Stamp Set
Tim Holtz : Distress Ink - Black Soot, Rusty Hinge
Tim Holtz : Distress Tool
K and Company : Brenda Walton Haunted Word Adhesive Chipboard

EKSuccess : EK Tools - Tarantula Spider Punch
Stickles Glitter Glue : Purple, Black, Green, Ice White

Martha Stewart : Glitter Bats and Moon Stickers

American Crafts : Zing! Embossing Powder - Black

Inkadinkado : Fall Trees Clear Stamp

Oh My Vinyl : Brushed Silver

Ranger Ink : Dylusions Ink Spray

Instructions:

1. Cut 10 tombstones out of grey cardstock. Ink the edges with the distress ink. 

 2. For Tombstone #1, spray the front of the tombstone on an angle with the ink spray. Take the spider web stamp, stamp in an embossing stamp pad, stamp onto the tombstone and cover with embossing powder. Take the tombstone stamp and the small skull stamp, emboss the skull stamp, and cut out. Adhere with a foam square. Cut 3 different sizes and colors in the poison bottles. Ink the edges and cover each bottle with Glossy Accents.
3. For Tombstone #2, mist the front of the tombstone lightly with the ink spray. Take the tree stamp and emboss in black embossing powder. Choose 4 differing sizes of the glitter bat stickers and attach to the tombstone using small foam squares. Take the moon sticker and cut it to fit the tombstone. Using the smallest tombstone in the spellbinders pack, cut a tombstone, write RIP and ink the edges.
4. For Tombstone #3, use the script stamp and stamp all over the tombstone. Mist it with the three ink spray colors. Stamp Happy Halloween onto a piece of orange cardstock, cut out around the phrase, and adhere to the top of the tombstone. Stamp the mirror and cut it out. Cover the center oval of the mirror with the OMC metallic vinyl. Stamp the silhouetted head of the man, cut out and glue to the vinyl.
5. For Tombstone #4, mount the chipboard Eek piece to the tombstone, but cut off the top portion with the cat. Create the pumpkin using a punch. Ink the edges and attach to the tombstone. Use the large arsenic label, adhere to a piece of cardstock and create a scroll. Ink the edges and attach to the tombstone. Stamp a cat from the stamp set and emboss with black embossing powder.
6. For Tombstone #5, spray with black ink spray. Stamp and emboss the spider web twice. For the spiders, punch out two shapes in black cardstock. Use glossy Mod Podge to cover the spiders and sprinkle purple and black glitter over them. The
Mod Podge will curl the spiders, giving them a dimensional look.

Happy crafting!

It's All About the CANDY!

Thursday, October 11, 2012

It’s All About the Candy
Created By OMC Designer Sandy

Supplies Used:

Adams and Co:
1.5-inch Stacking Cubes
OMC: Vinyl – Grape, Orange Glitter, Lucky Green, Ebony, transfer tape
OMC: Designer Cuts by Sandy or your own Halloween letters
We R Memory Keepers: Sweetheart Inker: Black
Scrap Halloween paper
Plaid: Mod Podge – Gloss
Slice: Brayer
General Supply: Foam Brush

Instructions:

1. Trim 3 colors of scrap paper to fit blocks.

2. Lightly ink edges of paper.
3. Use an eclips cutting machine to cut the .scut file phrases and shadows. Weed and pick excess vinyl from phrases. Use transfer tape to remove from sheet and then place on cardstock.
4. Coat front side of block with Mod Podge – using a moderate amount. Lay cardstock down with vinyl letters already attached and position in place. Use brayer to firmly smooth out any air bubbles. Repeat for remaining two blocks.
5. Ink edges of blocks if desired.

Happy crafting!

EEK Wood Blocks

Monday, October 8, 2012

EEK Wood Blocks
Created by OMC Designer Jill

Supplies Used:

Adams and Co. : Wood Block Set
Tim Holtz : Mini Halloween 3 Stamp Set
Versamark : Dazzle Frost Ink Pad
American Crafts : Zing Embossing Powder - Silver
Ranger Ink : Stickles Dry Fine Glitter - Paprika, Black
Vinyl Lettering
Stickles Gliitter Glue : Purple, Lime Green, Black, Red
EKSuccess : EK Tools - Tarantula Spider Large Punch

Instructions:

1. Using the Versamark ink pad and the Tim Holtz stamp, stamp on the corners of the block with the spider web and apply the embossing powder. Tap off the excess and emboss using a heat gun. I carefully removed any excess embossing powder with a tiny paint brush in places it should not be!
2. Cut out vinyl lettering the size and font you want to use. Pull out the letters and use the negative vinyl as a stencil! I applied the stencil with transfer tape as it was much easier than trying to apply it without it.
3. Press down firmly on the vinyl to make sure all edges are secure.
4. Paint a coat of Mod Podge over the vinyl and onto the cut out part of the letter. Be very careful not to coat over the sides at all, as you will be dumping glitter onto this and you don’t want to glitter on the sides.

5. Pour glitter on top of your block and press down into the Mod Podge. Let dry!
6. Once dry, carefully lift up your stencil and the glittered letter should be there!
7. Use the Stickles around the edge of each letter to add dimension.
8. Coat the front of the blocks with a matte clear coat to secure the glitter.
9. Punch out a few tarantula shapes, Use the black Stickles on their legs and backs and sprinkle some black dry fine glitter onto them. Use the red Stickles on the fangs. Let dry.
10. Display!

Happy crafting!

Halloween Countdown Blocks

Friday, September 28, 2012

Halloween Countdown Blocks
Created by OMC Designer Lindsey

Supplies Used:
Doodlebug : Haunted Manor Paper Pack
Archival Ink - Black
OMC Vinyl : Black, Daffodil
Making Memories : Slice Design Card - Spook Alley MS+
Adams and Co. : Wood Block Set
Adhesive


Instructions:

1. Cut 16 squares 2 1/2" x 2 1/2" out of different patterned papers. Ink the edges of the papers with ink. Adhere paper to the wood blocks with liquid adhesive.
2. Using the Design Card, cut the numbers 0-8 out of vinyl. You will need to cut out two 2's and two 1's. You can use the number 6 for the number 9.
3. Once all the vinyl numbers are cut, attach them to the centers of the blocks.
4. After all the number are in place and you have checked to make sure that all the dates are accounted for, cover the entire block with liquid adhesive, such as Mod Podge.
5. Cut a strip of paper for the base block. Ink the edges, and adhere to the block. Cut out the phrase, "Halloween" out of vinyl and attach to the center of the block. Cover the base block with liquid adhesive as well.

Happy crafting!

Coffin Box Halloween Decor

Thursday, September 27, 2012

Coffin Box Halloween Decor
Created by OMC Designer Jill

Supplies Used:
Small Wooden Coffin - Purchased from a local craft store and embellished with fun things from OMC!
Martha Stewart : Acrylic Craft Paint - Beetle Black Sizzix : elips Cartridge - Basic Shapes
My Minds Eye : Lost and Found - Halloween Paper
Martha Stewart : Double Embossed Large Punch - Pumpkin
Martha Stewart : Glittered Spider and Bat Stickers
Deco Wire - Black Craft Wire
Orange Glitter Paper


Instructions:

1. Paint the entire coffin box black. Let dry.
2. Cut out a skeleton and glue it inside one side of the coffin. Be careful to not lose any of the bones!

3. Punch a pumpkin out of the orange glitter paper. Attach to the inside of the coffin box, opposite the skeleton.
4. Drill a small hole in the top of the coffin.
5. Punch out a circle with the witch on it to make it look like a moon. Add some bats and glitter to the sides of the circle. Let dry. Punch out a black circle and glue the two circles together with some of the black making a shadow on one side of the circle to make your moon pop!

6. Curl some black craft wire around a small paint brush and attach it to the inside of your two circles. Thread the wire through the hole in the coffin box and bend to keep in place.
7. Embellish your coffin with the glitter spiders.
 

Happy crafting!

Small Halloween Party Bags

Tuesday, September 25, 2012

Small Halloween Party Bags 

Created by OMC Designer Lindsey


Supplies Used:


Life Style Crafts: QuicKutz BAG
Martha Stewart Carnival Paper Pack
Doodle Bug Haunted Manor Paper
Martha Stewart Carnival Stamps
Tim Holtz Distress Ink: Black Soot


Tips:

1. For the EEEEEEK! Stamp, a way to make it longer it stamp it twice, and paste it together under another stamp, so you cant tell the stamp isnt really that long.
 

2. With the Lifestyle dies, you can cut out more that one at a time, making these great party favors, they can be cut out and made in minutes.
 

3. Use pre-done embellishments like the ticket from the Doodlebug paper pack.
 

4. Twine is great for small bags like this.

Happy crafting!


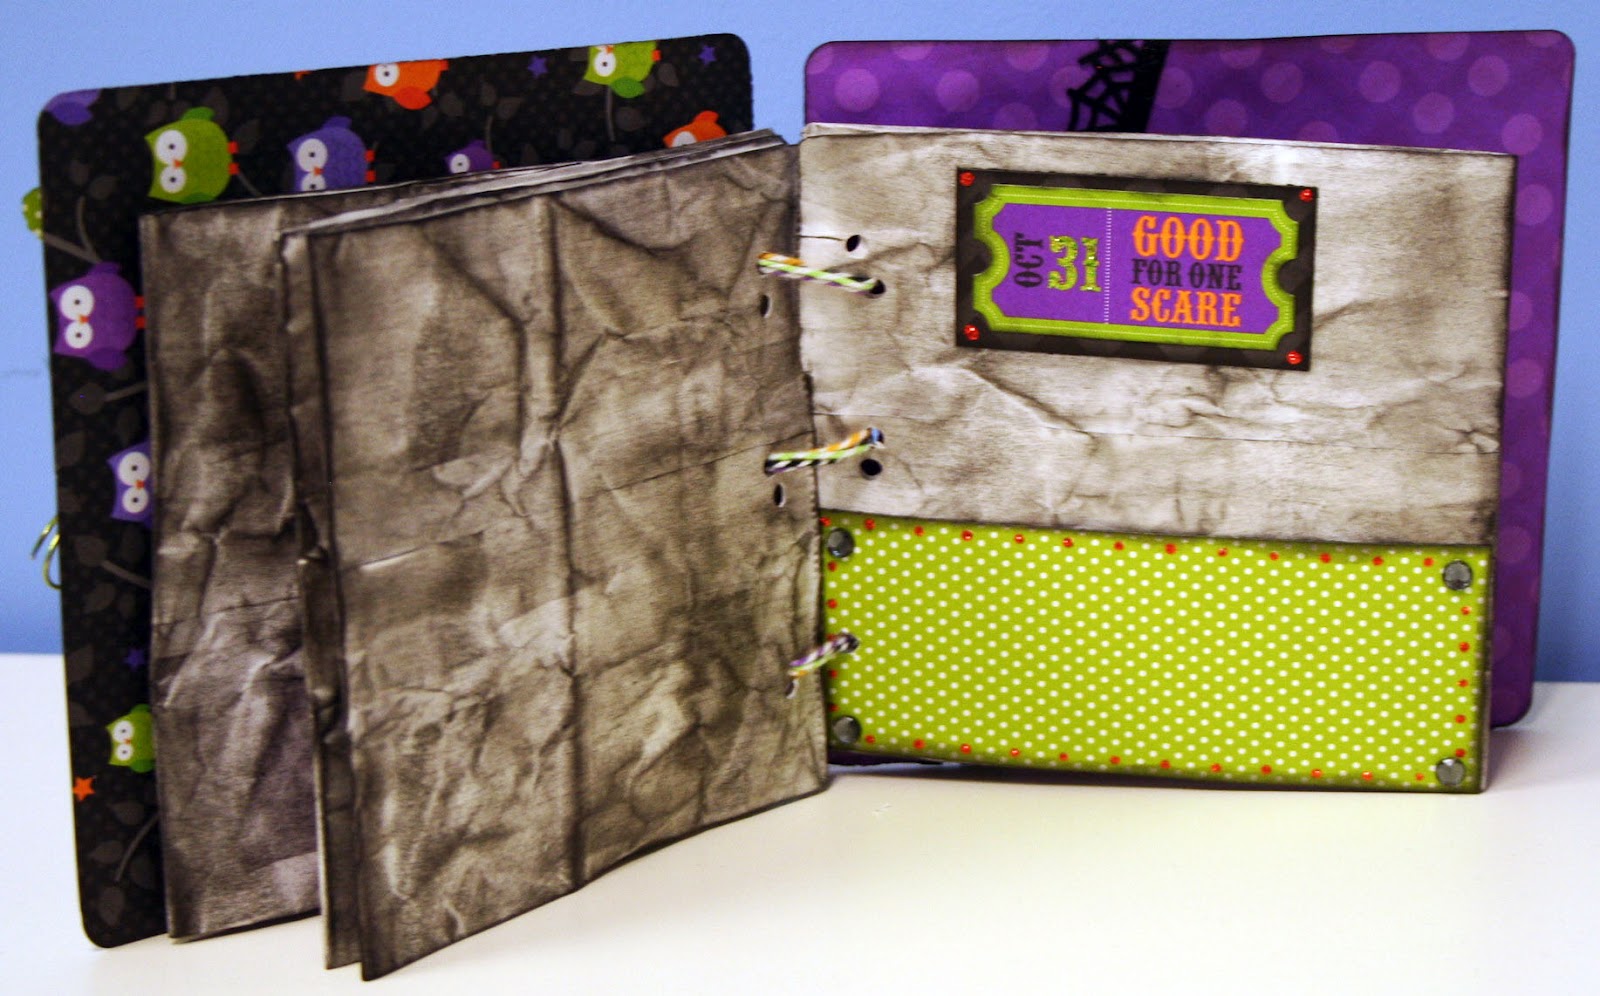
Halloween Paper Bag Booklet

Friday, September 21, 2012

Trick or Treat Booklet
 ...
Created by OMC Designer Jill


1. Cut out 4 pieces of paper 6x6 and adhere two together with Extreme Tac Glue Arts  to make them thicker. Round the corners. Ink the edges with Versafine Black Onyx Ink.

2. Cut out a 5 inch scalloped cutout using Lifestyle Crafts inverted scalloped circle.

3. Adhere the scallop to the front cover of your booklet.

4. Embellish with the punch outs from the Doodlebug Haunted Manor Paper Pack. This is where I used the two black brads and twisted the green craft wire around the brads.

5. Stickle the words on the punch out. Let dry!

6. Crumple the four white bags and then ink the entire bag with Versafine Black Onyx ink. This will give it an old weathered look. Fold the bags in half to make pages for your book. 

7. Cut out four pieces of paper 5 inches long and 2 inches high. Adhere these to the fronts of each paper bag page to make a pocket to drop a picture in!


8. Embellish each page with the pre-made punch outs from the paper pack. I like to stickle the on the punches to really make them pop! I also added the doodlebug Halloween jewels.
9. Punch out 3 round holes on each page and tie the book together using the Doodlebug Halloween twine!
10. Use the pockets to place pictures inside and use the blank pages to adhere pictures of your favorite Halloween spooks!
11. Enjoy!

Happy crafting! 


The Witch Is In Sign

Wednesday, September 19, 2012

The Witch Is In Sign
Created by OMC Designer Jill

Supplies Used:
Adams and Co. : 10.5 Black Blank Wood Block
Martha Stewart : Spider Web Punch
Lifestyle Crafts : Inverted Scalloped Rectangle
Doodlebug : Haunted Manor Paper Pack
Sizzix : eclips Cartridge - Happy Shapes Alphabet
Versafine : Black Onyx Ink Pad
Mod Podge


Instructions:
1. Measure a piece of the Haunted Manor Paper to fit the Adams&Co. wood block.
2. Ink the edges with Versafine Black Onyx Ink
3. Adhere to the wood block using Mod Podge. Pressing firmly to get any bubble out! Let dry completely!
4. Punch out 2 black spider webs using the Martha Stewart Spider Web Punch. These will be slightly less that 6" long. You can cut the excess off. Adhere these to the block with Mod Podge as well.
5. Cut out the words "The Witch Is In/Out" with the Sizzix Eclips cartridge Happy Shapes and Alphabet. 1.5" for the words "Witch, In, Out" and .75" for the word "The". I used coordinating papers from the Doodlebug Haunted Manor Pack.
6. Cut out a shadow of the words as well.
7. Ink the edges of the words and adhere them to the wood block using modpodge.
8. Cut out a 1 ½" circle with the Lifestyle Crafts Scalloped Circle. Adhere with Mod Podge.
9. Adhere the word "The" to this circle with Mod Podge.
10. Cut out a 4 inch tag using the Lifestyle Crafts Inverted Scallop Rectangle
11. Ink the edges with Versafine Black Onyx ink. Add the letters for In on one side and Out on the other. Embellish with bats from Martha Stewart.
12. Punch holes at the top and twist some black craft wire to hang it with,
13. Glue 2 black Doodlebug brads on the wood block to hang the In/Out sign on.
14. Mod Podge over the entire block except for the In/Out sign.
15. Use Stickles glue on all of your lettering and key spots on the spiders web. Let dry.
16. Hang the In/Out sign on the brads.
17. Display!

Happy crafting!

LinkWithin

Related Posts with Thumbnails