Showing posts with label Cricut. Show all posts

What's Provo Craft Imagining Next?

Wednesday, July 28, 2010

The Cricut IMAGINE!

And just what is the Imagine?  It is the world’s first tool that precisely prints and cuts with the touch of a button without requiring a computer or software. The Imagine saves you time since you no longer have to use three different tools to get designs, print, and then cut projects.


“Cricut Imagine is not only unique to the crafting industry, but to the world of technology. There is not another device that incorporates printing and cutting the way this machine does,” said Jim Thornton, CEO of Provo Craft. “The pairing of print and cut technology could only be done by the leaders in each category—HP and Provo Craft. We’re eager to see what our customers can now do with a simple sheet of white paper and Cricut Imagine print-and-cut technology.”

“HP is always expanding its personal publishing portfolio with new products and services that inspire and enable creativity among individuals and families,” said Kathy Tobin, Vice President and General Manager, Specialty Printing Systems Division, HP. “Cricut customers can benefit from high-quality Original HP ink to achieve unique and professional results.”

Cricut Imagine features include:
  • Cricut Imagine cartridges are enhanced by Cricut Pattern and Cricut Color cartridges to add dimension and layering
  • Cricut Imagine is fully compatible with all original Cricut cartridges
  • Compatible with Gypsy by Cricut handheld design studio
  • Easy-to-use LCD touch-screen navigation so that all information is right at your fingertips
  • New detachable accents to be able to personalize your machine with colors and textures
  • Access to a vast new library of content and artwork: Over 150 original Cricut cartridges (with several new cartridges introduced each month), 12 new Cricut Imagine Art cartridges specifically for this new machine, plus 12 new Cricut Imagine Colors & Patterns cartridges
  • On-board color and pattern selector - choose your own colors, sizes and much more
  • Works with paper sizes up to 12” x 12” and makes cuts from .25” to 11.5”, making large-format print and cutting possible
  • Retractable paper tray
  • No computer necessary
  • Uses same blades and blade housing as current Cricut products
  • Uses a separate mat than original Cricut machines 
Suggested retail for Cricut Imagine is $599.99.


What do you think?  Are you imagining the possibilities yet? :)


What's new with Cricut?

Wednesday, May 26, 2010

So you've all seen or heard about the new cartridges from Cricut, but do you know what you want to do with them yet?  Well here are some fabulous ideas!


Framed Family Layout
Display your family pictures in this cheerful layout!


Design by: Miranda Urry
Date: 2010-05-19 11:30:32
Category: Scrapbooking
Skill level: Easy
Time: 1 hour, plus drying time

Instructions
  1. Spray paint frame. Let dry.
  2. Use one 12" x 12" sheet of light blue cardstock as layout base. Cut one 11 ½" x 11 ½" block of dark blue cardstock. Cut one 11" x 11" block of white patterned paper. Layer and adhere to layout base.
  3. Cut frames. Using Cindy Loo cartridge and yellow cardstock, select Frame feature and cut one 5" . Ink edges. Using dark blue cardstock, select Frame feature, press Shift, and cut one 5" . Layer together and set aside. Using yellow cardstock, select Frame feature and cut one 5" . Ink edges. Using dark blue cardstock, select Frame feature, press Shift, and cut one 5" . Layer together and set aside. Cut two 4 ¾" x 3 ¾" blocks of light blue cardstock. Adhere photographs to blocks. Adhere blocks behind frames using foam dots. Adhere frames to layout as shown.
  4. Cut tree. Using green cardstock, cut one 9 ½" . Using brown cardstock, press Shift and cut one 9 ½" . Layer together. Adhere to layout as shown using foam dots.
  5. Cut FaMiLy. Using yellow cardstock, select Font feature, press Shift, and cut one 2" , one 2" , and one 2" . Ink edges and set aside. Using yellow cardstock, select Font Layer feature and cut one 3" , one 3" , and one 3" . Ink edges and set aside. Using dark blue cardstock, select Font Layer feature, press Shift, and cut one 2" , one 2" , and one 2" . Using dark blue cardstock, select Font feature and cut one 3" , one 3" , and one 3" . Layer letters together. Adhere letters to layout as shown using foam dots. Place layout in frame.
What You Will Need
  1. Cricut Expression® Personal Electronic Cutter with Plantin SchoolBook and Accent Essentials® cartridges [290300]
  2. Cricut® Cindy Loo cartridge [2000333]
Other Supplies
  1. Cardstock: yellow, green, light blue, dark blue, brown
  2. Patterned paper: white
  3. 12" x 12" Wooden frame
  4. Ink: light brown
  5. Spray paint: brown
  6. Paper trimmer
  7. Foam dots
  8. Adhesive


My Little Monsters Treat Bags
Create a fun place to hang special treats!


Design by: Georgina Jarvie
Date: 2010-02-25 15:57:33
Category: Holidays
Skill level: Easy
Time: 2 hours, plus drying time


Instructions
  1. Paint board purple. Wax areas you want purple to show. Sand board and paint black over purple. Sand lightly to allow purple to show through. Use hammer to add nails to board as shown.
  2. Cut my little. Using Cricut DesignStudio software and Plantin SchoolBook cartridge, select 1 ½" letters to spell my little. Weld together. Cut from light purple cardstock. Using Plantin SchoolBook cartridge, select Shadow feature and select 1 ½" letters to spell my little. Weld together. Cut from black glitter cardstock. Cut again from dark purple cardstock. Layer and adhere to board as shown.
  3. Cut Monsters. Using Mini Monsters cartridge and black cardstock, select Phrase feature and cut one 2 ¼" . Repeat cut using light purple cardstock and Phrase Shadow feature. Using dark purple cardstock, select Phrase feature, press Shift, and cut one 2 ¼" . Layer together. Adhere to board as shown using foam squares.
  4. Cut first treat bag. Using green patterned cardstock, cut one 5 ½" . Repeat cut using green cardstock and Layer 1 feature. Repeat cut using white cardstock and Layer 2 feature. Using light purple cardstock, select Layer 1 feature, press Shift, and cut one 5 ½" . Repeat cut using black cardstock and Layer 2 feature. Assemble bag. Tie ribbon through holes for handle.
  5. Cut second treat bag. Using light purple cardstock, cut one 5 ½" . Repeat cut using dark purple cardstock and Layer 1 feature. Repeat cut using white cardstock and Layer 2 feature. Using black patterned cardstock, select Layer 1 feature, press Shift, and cut one 5 ½" . Repeat cut using black cardstock and Layer 2 feature. Cut off handle. Punch holes in sides. Assemble bag. Tie ribbon through holes for handle.
  6. Cut third treat bag. Using orange patterned cardstock, cut one 5 ½" . Repeat cut using light purple cardstock and Layer 1 feature. Repeat cut using white cardstock and Layer 2 feature. Using dark purple cardstock, select Layer 1 feature, press Shift, and cut one 5 ½" . Repeat cut using black cardstock and Layer 2 feature. Cut off handle. Cut one handle in half to make horns. Punch holes in sides. Assemble bag. Tie ribbon through holes for handle.
  7. Hang completed bags on nails.
What You Will Need
  1. Cricut Expression® Personal Electronic Cutter with Plantin SchoolBook and Accent Essentials® cartridges [290300]
  2. Cricut® Mini Monsters cartridge [2000192]
  3. Cricut DesignStudio® software [290500]
Other Supplies
  1. Cardstock: orange patterned, white, black, black patterned, black glitter, light purple, dark purple, green, green patterned
  2. 18" x 3 ½" x ¾" Board
  3. Ribbon: ¼ yard each of three different patterns
  4. Paint: purple, black
  5. Paintbrush and sandpaper
  6. Candle or other wax
  7. 3 Horseshoe nails, hammer, hole punch, and scissors
  8. Foam squares and adhesive


Shabby Chic Name Swag
Create a cute piece of wall décor for your daughter or granddaughter!


Design by: Georgina Jarvie
Date: 2010-03-30 12:04:23
Category: Home Decor
Skill level: Intermediate
Time: 1 hour 30 minutes


Instructions
  1. Cut square charms. Using George and Basic Shapes cartridge and brown cardstock, select Charm feature, press Shift, and cut enough 5 ½" that you will have one for each letter in the name, plus two. Using a variety of pink patterned cardstock, press Shift and cut the same number of 4 ½" . Layer together using foam squares.
  2. Cut butterfly. Using Wall Décor and More cartridge and pink cardstock, cut one 3" . Repeat cut using pink patterned cardstock. Using brown cardstock, press Shift and cut two 3" . Cut out one brown body and discard wings. Layer butterfly together as shown, adhering only body sections together. Fold up pink and pink patterned wings for dimension. Adhere to charm as shown using foam squares.
  3. Cut dancer. Using brown cardstock, cut one 3 ½" . Adhere to charm as shown using foam squares.
  4. Cut name. Using pink cardstock, select Monogram feature and cut 3" letters to spell name. Using brown cardstock, select Monogram feature, press Shift, and cut 3" letters to spell name. Layer together. Adhere to charms as shown using foam squares. Embellish with rhinestones.
  5. Loop ribbon through charms, alternating colors. Adhere ribbons to tulle using glue gun. Glue buttons over ribbon, alternating colors. Tie loop in ends of tulle. Adhere craft flowers over knots using glue gun.
What You Will Need
  1. Cricut® Personal Electronic Cutter with George and Basic Shapes® cartridge [290001]
  2. Cricut® Wall Décor and More cartridge [2000270]
Other Supplies
  1. Cardstock: brown, pink, various pink patterned
  2. Ribbon: 1 yard brown, 1 yard pink, pink tulle
  3. Buttons: pink, brown
  4. Rhinestones: pink
  5. Two 1 ½" craft flowers
  6. Scissors
  7. Glue gun
  8. Foam squares and adhesive


Freshly Picked:


Flower Card
This cute flower card is a great for almost any occasion!


Design by: Miranda Urry
Date: 2010-05-19 16:35:53
Category: Paper Crafting
Skill level: Easy
Time: 30 minutes


Instructions
  1. Cut one 12" x 8 ½" block of light purple cardstock. Fold in half to create card base. Cut one 5 ¾" x 8" block of floral patterned paper. Adhere to card front using foam dots. Cut one 5" x 7 ¾" block of cream cardstock. Adhere to card front using foam dots.
  2. Cut flower. Using Freshly Picked cartridge and green cardstock, cut one 7" . Repeat cut using light pink cardstock and Layers feature. Using orange patterned paper, press Shift and cut one 7" . Repeat cut using dark purple cardstock and Layers feature. Layer together.
  3. Tie ribbon around pot as shown. Adhere flower to card as shown using foam dots.
What You Will Need
  1. Cricut Expression® Personal Electronic Cutter with Plantin SchoolBook and Accent Essentials® cartridges [290300]
  2. Cricut® Freshly Picked cartridge [2000313]
Other Supplies
  1. Cardstock: light purple, dark purple, green, light pink, cream
  2. Patterned paper: floral, orange
  3. Ribbon: 4" pink sheer
  4. Paper trimmer
  5. Foam dots
  6. Adhesive


Aren't those projects just too cute? These new cartridges have oh so many possibilities!


Happy crafting!


Cutting fabric with the Cricut? Big Shot? No problem.

Friday, September 18, 2009


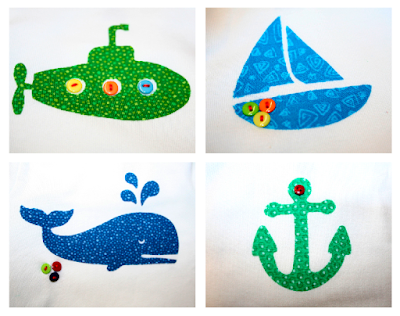
We often get questions about whether or not you can cut fabric with the Cricut. Or what about the Big Shot or Big Shot Pro? Well, today we'd like to offer some great tips for cutting fabric with these machines. One of our designers, Katie, recently created these baby onesies and burp clothes (out of fabric diapers), using fabric, and the Cricut.


A few tips for cutting fabric
• When using the Cricut, make sure your designs are SIMPLE. Use solid pieces, no designs with pieces cut out of the middle, etc. (If the blackout of the design is available on the cartridge, choose that.) If you want an intricate design, it is recommended that you for sure use a Big Shot, which is made to cut all mediums—including fabric.
• Cut your designs out of paper first to make sure it is the correct size. It is a lot easier (and cheaper) to keep cutting different sizes out of paper than to ruin a piece of fabric and have to prep another piece of fabric for cutting.
• Like any sewing project, make sure you pre-wash and iron your fabric to make sure it doesn't shrink after you've applied it to your article of clothing (in this case, the onesie). If you are making burp clothes out of cloth diapers, wash and dry at least twice before applying any designs.
• Using Freezer paper makes this project so much easier and yields better results and don't worry, it doesn't leave any residue on your fabric when you take it off.
• If you are embellishing with buttons, glue them onto the fabric with Fabritac first, then secure with embroidery floss. If the item you choose to make is for a baby, make sure there is no way the baby could somehow tear buttons off and choke on it. With the burp cloths that Katie made, she did not put any buttons anywhere, since burp cloths go right in a baby's face. They are embellished with stitching. You can also embellish with rick rack, secured with Fabritac. Or, you could also use a sewing maching to stitch ribbon through. The possibilities for cuteness are endless!

Okay, here's how she did 'em.


Supplies
Cricut Machine
Onesies
Cloth Diapers
Fabric (fat quarters)
Fusible Backing (Steam a Seam 2)
Blue Painter's Tape
Small Buttons from the Lime Rickey kit by Basic Grey
Embroidery Floss
Iron and ironing surface
Deep Cut Blade
Scissors
Fabritac
Freezer paper (optional—make sure it's freezer paper and not wax paper)

Cutting with the Cricut
Step 1
Prep the fabric to be cut—Assuming you know the size of the shape you'll be cutting, cut a piece of fabric the correct size for your design. Cut your fusible backing to the same size as your fabric. Iron on your fusible backing to the wrong side of your fabric. Katie used the Steam a Seam 2 because it has the paper on the back, which makes it work with the Cricut. If your fusible does not have a paper on the backside, use the paper you too off the front of the fusible backing and place it on the back, however this doesn't yield as good of results. don't try to cut the fabric without any paper over the fusible backing; the Cricut needs paper to cut through or the blade gets stuck. Freezer paper is helpful because it becomes stiff after you iron it onto the fabric and makes it easier for the Cricut blade to cut through in clean lines and it keeps the fabric from bunching up and creating a mess. If you choose to use it, iron the Freezer paper to the right side of your fabric.

Place your fabric on your Cricut Mat. If you are using Freezer paper, place fabric on the mat freezer paper side up. If you are not using it, place the fabric on the mat fusible backing side up. When you have your fabric positioned on the mat, take your blue painter's tape and tape all sides down to the mat. You can use regular masking tape, but it doesn't come off the mat so easily and might pull up the sticky from your mat, so always use the blue painter's tape. Now your fabric is ready to be cut.

Step 2
Load your mat into your machine. Make sure the pressure is on max and your speed is on minimum. Cutting fabric with a regular blade can be done, but it's probably best to use a deep cut blade. IF you are using a regular blade, at least make sure it's brand new or nearly brand new. If you cut fabric with a dull blade you might regret it.

Choose your design and size, press cut. Stay by your machine and watch it cut, just in case the fabric comes up and snags on the blade. If you're right there you could save the design by pulling the fabric back down so it can finish cutting.

After your design is finished cutting, unload your mat and take your fabric off. Remove the freezer paper and the paper from the fusible backing. Place your design on your onesie or burp cloth and iron on.

Embellish with buttons, embroidery floss, or whatever you fancy. Enjoy!

Cutting with the Big Shot
Step 1: Cut your fabric and fusible backing to the right size, iron on the fusible backing.
Step 2: Set up your fabric and die, just like you were using paper. Put through the Big Shot.
Step 3: Iron your cut design onto your onesie or burp cloth. Embellish and enjoy!

Any questions just give Katie a holler! katie @ ohmycrafts . com.

This just in...

Saturday, June 20, 2009

We've got some darling projects to show you with the four new Cricut cartridges that are now available for pre-order. Be the first to get on board! By purchasing any of these new products you're eligible to enter into the Cricut Ticket contest. It's a goodie, trust us. Here's what you could win. Be sure to read the rules, too.


Here's a great look with Stand and Salute:


And a whimsical look done by Jubilee:


This sweet birthday card comes compliments of Simply Sweet:


Finally, add the right touch to your page with Solutions: Home Decor:

What's the difference?

Thursday, June 11, 2009


Many people ask us what the difference is between the regular Cricut cartridges, and the Solutions cartridges. That is a wonderful question! 

Most regular cartridges have about 100 designs and six creative features. A solutions cartridge only has about 50 designs and two creative features. As a result, the Solutions line costs less because it contains less. Furthermore, Solutions cartridges come packaged without the traditional storage box and do not contain the booklet, which helps to keep the shipping cost lower.

Hopefully that helps! To view more Cricut pointers, there's a wonderful site that answers gazillions of questions. Click here.

Mkay now. Don't forget that the free shipping sale ends TONIGHT. Get on that train if you haven't. And want a sneak peak at tomorrow's sale???? Sure you do. Welp—we're bringin' it back since it was so popular—the Summer Kick-Off sale! You'll be able to use the code SUMMER15 for an extra 15% off ANY order!

Happy crafting!

If winning isn't everything, why do they keep score?

Wednesday, June 10, 2009

Let us all stop and take a breath of that fresh summer air out there. (Or for some of us—those summer storms that keep pelting outside the window...). For many—mainly little boys and girls—summer means that it's time to head outside and play some sports!

Here's some fun ideas for those athletic kiddos in your life.
This quaint little chipboard basketball tag was given its special look with the Cricut cartridge Alphalicious:


Got any soccer stars in your household? You might wanna try this scrapbook page, created with the George, Basic Shapes and Tags Bags Boxes and More cartridges:


School may be out—but football practice is only just begun! Gotta be prepared for that Homecoming game:


Here in Utah, it seems like every park and playing field these days is bubbling and brimming with eager baseball players. Summertime sure is a great time for rambunctious little bodies to join a baseball or t-ball league! It's a great way for recreation, not to mention it forms all sorts of memories to scrapbook about!  

Here's a fun idea, with a Cricut and Cuttlebug compilation. This card uses the Distressed Stripes embossing folder and the Opposites Attract cartridge:


When it comes to baseball, Sizzix has us covered. Seriously.


Don't these just make you want to grab your baseball bat and swing away? Don't forget to check out our sports and recreation quote bank to fill your pages with amazing phrases! Furthermore, Oh My Crafts can cater to your athletic aspirations. We've got great prices on the Solutions Baseball, Soccer, and Basketball cartridges. Not to mention amazing prices on all the other Cricut, Cuttlebug and Sizzix supplies. And did we mention that we're having a 2-day FREE shipping sale within the U.S.?

So get shoppin'! And happy crafting!

To have and to hold

Wednesday, May 20, 2009

As the wedding top-dog of the year—June—approaches, many people are hustling and bustling in wedding preparation. Here at Oh My Crafts, we've got several people planning on gettin' hitched this summer. And it seems like almost everyone has wedding festivities to attend very soon. So even if a wedding isn't in the works for you—you're probably still going to need to be prepared for one. Whether it be wedding gifts, cards or tags, you'll want to be ready for celebrating with your friends and family. So get a load of some of these darling ideas to really add that special touch to your gifts.


What a better way to express eternal love than with a clock? This innovative Cricut-created card uses the Graphically Speaking cartridge.


Also cuter than cute—this "happily ever after" Cricut card, created with the Plantin Schoolbook and Storybook cartridges. The happy couple will definitely know you care after they see how much time and love you put into their card.


What a modern and fun look! This card was created Cuttlebug-style with the Man and Woman sign die, and the Alphabet die.


For the elegant and sophisticated look, you simply cannot go wrong with Slice. The wedding design card has every look you need! It's cards like this one that a blushing bride will keep in her wedding memory box for the rest of her life.


If chic is what you're aiming for in a wedding card, take note of this QuicKutz showpiece. With it's retro colors and simple design, this card is sure to be a notable eye-catcher.


Naturally, here we have another Basic Grey masterpiece created with Marrakech.


So you've got your card. Now what about the gift presentation? Craftingly speaking, what's more fun than creating a gift bag? Karen Foster would agree. Hence this little beauty, equipped with a matching tag:


Scrapbook Day—here we come!

Friday, April 24, 2009

We're 8 days out from National Scrapbooking Day. For those of us at Oh My Crafts, the partying has already begun. Today we're kicking off our weekend Cricut sale! Anything Cricut—we've got it...and you're sure to find it for a great deal.

Here's some especially cute project ideas we found from Provo Craft, using the Cricut.


Indie Arts cartridge, Street Sign cartridge


Plantin Schoolbook cartridge, Walk in My Garden cartridge, Doodletype cartridge


Celebrations cartridge, Accent Essentials cartridge


Mickey and Friends cartridge, Mickey Font cartridge


Lastly, we highly suggest making National Scrapbooking Day a party that lasts all week. That's undoubtedly what we plan on doing. Heck, make it last all year! Here's a few more ways to celebrate:
Work on your contest submissions for Oh My Crafts! (That's right...we've extended the deadline indefinitely!)
Donate a few scrapbook items to a scrapbooker in need!
If you work this coming Saturday—take the day off (or off early, at least!) This is your day!! Send the kids to the neighbor so you can really get to work.
Write a letter to Congress requesting this day be recognized as a National Holiday (but only if you're really bored. Which you shouldn't be with all that crafting you've got to get to...)
Ooooh! Oooh! Here's a good one: Sign yourself up for the October 2009 Oh My Crafts Canada/New England crafting cruise!
And finally, after you're signed up and sitting pretty with our cruise, do a little shopping on our site for those crafting items that you need. Naturally, we don't recommend waiting until Saturday—we've got deals planned for the entire week! These savings are so superb your bank account won't even realize you spent any money!
Happy weekend, and happy Cricuting!

LinkWithin

Related Posts with Thumbnails