Stained Glass Glitter Cards

Wednesday, March 30, 2011

Stained glass is so beautiful and intricate—much like these cards. Although they look difficult to make, they are really quite simple. With pre-made card bases, these beautiful cards come together quickly. If you love to color, then these are for you!


Supplies Needed:

Doodlebug Design: assorted card sets
Copic Markers: V17, V05, Y02, Y06, YG13, B02, B05, RV02, RV06, YR04,E00, 110, T2
Faber-Castell: Pitt Artist Pen—Silver
Elizabeth Craft Designs: peel-off stickers—Thanks-Silver; Big Butterflies-Silver; Fantasy Flowers-Silver, Lady With Parasol-Silver;
Be Creative tape sheets
Glitter Ritz: Cool Highlights
Bazzill: Simply Smooth White Cardstock
Imaginisce: I-rock, Glam Rocks—mirror
Glue Arts: Glue Glider Pro
3L: foam squares


Hawaiian-style Card 


1. Choose peel-off sticker design and gently lift off liner. Remove backing from tape sheet and adhere sticker to sticky side of adhesive.
2. Remove second liner and adhere to smooth white cardstock. Trim around design leaving a small border of about ½” around the flower. (This cuts down on amount of glitter used.)
3. Fold a piece of copy paper in half and place flower peel-off on top. Carefully sprinkle glitter over flower. Be generous with glitter. Fold one half of the paper over the glittered design and rub glitter into adhesive. Open paper and brush off glitter. Lightly rub off excess glitter until none remains. Use the fold to pour the remaining glitter back into the jar.
4. Either tip on the Copic markers will work to color in the glitter. Use very light pressure to color in the space; hardly any amount of pressure is needed. As the ink touches the glitter, it quickly spreads across the surface. For very small tight areas, the brush tip will work best. For large areas, the chisel tip is best. After finishing with a color, be sure to gently wipe the glitter off the tip of the marker on a paper towel.


5. Once the flower is colored in, carefully trim as close to the design edge as possible.
6. Mount flower with foam squares on a white 2 ½” square at a slight angle. Then attach the 3D piece to center of card.
7. Use an I-rock to embellish card front with mirror glam rocks as desired.
8. Make one more small flower piece for front of envelope. Use the same steps as above to make flower.


Floating Butterfly Card


1. Follow steps 1-5 above except do not remove second liner. Sprinkle with glitter as before and color butterfly.
2. Once the design is colored in, remove the second liner and place directly onto card. This application gives a more translucent look to the design.
3. Select two circles the same size from the peel-off sheet. Separate the circles from their centers and place in top corners of card with the open circle on top and its center just below.
4. For the inside of the card, select from the Thank You Peel-Off Stickers, a sentiment and design to place in the center of card.
5. Make one more flower for the center back of envelope flap. Remember not to mount design on card stock.


My Fair Lady Card
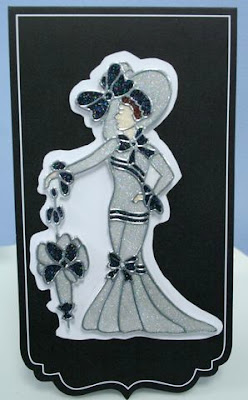


1. Repeat steps 1-5 from Hawaiian Card.
2. Turn glitter image over on white piece of smooth cardstock and trace the outer edges of lady to create a shadow of her.
3. Trim about ⅛” larger than pencil tracings. Turn over and check to make sure shadow fits. Adhere shadow directly to center of black card base. Mount lady with foam squares to shadow.
4. Make a glitter bow for back of envelope flap. Using the silver Pitt pen, draw a box around front of envelope about 1/16” in from edge. Trace around bracket on backside if desired.


Tip: When removing a peel-off, try to leave all of the negative pieces in place. The pieces can be removed with a special transfer tape and also used as a design.


Happy crafting!


USTREAM Butterfly Gift Bag

Tuesday, March 29, 2011


Butterfly Gift Bag created by OMC designer Whitney


Supplies Used:

Brown Gift Bag (Found at the dollar store. Shopping bags work great too! This bag is 8x10”) 

Martha Stewart : Large Punch Around The Page - Wild Flowers
Bo Bunny : Gabrielle Collection Pack 
Sizzix : Bigz Die - Fanciful Flight by Tim Holtz
Prima : Dechire Collection - Cream  
Bazzill Basics : Coral and Cream Cardstock
Scrapper’s Floss 
Tim Holtz : Crackle Paint - Rock Candy
Sizzix : Adhesive Sheets
Tim Holtz : Distress Ink Pad
We R Memory Keepers : Crop-A-Dile Tool


Instructions:   


1. Cut background color 8x5 ½ inches and distress with ink. 
2. Cut coordinating color 8x5 ½ inches and starting with the corners then moving in, punch wildflowers out on top and bottom edge. Layer on top of background.
 

TIP - On the Martha Stewart Punches’ instructions are dimensions that you should cut the paper. If you don’t cut them at the right dimension, then the punches will not cut evenly. Wildflowers cut in 2” increments.
 

3. Cut strips 2 ½ x 8” and distress with ink. Adhere on top of project. 
4. Cut strip ¾ x 8” and adhere to project centered on other strip. 
5. Cut 3 strips of Scrapper’s Floss 10” and tape onto the back of the background paper then bring in front and back again, taping the other end to the back side of paper.  
6. Die cut butterfly and apply a thick coat of Tim Holtz Crackle Paint. Let Dry.
    - Make sure to cut mirror image of the wings.  
    - Tim Holtz Crackle Paint is heat sensitive, so to speed up the drying process use a heat gun or hairdryer. 
 

TIP - Apply Sizzix Adhesive sheets to the paper before die cutting so adhering is a breeze!

7. Adhere butterfly in the center over the floss  

8. Adhere project to front of bag 
9. Adhere Prima flower over butterfly.


Finish it off with a tag:


1. Adhere a sticker to paper and cut around sticker so you are left with an opened tag. Fold.  
2. Hole punch upper left corner. 
3. Pull one side of handle out of bag and attach tag.  
4. Tape handle back on so it is very secure.


Here we have the USTREAM video with OMC designer Whitney who created the Butterfly Bag!


Click HERE to check out OMC's other USTREAM videos! 


 Happy crafting!

Life is a Journey

Monday, March 28, 2011

“Journey” Card by OMC designer Whitney

Supplies Used:

Doodlebug : Square Grid Card - Beetle Black

Tim Holtz : Crowded Attic Paper Pack 
Tim Holtz Stamp: Air Travel
Tim Holtz : Distress Ink Pads - Forest Moss, Brushed Corduroy, and Rusty Hinge 
Tim Holtz : Embossing Ink Pad
Tim Holtz : Hitch Fastener 
Karen Foster : Tawny Scrapper’s Spools (floss)
7 Gypsies : Danglers Charm 
Marvy Uchida : Heat Gun 
American Crafts : Zing Embossing Powder - Gold Metallic
3L Foam Squares

Instructions:

1. Cut about ten 1 ½ x 1 ½” squares using your favorite paper from Tim Holtz paper pack and distress with colored ink pads.
2. Adhere squares to card, leaving center empty.
3. On back of front page, adhere 4 ¾” x 4 ¾” patterned paper so a desired color shows in front through window.
4. Cut four pieces of floss 7” long.
5. Adhere floss to back of card and then cover with a 4 ¾” x 4 ¾” patterned paper.
6. Attach Hitch Fastener to front and tie the floss around it. Trim floss as needed.
7. Stamp the plane on separate piece of Tim Holtz paper with embossing ink and emboss with gold powder. Cut around the borders of plane.
8. Adhere plane with pop-up squares.
9. Distress all the edges of card.
10. Attach “Journey” Charm to the floss.


Happy crafting!


What's New? Lush 2!

Saturday, March 26, 2011

Have you seen what's new with My Mind's Eye? 

The new Lush 2 Collection!
 

We have albums, brads, buttons, and paper packs all in the new Lush 2 colors! Not to mention that some of the products are on sale which is always a perk :)
 

Tamara Jensen, one of the My Mind's Eye Design Team designers created a fabulous "Our Family" album using the Navy Lush Album and we wanted to give you a sneak peek...


Oooooohh...


Aaaaaahh....

Isn't the album gorgeous? You can see the entire project and download the full instructions by checking out the My Mind's Eye Blog!


Happy crafting!

Doodlebug Cards Galore!

Friday, March 25, 2011

Occasions are best remembered when they're celebrated with a heartfelt card... and the perfect way to send your love is with a Doodlebug Create-a-Card! A one-stop shop of colorful cards and whimsy envelopes sure to make your every occasion an extra special one. Perfect for wedding announcements, birthdays, baby showers and more... this unique array of cards and envelopes was created to make your card crafting a snap!

Here are some adorable cards made with the new products from Doodlebug!

Blue Flower Card & Envelope


Supplies Used:

Doodlebug : Square Grid Card & Envelope - Swimming Pool 
 
BoBunny : Ad Lib Collection Pack  
Bazzill Basics: White Cardstock 
Prima : Vintage Trinkets Flowers  
Prima : Blue Flower  
Sizzix : On the edge Die - Mini Scallop & Pinking By Tim Holtz  
Tim Holtz : Distress Ink Pad - Brushed Corduroy 
Diamond Glaze  
TomBow : Mono Multi Liquid Glue  
Fabritac

Instructions:

1. Cut patterned paper 3x10 inches

2. Die cut two Sizzix borders with white paper
3. Adhere borders to the back of the patterned paper so a little white shows in front.
4. Adhere patterned paper to the center of the envelope, bending the extra paper around the card.
5. Adhere Prima flowers to the right of the card with fabritac
6. Apply dots with Diamond Glaze on patterned paper and let dry.

Red Paisley Card


Supplies Used:


Doodlebug : A6 Paisley Card - Ladybug

Basic Grey : Rub-on 2367 (or any rub on with flourishes or flowers) 

Prima : Vintage Trinkets Flowers 
Cosmo Cricut : Circa 1934 Crafting Kit 
TomBow : Mono Multi Liquid Glue   
Tim Holtz : Distress Ink Pad - Brushed Corduroy 
Mark Richards : 3 mm Gold 
Brown Tulle 
Fabritac

Instructions:


1. Distress card flap edges

2. Apply brown floral rub ons to bottom right corner
3. With fabritac glue, adhere Prima flowers together
4. Cut patterned paper 6.25” X 3.25”
5. With 10 inches of tulle, tie a knot at 7 inches then adhere tulle with the knot one inch from the edge. Adhere on the back flap of the card so glue will not show. Then paste the patterned paper over the tulle and securely onto the back flap so the glued down tool is covered.
6. With fabritac, adhere prima flower over the knot of the tulle.
7. Apply embellishments, such as Mark Richards dots in the center of the flowers.

“Call Me” Card


Supplies Used:

Doodlebug : Square Grid Card - Tangerine 

Unity Stamp : Call Me 
We R Memory Keepers : Wide Shimmer Eyelets - Orange
We R Memory Keepers : Crop-A-Dile Tool  

Tsukineko : VersaColor 82 Black Ink Pad


Instructions:

1. Center three eyelets on orange paper to the right of the frame using Main Squeeze tool.

2. With a pencil lightly trace the frame so you can tell where the stamp should be placed.
3. Open card and stamp in the penciled frame
4. Wait until ink is completely dry, to erase pencil marks

“Life…How Sweet it is!” Card


Supplies Used:


Doodlebug : A2 Polka Dot Card - Bubblegum
 
Cricut : Sweet Treats Cartridge 
Sizzix : Birthday Set #2 Embossing Folder (or Cuttlebug Polka Dots)  
Unity Stamp : Sweet Life 
Bazzill Basics : black, light blue, pink, light pink, smooth white paper 
Bazzill Basics: Modern Buttons - Petunia or Candy Apple
Elizabeth Craft Designs : Glitter Ritz - Warm Highlights 

Black ribbon with white polka-dots - 4” long  
Tsukineko : VersaColor 82 Black Ink Pad  
TomBow : Mono Multi Liquid Glue  
Karen Foster : Tawny Scrapper’s Spools (floss)
Quickie Glue  

3L Foam Squares

Ice Cream Sunday Instructions:


1. With Cricut set at 3” inches, cut the Icecream Sunday from the cartridge Sweet Treats using blue cardstock for the dish, pink for the first layer of icecream and cherry, light pink for the second layer of icecream, and white for the whipped cream, sprinkles and reflection on dish.

2. Pull aside the white sprinkles and slender reflection strip. Apply Quickie Glue then coat with glitter. Allow the glitter to dry and then brush extra glitter off with your finger. For the remaining glitter, use the magnet material to pick up the rest.
3. With the first layer of pink icecream, emboss with polka dot embossing folder.
4. On the base of the Icecream cup, tie a little knot of twill.
5. On the cherry, embellish with a gem.
6. Assemble the icecream Sunday.

Card Instructions:


1. Two inches from the bottom, paste the ribbon horizontally across the card, cut off extra ribbon that might hang off the sides.

2. Stamp “Life…How Sweet it is!” on white paper with black ink. Trim white paper around phrase and frame with black paper.
3. Apply Quickie Glue to the white scallop lines at the bottom of card and apply glitter same way as before.
4. Cut 3x4” of white paper for the inside of the card and stamp with the cherry from Unity Stamp’s collection. Paste the white paper so that a little of it shows on the front side.
5. Finally, adhere the Icecream Sunday with glue and adhere the sentiment with Foam Squares.


Happy crafting!

NOMINATE YOUR MOM TO BE OUR NEXT CUSTOMER SPOTLIGHT!

Thursday, March 24, 2011

NOMINATE YOUR MOM TO BE OUR NEXT CUSTOMER SPOTLIGHT! 
Email contest@ohmycrafts.com why you think your mom would be the best Oh My Crafts Customer to spotlight on our blog. If possible send us a picture of your mom and something creative she has made recently! Tell us why she loves to shop at Oh My Crafts! 

Winners of the Mother's Day Inspirational Contest!

Wednesday, March 23, 2011

Winners who participated in our recent contest and posted their comments about their inspirational mothers on our blog are:
Duryea Place Designs
Crafty 1 
Breon 
Winners who posted comments about their mom on our facebook page are:
Diana Ansman McConnel
Tracy Chipman Schmedel! 
Congratulations please email your information to contest@ohmycrafts.com and we will email you back a $5.00 gift certificate code that you can use to shop with us anytime!

Classy and Fabulous!

“A woman should be two things: Classy and Fabulous!” – Coco Channel


We think so too! This cute little card kit can be made into several kinds of cards – birthday, best wishes, thinking of you etc. Perfect for giving to a dear friend. Whether you use this kit or one of the many others, it is so easy to create a beautiful card in minutes. The kit comes with a separate sheet of printed card weight paper and several die cuts that can be used individually or layered for more effect. Add more embellishments or not, it’s up to you.


Supplies Needed:

Kanban Crafts: Classy & Fabulous card kit, Acetate Sheet- Tudor Black, Duo-Mirror Reflective Cardstock – Red & Pink
Bazzill: Black and Tan Cardstock
Provo Craft: Cricut Expression, Hannah Montana Cartridge

Glue Arts: Glue Glider Pro

3L: Foam Squares


Card Cutting Chart:


2 Ladies Card
Dress Form Card
Base
Black
9 ⅛ x 5 ½”
Pink Floral
9 ⅛ x 5 ½”
Layer 1
Glitter Overlay
4⅝ x 5 ½”

Pink mirror
4 ⅛ x 5 ⅛
Layer 2
Red Mirror
4 ⅛ x 5 ⅛”
Die card base
Layer 3
Die card base
Die dress
Layer 4
2 ladies die

Inside Base
Glitter overlay
4 ½ x 5 ½”


Cricut Cutting Chart

Cartridge
Object
Size
Speed
Pressure
Blade Depth
Rose Shadow
use shadow feature key
Hannah
Montana
Rose
Pg. 68
1”
Medium
High
6
Rose
same
Rose
Pg. 68
1”
Medium
High
6


Two Classy Ladies Card:

1. Cut card base according to chart, score and fold card in half.
2. Cut each layer according to chart. Set aside.
3. Punch out die base of card. Using scissors or nail file – trim or sand off the little tabs that attach die card to base.
4. Attach the die base to red mirror paper. Then adhere the mirror base to the smooth side of overlay. Next place glue on the rough side of the overlay so that it does not show through and attach to black base.
5. Place foam squares on backside of ladies – you may need to trim squares in half for smaller areas like the heads.
6. For the inside overlay, place small amounts of glue on the black portions of the flowers so it doesn’t show through. Punch out the Happy Birthday die cut and attach to card.
7. Cut both rose layers on Cricut according to chart. Assemble and attach to card.


Style is Eternal Card:

1. Cut card base according to chart, score and fold card in half.
2. Cut each layer according to chart. Set aside.
3. Punch out die base of card. Using scissors or nail file – trim or sand off the little tabs that attach die card to base.
4. Attach the die card base to pink mirror paper and then adhere to floral card base.
5. Place foam squares on the back of dress form and attach.
6. Punch out the oval die cut dress and sand off the tabs. Adhere to small piece of pink mirror paper. Trim around the die cut leaving about ⅛” border and attach to lower right corner of inside base.


Tip
The mirrored paper is very shiny so be careful of fingerprints! The silver mirror paper in this line would make an excellent mirror in a project.


Happy crafting!

Lucky To Be In LOVE!

Tuesday, March 22, 2011

“Lucky To Be In LOVE” Scrapbook Page by OMC designer Whitney!


Supplies Used:

C
ricut : Opposites Attract, Doodletype, Cindy Loo Cartridges
Fancy Pants : Coffee Filter Flowers 
Ranger Ink : Adirondack Butterscotch and Lettuce 
Tattered Angels : Glimmer Mist - Mustard Seed 
Prima : Swallowtail Butterflies - Tiger 
Slice : Design Cartridge - Spring 
Fiskars : Corner Punch - ½ inch hole punch 
Cosmo Cricut : Glubers 2” Pack 
We R Memory Keepers : Maple Grove Paper Pack 
Bazzill Basics : Greens and White Cardstock
Mark Richards : 3 mm Gold Glitter Dome


INSTRUCTIONS:

Clover:
 

1. Cut clover using Slice Design Spring Cartridge set at 4” with green paper. 
2. Place 2” adhesive dot in center of pre-cut clover. With another 2” dot, cover the rest of the clover. Use scissors to cut around clover so no adhesive hangs off edges.  
3. Mist light green cardstock with Ranger Ink Spray (Color: Lettuce). 


* TIP: USE A HEAT GUN TO QUICKEN THE DRYING PROCESS. (Heat sensitive spray)
 

4. With sprayed paper, cut about 50 circles with ½ inch hole punch. 
5. Fold up corners of circles and start placing them on the clover. Start in the middle and work outward, keeping them tight together.  
6. For the stem, cut a thin strip of sprayed paper and accordion fold so it will be the same height as the clover leaves and secure on adhesive. 
7. Spray with glimmer mist to add shine.
 

* TIP: INSTEAD OF MAKING A CLOVER, TRY A HEART, STAR, OR FLOWER.

Spray: 


1. With Butterscotch Spray: spray large floral doily and scalloped circle doily. Also spray a white sheet of cardstock. 2. With Lettuce Spray: spray one small floral doily and one scalloped circle doily.

Cut Words: 


1. Cut “Lucky to be in LOVE” using the chart below.

Cartridge
Material
Words to Cut
Size in Inches
Blade Depth
Pressure
Speed
Cindy Loo
White paper
"LOVE"
1 3/4"
4
High
High
Opposites Attract
Butterscotch sprayed paper
"Lucky"
1 1/2"
4
High
High
Doodletype
Butterscotch sprayed paper
"to be in"
1"
4
High
High

Cut: 


1. Four 2x2” squares of patterned paper 
2. 1 ½ x12” strip of patterned paper 
3. 1/8 x 12” strip of patterned paper 
4. 2 ½ x 12” strip dark green paper 
5. 7 ½ x 5 ¼” dark green paper 
6. 5x7” white paper 

* Corner Punch each corner

Assemble: 


1. Glue 12” strips of patterned paper on the 12” strip of green paper and adhere to left side of 12x12” sheet of light green paper. 
2. Glue white 5x7” paper on dark green 7 ½ x 5 ¼” paper
* Glue onto page ½ inch from the right edge and 3 ½ inches from the top. 
3. Glue 2x2 inch squares of patterned paper, tilted like diamonds, overlapping onto bottom of page. 
4. Glue doilies in both corners and glue clover and butterfly in opposite corners. 
5. Glue “Lucky to be in” at the top of page. 
6. Glue “LOVE” at the bottom of the page, centered on diamonds.  
7. Finish with glitter dome stickers on corners of white paper and around the clover.


Happy crafting!

LinkWithin

Related Posts with Thumbnails