Showing posts with label Weddings for the Crafty. Show all posts

Bride To Be Banner

Tuesday, August 7, 2012

Bride to Be Banner
Created by OMC Designer Lindsey

Supplies Used:
Canvas Corp : Corrugated Kraft Paper
Sizzix : eclips Cartridge - Baby Shower & Precious Alphabet
Tim Holtz : Distress Ink Pad - Spun Sugar
Bazzill Basics : 12" x 12" Cardstock - Blossom, White
Martha Stewart : Deep Edge Punch - Blossom Eyelet
Imaginisce : Bitty Blossom Jar - Paper

Instructions:

1. Cut pendant pieces out of the corrugated kraft paper.
2. Cut letters to size using the eclips cartridge. Make sure you check all of the letter sizes to make sure that they fit on the pendants.

3. Using the deep edge punch, punch strips out of the blossom cardstock. Using adhesive, attach the strips together to create a continuous line. Attach the pendant pieces to the punched strips. Leave extra punched strips on the ends to hang the banner.

4. Add flower embellishments.

Happy crafting!

Paper Wedding Cakes

Tuesday, June 26, 2012

Paper Wedding Cakes
Created by OMC Designer Lindsey

These adorable little paper cakes would make great accent pieces for a wedding or party display! 

Supplies Used:
Jolee's Boutique : Dimensional Border Stickers - Icing
Bazzill Basics : Double Dot Cardstock
Ranger Ink : Stickles Glitter Glue - Yellow, Crystal
Adhesive
Ribbon

Instructions:

1. Cut 3 strips of paper in 3 different widths depending on the size that you want the cake to be. Each layer should also be shorter length wise to create the tiers of the cake. Roll the strips into circles and adhere the edges. Trace the size of the circle onto a piece of paper and cut the shape out. Adhere to one side of the circle to create one layer of the cake.

2. Once all the individual layers of the cake are put together, stack them on top of each other and glue them together. In the crease where the layers meet, add a thin strip of Stickles glitter glue. to hide the edge of the paper.

3. Wrap the icing stickers around the different layers of the cakes. You may need to use an adhesive or craft glue to reinforce the stickiness on the dimensional stickers.
4. Add ribbon around the cakes.


Happy crafting!


To Have And To Hold

Wednesday, June 9, 2010

Who doesn't love a wedding? The happy smiling couple and all their friends and family around to share in their joy.  Is there anything better than seeing two young people starting their lives together?

Lindsey has been working hard in our Design Room coming up with some simply adorable wedding ideas and we'd like to show off her talent (and we've included the instructions just to be extra nice :) ).


For instance, we have this darling Bride Box.


Lindsey used the Tim Holtz Shabby Vintage Paper Stack and the Sizzix Bigz Pro Die : Box, Match by E.L. Smith to create this adorable box.


Coming soon to OMC is this super versatile Chipboad Scallop Circle from Technique Tuesday! 


Lindsey used the D'vine Swirls Cuttlebug Embossing Folder to create this fun texture on the box. We think it gives it that extra bit of elegant flair every wedding needs!


Supplies:

My Mind’s Eye: Lush Blue Floral Sheet
Cuttlebug A2 Embossing Folder: D’vine Swirl
Tim Holtz Distress Inks: Pumice Stone

Tsukineko: Fantastix Pen Tool

Technique Tuesday: Chipboard Scallop Circle (Coming Soon to OMC!)
3” wide Aqua Blue Tulle (any brand)
Tattered Angels Glimmer Mist:
      - Green Tea
      - Blue Skies
Basic Grey: Nook and Pantry Alphabet Stickers

Sizzix Bigz Pro Die: Box, Match by E.L. Smith

Cuttlebug Machine


Technique Tip: When using multiple Tattered Angels Glimmer Mists to create your desired color combination, spray the first color and dab the extra off with a paper towel. Next, spray your second color and dab the extra off. Repeat until you get you desired color. (Make sure you swirl your Glimmer Mist bottles instead of shake. This will prevent clogging and globs of mist on your projects.)

INSTRUCTIONS

Step 1: Take you My Mind’s Eye Lush paper and cut it out with Sizzix Bigz Pro Die. Next, by following the directions that come with the die, assemble the box.

Step 2: Using your Fantastix tool and your Pumice Stone Distress Ink, dab a little of the ink onto the swab end of the tool. Next, ink parts of the D’vine Swirl Embossing Folder (don’t worry the ink will come off). Finally, fold the box flat so that it will fit in your embossing folder. Emboss the box by putting the embossing folder through your Cuttlebug machine.  

Step 3: Take the Technique Tuesday Chipboard and mist it using the Tattered Angels Glimmer Mists (see technique tip). Let your box dry for about 5 minutes.

Step 4: Once the chipboard is dry, take your Nook and Panty Alphabet Stickers and spell out “bride”.

Step 5: With your blue tulle (for this project, Lindsey used Bazzill Basics 3” Tulle), cut a piece 11 inches long and tightly tie it around the top section of the box.  Place the chipboard under the knot of the tulle. Your knot should be tight enough that it will hold the chipboard in place.


Up next we have a cute card for the happy couple! Mr. and Mrs. officially, this card is perfect to say congrats!


 Isn't the Ampersand Bling from Basic Grey just ever so delicate and pretty? And check out that homemade flower. Too cute!


Supplies:

Basic Grey: Basic Kraft Paper Pack
     - Paper Line Up Sheet
Tim Holtz Distress Inks: Pumice Stone
Basic Grey: Cappella Ribbon Doilies
Basic Grey: Cappella Stitched Brads

Basic Grey: Rhinestones - Ampersand (Diamond)

Tim Holtz: Advantus Paper Stacks - Shabby Vintage

FISKARS: Border & Corner Punch-Read Between
3” wide Aqua Blue Tulle (any brand)
Bazzill Basics: 12”x12” Cardstock
-        Vanilla
-        Bon Bon
Circuit: Tie the Knot Cartridge
     -     “Mr. and Mrs.” size 2 ½
Quickie Glue pen


Technique Tip:  When creating homemade flowers, be sure to be as creative as you’d like! The more texture you create, the more interest you’ll gather.  For the flower in this project, cut circles out as big as you want, but make sure that the first circle is the biggest as it will be the bottom part of the flower. Once the circles are cut, tear the edges and crumble the circles to give them texture.

INSTRUCTIONS

Step 1: Cut out the 12”x5” base of the card using the Basic Kraft Paper Line Up sheet. Ink the edges of the card with the Pumice Stone Distress Ink. Fold the paper in half to create a 6”x5” card.

Step 2: Within the Shabby Vintage Paper Stack, find a blue floral page and cut out a 6”x3” piece.  Using your Fiskars Border & Corner Punch, punch one of the 6” sides of the paper. Use your Distress Ink again and ink the sides.

Step 3: Cut a 6” strip of the Blue Cappella Doily and glue it to the other 6” side of the Lost & Found piece of paper opposite of the side you punched.  Glue the 6”x3” piece of paper to the bottom of your card. The doily should be in the middle of your card.

Step 4: Using your Tie the Knot Cartridge, take your Bon Bon cardstock and cut out “Mr.” and “Mrs.” in size 2 ½. With your Quickie Glue Pen glue down “Mr.” above the doily and “Mrs.” underneath it. In the space between the Mr. and the Mrs. attach the Basic Grey Ampersand Bling.

Step 5:  To create your flower, cut out 3 circles from another blue floral page within the Shabby Vintage Paper Stack. The size of the flower will depend on how big you make the three circles. You will want one large circle and two smaller circles. For this project Lindsey cut out three circles: 1 ½”, 1”, and ¾”. Once the circles are cut, tear the edges and crumble the circles to give them texture. With your aqua tulle, cut out a circle about 1 ¾”. Place it between the 1 ½” and 1” circles. Next, place the ¾” circle on top of the 1” circle.  Once all the layers are placed, take the brown Cappella Stitched Brad and stick it through all of the layers.

Step 6: Attach the flower to the left side of the Ampersand Bling on top of the doily.  


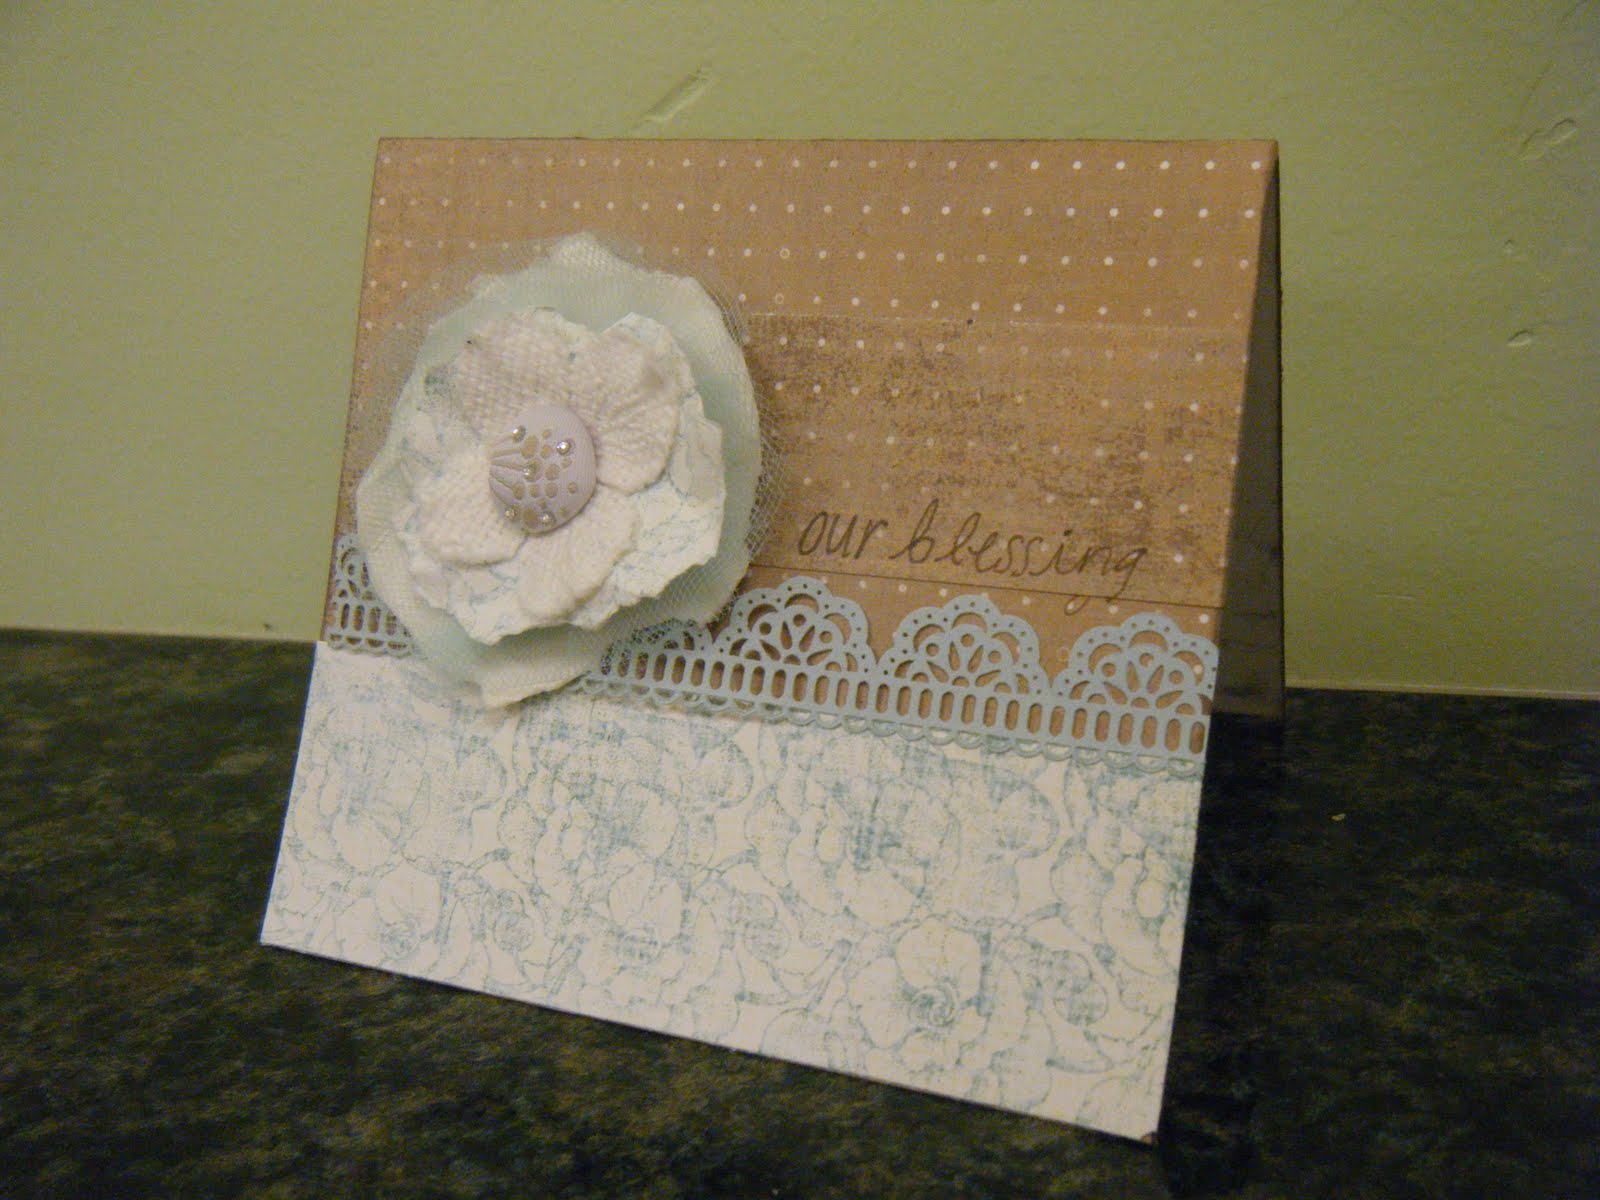
How about another card for the happy couple?  There are just too many great wedding card ideas out there!


OMC loves the Cappella Ribbon Doilies from Basic Grey!  Self-adhesive and simplistic in nature, these ribbons make perfect borders!


Supplies:

Basic Grey: Basic Kraft Paper Pack
      - Paper Line Up Sheet
Tim Holtz Distress Inks: Pumice Stone
Basic Grey: Cappella Ribbon Doilies
Basic Grey: Cappella Stitched Brads
Quickie Glue Pen
3” wide Aqua Blue Tulle (any brand)
Bazzill Basics: 12”x12” Cardstock - Vanilla
Prima Flowers: Lime Green Calcutta Petals
Brown font marker (any brand)


INSTRUCTIONS

Step 1: Cut out the 12”x5” base of the card using the Basic Kraft Paper Line Up sheet. Ink the edges of the card with the Pumice Stone Distress Ink. Fold the paper in half to create a 6”x5” card.

Step 2: Within the Shabby Vintage Paper Stack, find a blue floral page and cut out a 2”x5” piece.  Use your Distress Ink again and ink the sides.

Step 3: Cut a 5” strip of the blue Cappella doily and glue it to the top of your Shabby Vintage piece of paper to create a decorative edge. Glue the 2”x5” piece of paper to the bottom of your card. The doily should be in the middle of your card.

Step 4: To create your flower, cut out 2 circles from another blue floral page within the Shabby Vintage Paper Stack. You will also need a small Calcutta Petal about ¾”, that is mostly white in color. The size of the flower will depend on how big you make the two paper circles. You will want one large circle and one smaller circle. For this project Lindsey cut out two circles: 1 ½” and 1”. Once the circles are cut, tear the edges and crumble the circles to give them texture. With your aqua tulle, cut out a circle about 1 ¾”. Place it between the 1 ½” and 1” circles. Next, place the ¾” Calcutta petal on top of the 1” circle.  Once all the layers are placed, take a cream or white Cappella Stitched Brad and stick it through all of the layers.

Step 5: Take your brown font pen and write “our blessing” above the doily. You can write other sayings as well such as: happy couple, congrats, husband and wife, or just wedding.


Don't worry, we aren't done yet! We have some more fabulous ideas for you, but you'll have to wait until tomorrow for the rest of our project ideas.

Happy Wednesday!

A real love story has no ending

Monday, June 29, 2009

With June nearly over, perhaps we'll start seeing a little wedding hiatus—until August, that is. So clearly the next thing all we wedding planners and wedding goers need to do is get scrappin'!  If you follow our Facebook fan page (which, you should, because we've been introducing some killer contests that can get you some super free stuff), then you already know who won our wedding scrapbook page contest, and that she received the Solutions: Wedding Cricut cartridge. Today it's our pleasure to feature the winner and runner up right here on our blog, and present a couple other great ideas from some of our fav brands!

Winner of the Facebook Wedding Scrapbook Page—Susan


And Sherry was the runner up! Great job ladies!


Here's two cute Bazzill looks:


And Slice knows how to do weddings! Here's three goodies that 
you're sure to love.


This amazing cake page uses the Basic Shapes 2 Design Card:


And this page stunning page uses the Basic Shapes 1 (which is included when you purchase your Slice Machine Starter Kit) and Basic Shapes 2 design cards. And want more? Try the Weddings Design card too!

To have and to hold

Wednesday, May 20, 2009

As the wedding top-dog of the year—June—approaches, many people are hustling and bustling in wedding preparation. Here at Oh My Crafts, we've got several people planning on gettin' hitched this summer. And it seems like almost everyone has wedding festivities to attend very soon. So even if a wedding isn't in the works for you—you're probably still going to need to be prepared for one. Whether it be wedding gifts, cards or tags, you'll want to be ready for celebrating with your friends and family. So get a load of some of these darling ideas to really add that special touch to your gifts.


What a better way to express eternal love than with a clock? This innovative Cricut-created card uses the Graphically Speaking cartridge.


Also cuter than cute—this "happily ever after" Cricut card, created with the Plantin Schoolbook and Storybook cartridges. The happy couple will definitely know you care after they see how much time and love you put into their card.


What a modern and fun look! This card was created Cuttlebug-style with the Man and Woman sign die, and the Alphabet die.


For the elegant and sophisticated look, you simply cannot go wrong with Slice. The wedding design card has every look you need! It's cards like this one that a blushing bride will keep in her wedding memory box for the rest of her life.


If chic is what you're aiming for in a wedding card, take note of this QuicKutz showpiece. With it's retro colors and simple design, this card is sure to be a notable eye-catcher.


Naturally, here we have another Basic Grey masterpiece created with Marrakech.


So you've got your card. Now what about the gift presentation? Craftingly speaking, what's more fun than creating a gift bag? Karen Foster would agree. Hence this little beauty, equipped with a matching tag:


On the big day, it's the nitty-gritty details that count

Thursday, April 23, 2009

Last week we presented some innovative craft ideas for weddings. We focused on novel "guest book" ideas. (To re-read, click here.) However, there's more wedding planning that can be left up to the craftiness of your minds and hands! And really, it's the teeny details that tie your entire wedding together—not to mention give a little relief to your budget. Basically, if you plan carefully and think brilliantly, you can pull off a stunning look throughout the entire reception, and you just might have guests wondering just how much you spent on the whole shabang. It'll be our little secret.

The first thing to pinpoint is how you can dress up the decorations with simple, yet classy crafts. Let's start with the basics.

Flowers


This may sound insane, but the creative crafter can even make stunning paper floral arrangements. We found this paper bouquet on Wedding Bee. Yep, you read it right: bouquets made out of paper. All you need is some good paper (tissue paper is great!) and a good collection of flower die-cuts and you're well on your way. You can even fashion the smell of real flowers with a little spritz of perfume across the paper. Think of the money you can save with that route!

Centerpieces
Other than flowers, what else can you do for your table centerpieces? The options are endless, really. It just takes some creativity. One popular idea in recent years has been using candy for the main focal point on tables.


This chic candy look comes from a blog we found: Little White Book. Instead of (or along with) the sweet sent of flowers...entertain your gifts with the sweet taste of goodies. This can be done quite nice when you choose your candies based off of the colors of your wedding. Then, with just the right ribbon, you've got yourself a beautiful look with a totally new attitude. Check out the ribbon selection at Oh My Crafts!

Here are some more ideas for table decorations:


Embellish your cake table! The craftier the better! This was a look we found on Wedding Bee.

Seating Placards


Make the name tags! These name tags are from Chocolate Mango. You'll have fun doing it too! Oh My Crafts has a wonderful selection of wedding scrapbook paper—and it's on sale today too, in our anticipation for National Scrapbook Day! Also, to help this task, you'll want to check out our Cuttlebug embossing folders and dies. We've also got the perfect assortment of embellishments to get the job done.


Now this is fancy! These seating arrangements, which we found on Project Wedding, are designated with an etched mirror! This could be a fun idea if you are hosting a smaller, more intimate luncheon or dinner for perhaps an exclusive group of people (like the fam). Oh, and vinyl could work just wonderfully!

Here are some more thoughts on ways to take your wedding up a notch or two with beautiful crafted, home made items. Remember, it's the detail that makes all the difference!


A unique look from Wedding Bee.


Here's an idea! Get crafty with your reception programs! These beautiful programs come from Project Wedding.


This amazing picture comes from the Next Exit Photography site. It's a good idea to identify certain foods or drinks. AND another way to tie in the look of your wedding with a crafty and sophisticated touch.


Cupcakes are BIG these days. And with the Sizzix cupcake holders, you've got yourself a darling look.


Here are some beautiful embellishments for candles—all made with the Cricut Tags, Bags, Boxes & More cartridge!

When choosing your own decorations and adornments, the look is solely up to you. And since there are infinite amounts of color and paper and design opportunities, your wedding reception will be irreplaceably one-of-a-kind. So get your bridesmaids together, pull out that crafting paper and let the creativity run wild!

Stay tuned for tips on party favors, cards, invitations and more!

Crafty wedding tips that will have you saying "I do"

Friday, April 17, 2009

As summer quickly approaches, love seems to be wafting through the air thicker and thicker these days. Oh My Crafts! is happy to present some of the hottest crafting ideas in homemade decorations and details that will indeed make a wedding the happiest day of a woman's life.

A few years ago, a homemade wedding might have denoted cheap balloon towers and cheesy lace doilies donning pastel wedding mints. The mere idea of it was a bride-on-a-budget's worst nightmare. However, in recent years, modern technology has merged with the crafting lifestyle and revolutionized how the world views crafting. Suddenly, with nifty little tools and devices that the crafting world has to offer, homemade isn't so lame anymore. It's just the opposite.

One of the reasons homemade wedding creations seem to be quite so popular as of late is because they offer uniqueness to weddings and receptions that isn't traditionally seen? Who wants a wedding that looks just like the Jones'? With a crafty wedding, innovative ideas and elegant styles are at a bride's bestowal, and it can even save a few Benjamins.

So here's a suggestion that can give flair to your event and relief to your bank account: put your crafty mind to use before heading out to the wedding planner and meeting your checkbook's demise.

Now, it's not like we're suggesting you go out and sew your own gown, bake your own 7-tier cake or construct the glittering gazebo that houses the cake. Unless you happen to be or know a professional, it is highly recommended that you stay away from the homemade realm for these details. However, homemade crafts can really help to glitz up the little details of wedding decor, whether it be favors for guests, table design, thank you cards, or anything in between.

For the next few weeks, we'll be presenting a few concepts that seem to have taken fire amongst wedding-ers.

The Guest Book
The "guest book" has evolved considerably in the last decade or so. Anything goes when keeping record of the visitors at your reception. Here are some fun ideas we've seen that are unique, chic, and basically homemade.


Set out a platterWith an etched or vinyl-applied print of the two love-birds' names, date, etc. in the middle, set out a nice big serving platter for everyone to leave their names and well wishes. This way, you'll be able to remember everyone who attended your wedding every time you have Thanksgiving. Be sure to use a pen that won't fade after washing.


Sign the ceramics—Similar to the platter, some couples opt to set out ceramic pottery—like a vase—with their names engraved or vinyl-printed with their names for friends to sing. It is recommended that you don't put real flowers in the vase until after the occasion. (Do it Yourself Weddings.)


Picture frame to capture it all—This idea is relatively simple to create. You'll need a large amount of matting for guests to sign. Should you choose this route, it is suggested to have a small 4x6 picture in the middle of a 16x20 or larger matted frame.  A variation from this is to use a mirror instead of matting. From there, you can be as crafty as you'd like with your frame. Decorate away.


An aproned well-wishing—Another quirky proposal for guests to sign while at the reception is two aprons—his and hers, if you will. Many crafters own their own clothing-printing machine, a Yudu, and they can print names, designs, etc. fairly easily onto the top portion of the apron. The rest of the "design" is up to the guests. (Do It Yourself Weddings.)


Okay...the initial, fundamental guest book—Despite all these new ideas, there is still nothing wrong with using what has always worked in the past—the original guest book. However, there's no need to buy a book at a posh, over-the-top wedding or publishing store. Make one! Scrapbook (both by hand or digital look great!) a few pages of you and your sweetheart and then bind it. Binding options can vary—from interwoven lace to YourStory. YourStory is a recent innovative tool in the crafting industry that is specifically for personalized books with a professional look (also a great tool for after-wedding memories). One thing to remember when creating your book is to leave space for people to leave their remarks. unless you don't mind having writing across your faces.

Basically, each option brings a fresh perspective to the guest sign-in table.  Want to see more creativity? Click here.

Stay tuned for more unique and chic crafty wedding ideas!

P.S........................... 


Have you heard about our pre-cut Oh My Vinyl? That's right, enhancing your home and accessories with classy vinyl decor has never been easier—because we've already taken care of the hard part! We've got tons of phrases and designs to choose from. However, if we don't have quite what you're looking for, we've got a huge collection of colored Oh My Vinyl sheets


LinkWithin

Related Posts with Thumbnails