Baby Boy Doodlebug Layout

Thursday, June 30, 2011

Baby Boy Doodlebug Layout by OMC designer Lindsey!


Supplies Used:


Doodlebug : Let's Kit Together - Baby Boy

Lifestyle Crafts : Fresh Start Alphabet Cutting Dies - Carousel
Bazzill Basics : Brown Cardstock
Tim Holtz : Distress Ink Pad - Brushed Corduroy
Martha Stewart Punch : Bubble Bath


Instructions:


1. Cut a mat of brown cardstock 9" x 6". Also cut a pale green paper 8¾" x 5¾"  and a pale blue checker paper 8½" x 5½". Layer the three papers and glue together to create your photo mat.

2. Cut a strip of the pale green paper 9” x 2" and use the Martha Stewart punch on one of the 9" sides. Glue the paper  under left side of photo mat with the punched side exposed.
3. Cut a square of the pale green paper 3" x 3", punch the right side, and glue down under photo mat on bottom right side.
4. Attach the sail boat and bottle stickers to brown cardstock and cut them out leaving a small border of brown around the edges. Attach the sail boat and bottle to the bottom corner of the picture mat.


5. Using the Lifestyle Crafts alphabet cutting dies, cut “Baby Boy” out in white cardstock. Ink the edges using the Tim Holtz ink pad.
Attach the letters to the right side of the photo mat above the 3" x 3" pale green square.


TIP: When doing baby layouts, simple is sometimes better!


Happy crafting!

Happy Birthday Contest WINNERS!

Wednesday, June 29, 2011

Thanks to everyone who participated in our Happy Birthday Contest! Our three winners are:

Mommamea's favorite things!
I rock is a for sure and Birthday bash cricut cartridge. Some pretty papers (i’m addicted to paper). I seem to fall into the never have enough paper. Thanks I love your site. I only shop at like 3 or 4 out of all the sites online and your in that group. I always tell my friends to check out your specials.

GERI!

Well, I would need Bling, Prima Flowers, And Pretty Flowerie (is that even a word?? LOL). I wouldn't stop at 3 items though, Thanks for the chance to win.....

Julie S!

I would use some 'core creations card stock' that I ordered from you this morning. probably some October Afternoon patterned paper and lots of bling. I am a card maker...and love to make cards for friends and family. I would also do some heat embossing..love the look.

Winners, please send your shipping information to contest@ohmycrafts.com to claim your prize.


Happy crafting!

Who Doesn't Love Cupcakes?

Everyone loves cupcakes and these cute little patriotic flags complete the yummy frosting on top! All you need are some patriotic papers, toothpicks and glue to make your cupcakes be the talk of the BBQ!


Supplies Used:


We R Memory Keepers : Yankee Doodles Scrapbook Pad

Oh My Crafts : Acid Free Craft Tape ¼ inch
Jenni Bowlin : Spice Tin Ink
Diamond : Bamboo Forks (by regular toothpicks)


Optional Supplies:


EK Success Punches :
Dotted Wave, Ziz Zag Stitch
Tsukineko : Versamark Dazzle Watermark Ink

American Crafts : Zing Embossing Powder - Glitter Finish - Red, Black / Metallic Finish - Teal, Silver
Stampendous : Patriotic Pair Stamp Set
Marvy : Heat Emboss tool


4th of July Cupcake Flags:

1. Cut a strip of printed-paper 1½ x 2⅜ inches. Repeat for number of flags needed.

2. Cut stars and other shapes from paper in the kit to embellish flags. Stickers can also be used to spell out phrases.
3. Ink edges of flag with matching ink to cover white core.
4. Wrap one end of flag around the top of the bamboo fork to make creases*.
5. Cut two strips of craft tape about 1¼ inch an place next to edge and then just a space apart. (See photo)
6. Place stick on outer strip of adhesive and roll on to the other adhesive strip.
7. Place in cupcake and enjoy!


Optional Embellishments:


1. Stamp design on flag with Versamark ink.
2. Sprinkle liberally with Zing powder. Shake off excess powder into creased paper and pour back into bottle. Flick back of flag to remove any remaining powder.
3. Use heat emboss tool to activate powder and give raised image.


TIP: Creasing the flag around the fork before applying adhesive will help to insure the flag goes on straight.


Happy crafting!


Happy Birthday Contest Time!

Monday, June 27, 2011

Time to win something cool from ohmycrafts! Tell us what products from Oh My Crafts you would use make a birthday gift or card. Embellish a little bit :)  Three lucky winners will be selected to win randomly a little goodie bag from Oh My Crafts. Winners will be announced this Wednesday. 

Thanks for being a fan on our Facebook page! Also join us on Twitter and in case you haven't all ready joined check out our new  Pinterest page!

This Card Designed by Lindsey using Jenni Bowlin Buttons, Bazzill paper, We R Memory Keepers Sew Easy

It's All About Framing

Looking for a way to upgrade those old frames you have lying around? Try these two fun techniques to help spice them up!

Accented Whit
e & Grey Frame 


Supplies Used:

Twelve Timbers : 13"x15" Unfinished Frame
Oh My Vinyl : Cloud White
Foam Paint Brush  

X-acto knife
Oh My Crafts : My Color Acrylic Paint : Cloudburst
Cricut Cartridge : Paper Lace 

Bazzill Basics Cardstock : African Daisy


Instructions:

1. Using the acrylic paint and a foam paint brush, paint the frame (use two solid coats for best result).
2. Cut out accents using the Paper Lace cartridge with the white vinyl (size 3 ¾" and 4”). Once the paint on the frame is dry attach the accents to the frame using transfer tape. Where the accents meet the edge of the frame use the X-acto knife to cut off the extra. 

3. Cut the Bazzill cardstock to fit in the window of the frame. Attach it to the frame back.  
4. To complete the frame, attach a photo in the center, vinyl a favorite phrase, or do both!

Tips:


1. Try attaching the extra pieces of the accent that you cut off on other areas of the frame.
2. Cut out the accents in several different sizes to help create visual interest.


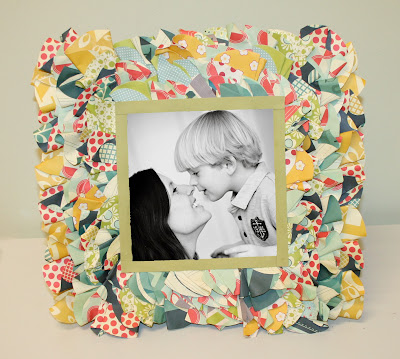
Circle Social Club Frame 


Supplies Used:

Cosmo Cricket : Social Club Paper Crafting Kit

Tim Holtz : Tiny Attacher
Tim Holtz : Mini Mister
Petersen-Arne : Craft Peddlers Paper Mache Frame - Craft 8"x8" Photo
Jenni Bowlin : Acrylic Paint Dabbers - Stick Candy 

Tombow : Mono Multi Liquid Glue

Instructions:


1. Choose six 12"x12" prints out of the Social Club kit and cut out as many 4" circles as you can.

2. Once all the circles are cut spray them with water using the Mini Mister. While the paper is wet fold it in half, then fold in half again, twisting the second fold. Staple the pointed edge of the paper using the Tiny Attacher and let the paper dry.
3. Using the Tombow glue attach all the circles to the top of the frame in layered rows starting along the outside edge.
4. Cut four ½” strips and glue them along the edge surrounding the center of the frame. This should cover the staples on the last row of folded papers.
5. Add a picture and you're done!

Tips: 

1. You'll want to do this project near a sink as you will be filling up the Mini Mister A LOT!
2. Don’t worry about cutting out perfect circles - the faster you can cut them the easier the project will be.


Happy crafting!

Traveling Contest WINNERS!

Friday, June 24, 2011

There are some awesome traveling adventures going on this summer! Thanks to everyone who shared their summer plans with us.


The six winners of this contest are:

1. Shannen!
Summer holiday? We absolutely love ROTTNEST ISLAND, off the coast of Western Australia... If ever you get the chance, make sure you head there. We go for a week and experience beautiful beaches, bikeriding for the whole family, cute little quokkas (not found anywhere else in the world) and of course it wouldn't be an Aussie Summer without a BBQ for dinner each night! Too gorgeous to fully describe, best I go scrap some pages about it!! Thanks for the chance!

2. Denise!
I'm going to take my best friend to see Mount Rushmore and the Black Hills of South Dakota. I used to live in that area and she's never seen the monument. I'm really looking forward to the scenic drive through Custer State Park, too!

3. acopisshe!
This summer after my son gets out of Scout camp we are traveling from Fort Dix, NJ to Destin Florida to meet my Dad & Brother and fish a few days. Then back to their house in North Mississippi. Hoping to stop over for a day in Gatlinburg TN on our drive back to New Jersey. It will be our first vacation since my husband and I were married 4 years ago. Hope he gets leave!!!!

4. kimt816!
It has been a busy spring / summer so far, we have been to the beach twice, I have been to Sedona Arizona and visited the grand canyon in a plane tour and a helicopter plus took a pink jeep tour all around the Arizona canyons and got to eat on the rim got some great photos to scrap so far this year cant wait til the next one in august going to smith mnt lake with friends.

5. Joanne!
We will be travelling from Ontario, Canada to Mercer, Pennsylvannia next weekend for 5 days. We have a 5th wheel trailer so will be staying at a campground. Looking forward to this as we weren't able to get out in the trailer this past year. Just have been soo busy with many things. Look forward to a break....

6. Johnson Academy Momma!
We tend to like to vacation in the off season so we did our beachtime early in april and will do our Disney time in september! In the meantime, we do a lot of trips to the zoo and aquariums because my daughter is in love with animals and dolphins! We also do nature walks and hikes and truly enjoy our surroundings in our resident state. It's fun to just have a mid-summer stay-cation!


Winners, please send your shipping information to contest@ohmycrafts.com to claim your prize.


Have a great weekend everyone and happy crafting!

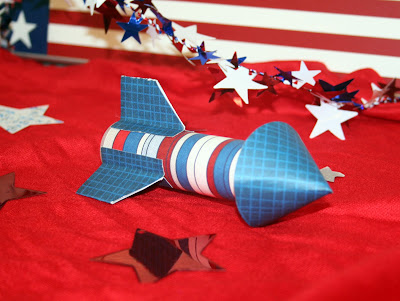
Alka-Seltzer Rockets!

Thursday, June 23, 2011

Alka-Seltzer Rockets Created by OMC designer Whitney

A great project for kids!


Supplies Used:


We R Memory Keepers : Yankee Doodles 12x12 Scrapbook Pad 
Oh My Crafts : Exclusive OMC Acid Free Craft Tape - ¼” x 5 yards 
Alka-Seltzer Rocket Template (Available below)
Pencil 
Film Canister 

Alka-Seltzer Tablet 
Water


Instructions:

1. Cut out images from the Rocket Template.
2. Use templates to trace, cut, and fold onto patterned paper.
     a. Cut the solid lines and fold the dashed lines.
3. Adhere the square to the film canister with craft tape, wrapping it around the canister entirely. It will be taller than the film canister.
4. Adhere the 3 rocket fins to the bottom of the rocket.


5. With the circle, roll into a point by overlapping the two sides next to the slit. Adhere to the top of the rocket.


6. Now it’s time to prepare for take-off!

     a. Fill the canister half-way with water.
     b. Add half a tablet of alka-seltzer and quickly place the cap on.
     c. Stand back and enjoy the surprise take-off.

Note: It is recommended to do this outside with adult supervision.


Here is the template for the rockets. To open, click on the image and it should enlarge. Print the template on white cardstock. If the template does not enlarge or does not print to the correct size, you can email contest@ohmycrafts with "Rocket Template Request" as your subject line to request a PDF version of the rocket template.


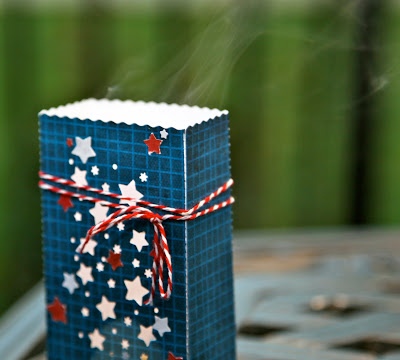
Luminaries Created by OMC designer Whitney


Supplies Used:
 

Lifestyle Crafts : Yearbook - Paper Bag and Embossing Machine to cut 
We R Memory Keepers : Yankee Doodles 12x12 Scrapbook Pad 
Oh My Crafts : Exclusive OMC Acid Free Craft Tape - ¼”x 5 yards 
Martha Stewart : Punch All Over the Page (Any punch would work such as Star or Starry Sky) 
Embellishments : Doodlebug Ribbon Packs- Primary, Tattered Angels Glitter Spray, Stickles, Rub-ons, thread, etc... 
Small LED Candle Lights


Instructions:

1. Die cut paper bag with patterned paper.
     a. Lifestyle Crafts products work with most major embossing machines such as Cuttlebug, Big Shot, Vagabond, Grand Caliber, and Epic 6.
2. Before adhering the bag together, punch out an image using the Martha Stewart: All Over the Page punch. This image will provide a hole for the light to shine through.
3. Adhere Paper Bag together with craft tape.
4. Add any type of embellishments such as ribbon, Glitter Spray, stickles (takes time to dry), buttons, etc…
5. Finish by placing a LED light inside the bag and enjoying the great night time decoration or party favor.


Happy crafting!

It's Time for a Traveling Contest!


For this contest we want to hear all about your summer travels! Where have you gone or where are you going? Leave us a comment on this post about your summer vacation plans for a chance to win! Six winners will be chosen and announced on Friday to win a fun Traveling Goodie Bag from OMC!


Good luck, safe traveling, and happy crafting!

Chalking it Up!

Wednesday, June 22, 2011

Looking for a cute homemade chore list? Or perhaps a memo board for your kids? Trying creating these adorable Chalk Plates!


Supplies Used:
Oh My Crafts Vinyl : Chalk Board and White Vinyl
Adams & Co: Metal embossed tile – lime green and hot pink
Cricut Cartridge : Alphalicious Cartridge
Chalk
Ribbon


Instructions:

1. Cut a piece of chalk board vinyl 6"×6" and place it in the center of the tile.
2. Using the Cloud White vinyl and the Alphalicious Cartridge, cut out your saying (size 3/4) and stick to chalk board vinyl (pressure low and blade 4).
3. Cut a piece of ribbon 12" and tie one end to the wire on the back of the tile. On the other end of the ribbon tie on your piece of chalk


Happy crafting!

Disney’s Pixar CARS Party

Tuesday, June 21, 2011

Disney’s Pixar CARS Party Created by OMC designer Whitney!


Excited for Cars 2 to hit theaters at the end of the month? (June 24th to be exact!) Throw a Cars 2 release party by inviting friends and family over to watch Cars 1 before the big premier. Make your own party décor with the Cars Cricut Cartridge!


Supplies Used:

Cricut Cartridge: Cars
Oh My Crafts Vinyl : Assorted Colors

Sizzix : Bigz Pro Die - Box, Popcorn #2
Napco : Set of 2 Planter (Yellow and White)


Wall Decor


Start by cutting out backgrounds for each image in black and then cut out the features with the appropriate colors. Use transfer tape to assist in putting the large pieces of vinyl on the background but for the small pieces, you should be fine without it. The black background should have cuts that help when layering the vinyl.

All of the vinyl was cut at blade setting 5, Medium depth, and fast speed.

Image from Cars Cartridge
Vinyl Colors
Size
"The World of Cars" Sign
Ebony, Cherry Red and Cloud White
11 1/2"
Mater
Ebony, Cloud White, Walnut, Peanut Butter, Elephant Grey, Stormy Grey, Celadon, Metallic Copper
11 1/2"
Lightning McQueen
Ebony, Cherry Red, Cloud White, Lemon drop, Persimmon, Walnut, Admiral Blue
8"

Many of the cars will not cut larger than 11 1/2"; however, this Lightning McQueen will cut very large (note that this car cut at 8”).


Popcorn Boxes


This is an easy to assemble popcorn box that you can customize with more Cars images or sayings. Simply die cut the boxes with the Big Shot Pro machine and assemble. Use Oh My Crafts Exclusive Acid Free Craft Tape ½”x5 feet for a strong hold. Adhere a Cars emblem to the box in vinyl. Line the boxes with a plastic bag (found at general party stores) and fill with popcorn or goodies.


Soda Holders


Buy these cute Napco Planters and use them as picnic baskets, flower pots, or as seen here - drink holders!


Happy crafting!

Father's Day Contest WINNERS!

Monday, June 20, 2011

We hope you all had a fabulous Father's Day this past weekend! There are some pretty amazing dads out there to be sure.


Here are the three winners of our Father's Day Contest:
 
Denise!

Oh my goodness...this is such a good picture of my dad and me!! I loved looking through the old photos on my computer and was extra happy to find this one. My dad is really, truly amazing. He's one of those guys that can fix anything, make anything, do anything. I can't even count the times that I've said, "It's okay, my dad can fix it." Or, "I'll ask Dad, he'll know exactly what it needs." Oh and you should hear how he raves about the cards I make him. Even weeks later, he'll say, "I just wanted to thank you again for that card; it is really something." I love him to pieces! He's the most supportive dad and grandpa EVER!!!


Cherie Goyer!

My dad is the best! He has always been there for me. Father's Day
weekend is a very special time for us. I have only missed this weekend three times in my life (and once I was out of the country). My dad is no doubt a Minnesotan. He loves to fish, hunt, and he loves his car. I grew up around cars. My dad is a mechanic so it only makes sense too. Since I was little, I would play in the garage with him. We took apart cars together, once I even got to take apart part of one by myself, I'd help him when he needed an extra hand, and I helped him restore a 1959 El Camino. This weekend is the big car show in Minnesota. All weekend long, I would go all weekend with him. Sunday morning we would wake up extra early and go to a swap meet. It is our tradition, whether he needs parts or not, just me and him. He taught me a lot about cars, I even surprise my husband every now and then with things I know. I can go to my dad for anything. He has a heart of gold. Currently, I live 1700 miles from home, so getting home isn't easy. But when I call, or skype, the excitement on his face or in his voice shows. I know my dad is proud of me no matter what. I have many great memories that I hold near and dear to my heart, and I hope to have many more in the future. He is the best dad ever, just ask my older brothers, I am sure they would agree too!

I had to add a picture of me helping my dad restore his car. (so that is what the second pic is of)


Holly Connors!
 

My dad has always been there for me no matter what the situation. He is the ultimate handy man, which is especially useful since my husband isn’t. He never yells and always understands and there has never been a single thing about my Dad not to love. There is no doubt that he is the best Dad ever! This photo was taken on my wedding day last year and I love it since there are not a lot of photos of me and dad, so it’s really special.


Congrats winners and enjoy your OMC goodie bags!


Happy crafting!


Best Friends Day - ATC USTREAM Class

Artist Trading Cards (known as ATC cards) are miniature works of art made on a 2 ½” x 3 ½” card for the purpose of swapping with friends. They can be made using any technique. Sign your name on the back and swap at a Trading Session with friends. Display the cards you collect on 7Gypsies ATC & Photo Display.


Amy’s ATC Card


Supplies Used:

Sizzix : Movers & Shapers Die - ATC & Corners by Tim Holtz
Bazzill Basics : Cardstock - Purple
Fancy Pants : Lilac House
Martha Stewart Punch
Pink By Design Stamp
Mark Richards : Crystal Stickers: Borders - Clear Leaves Rhinestones
Copic Markers

Instructions:
 

1. Die cut ATC & Corners out of Bazzill paper.  
2. Cut 2”x2 ½” of purple paper from Lilac House and punch both sides with Martha Stewart Punch.  
3. Cut a 1 ½”x2 ½” of white paper and stamp sentiment on it.  
4. Adhere rhinestones to corners of white paper and adhere to center of card.
 

TIP: Change the color of your clear rhinestones by coloring them with Copic Markers.


Whitney’s ATC Card


Supplies Used:

Inkssentials Surfaces : Manila Cardstock 12”x12”
Scrap patterned paper
Sizzix : Movers & Shapers Die - ATC & Corners by Tim Holtz
Lifestyle Crafts : Fresh Start Cutting Dies - Spray
Doodlebug : Doodlebug - ABC’s & 123’s + Free ETC’s – Grasshopper and Bumblebee
Doodlebug : Ribbon Packs - Citrus
Tsukineko : Versamark Dazzle Ink Pad
Melt Art : Ultra Thick Embossing Enamel
Tattered Angles : Glimmer Mist - Yellow Daisy and Meadow Green
Tim Holtz : Stampers Anonymous - Tiny Textures


Instructions:
 

1. Die cut ATC & Corners out of manila cardstock. Stamp ATC card with Tiny Textures dots and Versafine Watermark Ink pad. Sprinkle Embossing Enamel on wet ink and heat emboss.  
2. Spray card with Tattered Angels over the embossing enamel.  

TIP: Note how the spray doesn’t stick to the embossing enamel. This is a great “resist” technique because the color is repelled by the embossing enamel.
 

3. Adhere a 1 ½”x 2 ½” strip of patterned paper at the top of the ATC card.  
4. Adhere a 2 ½” Doodlebug ribbon to the bottom of the patterned paper. 
5. Die cut two spray flowers out of patterned paper and adhere to ribbon. Curl the flower petals upward.  
6. Tie a bow with string on Doodlebug Ribbon. Adhere button to the flower.  

7. Adhere “friend” to bottom of card.

Feel free to watch the USTREAM video of Whitney and Amy making these adorable cards by clicking HERE!


Happy crafting!

4th of July Cupcake Display!

Friday, June 17, 2011

4th of July Cupcake Holder Created by OMC Designer Whitney!


Supplies Used:
 

Two boxes : 16x16x6 and 10x10x6 
K&Company : Americana 12x12 Specialty Paper Pad 
Ribbon or Trim


Instructions:

1. Find two boxes that are about the same height but one should have a larger base than the other.
2. Cover the sides of one box with patterned paper. You will need two sheets of the same patterned paper.
3. For the top of the box, cover with a different patterned paper. If there is not enough paper to cover the entire top, only cover the edges that will be showing.
4. Again, cover the sides and top for the smaller box.
5. Add trim and ribbon to the sides of the box. Fabri-tac or hot glue works great. The ribbon hides any imperfections of the paper hanging off the edges a little.
6. Stack the smaller box on top of the bigger box and place cupcakes around the edges.


Happy crafting!

Happy 4th Banner

Happy 4th of July Banner by OMC designer Machelle!


Supplies Used:

 
Doodlebug : Let’s Kit Together - Uncle Sam
Ranger Ink : Stickles Glitter Glue - Red, Denim, Pearl
Cricut : Expression Machine
Cricut Cartridge : Plantin Schoolbook
Oh My Crafts Vinyl : Ladybug Red, White, Admiral Blue
White ¼ ribbon (not included in paper kit)
Twine or thread (not included in paper kit)


Instructions: 

1. Cut printed paper: sew American, Starts stripes and Yankee doodles, into eight pieces 3"x12". Fold pieces back and forth accordion style and then fold in half and attach end together as shown to form a circle.

2. Cut eight 2 ½" circles using Plantin Schoolbook cartridge, from cardstock in Doodlebug kit.

3. Using Oh My Crafts Vinyl cut out the phrase "July 4th" in size 1 ¼" from the Plantin Schoolbook cartridge using the shadow mode.

4. Attach 2 ½" circles to folded printed circles.

5. Attach vinyl letters to circles.

6. Using polka dot organdy ribbon cut length you desire to hang your banner.

7. Punch holes in each folded circle and cut white ribbon and thread through each hole. Tie ends and then tie ends to polka dot organdy ribbon.

8. Cut eight 3" pieces of gingham ribbon and tie in knot to top of white ribbon where it is tied to polka dot ribbon as shown.

9. Attach star buttons from kit by threading twine or thread through holes in buttons and then tie to polka dot ribbon as shown.

10. Use the Stickles glitter glue to make dots around the circles with the letters "July 4th".


Happy crafting!

LinkWithin

Related Posts with Thumbnails