Pin It To Win It Contest!

Wednesday, January 25, 2012

We're having another PINTEREST contest!
How To Enter:
To enter this contest go to our OMC Pinterest Page and find the Pin It To Win It Pinboard. Pin the product within the category that you would like to win! One lucky person will be chosen to receive the product they've pinned!

The winner will be announced on Thursday, January 26th.

Contest Starts: January 25th @ 12:01 am
Contest Ends: January 25th @ 11:59 pm


Good luck and happy crafting!

Elizabeth Layout

Monday, January 23, 2012

Elizabeth Layout
Created by OMC Designer Lindsey

The techniques taught in this layout are layering patterned paper, detail and shapes.

Supplies Used:

BasicGrey : Picadilly Collection Pack
Tim Holtz : Distress Ink Pad - Walnut Stain
Sizzix : Moves & Shapers Die - Styled Labels by Tim Holtz
Martha Stewart : Punch Around the Page - Vintage Flowers
Martha Stewart : Punch All Over the Page - Flourish Square
Glossy Accents
Doodlebug : Chunky Brads - Red
Prima : Flower Embellishment
BasicGrey : Picadilly Wood Button
Bazzill Cardstock : 12x12 Classic Orange
Sizzix : eclips Cartridge - Bang! Zoom! and Yarn Alphabet
We R Memory Keepers : Sew Ribbon Punch & Stencil - Shoe Lace
We R Memory Keepers : Sew Ribbon Set - Orange

Instructions:

1. Select a piece of patterned paper from the Picadilly collection to be the base of your layout page and ink the edges with the Walnut Stain ink pad. Cut a strip of patterned paper 3" x 12" and ink the edges. Using the Flourish Square punch, punch out an accent in the top of the 3" x 12" strip. Ink the edges of the cut out. Adhere the strip to the left side of the paper.  

2. Cut out letters for name using the eclips cartridge and another patterned page from the Picadilly collection (for this project we used the name "Elizabeth"). Ink the edges. The papers are busy, but the focus of the layout isn’t the name or the heading. Once all the letters are inked, adhere them to the top of the paper.
3. Cut out a 5" x 7" piece of paper and ink edges. Using different patterned paper, cut out three labels using the Tim Holtz die. Ink all of the edges. Adhere the cutouts to the layout with the 5" x 7" piece in the center and the three labels to the right.

4. Use the Sew Ribbon Shoelace tool to cut the pattern out along the botton. Lace the orange ribbon through the holes.  

5. Adhere a picture to the 5" x 7" piece of paper.  
6. Add embellishments such as Prima flowers, buttons, etc.
7. Add glossy accents over the letters of the name and lay flat to dry.

Happy crafting!


LOVE Doodlebug Frame

Friday, January 20, 2012

LOVE Doodlebug Frame
Created by OMC Designer Lindsey

Supplies Used:

White Frame
Sizzix : eclips Cartridge - Starter and Rockin' Janie
Bazzill Basics : 12" x 12" Cardstock - White, Pink, Black
Doodlebug : Sweet Love Paper Pack
Oh My Vinyl : Ebony
Doodlebug : Sweet Cakes Clear Stamps - Sweet Cakes
Doodlebug : Doodle Twine
Doodlebug : Glitter
Tim Holtz : Distress Ink Pad - Black Soot
 
Glossy Accents

Instructions:

1. Cut the Pink Bazzill cardstock to fit inside the frame.
2. Using the eclips cartridge, cut
out the phrase, "youre my sweet heart" in the desired size. For this project the letters were cut out in 1.00.
3. Using scissors, cut out 17 triangles to create the banner pieces. Cut them shorter or longer depending on the size of the letter. Ink the edges of each banner piece with the Black Soot ink pad. Attach the phrase to the banner pieces.

4. Cut three pieces of Doodlebug twine to string across the frame. Tie bows on each of the ends and attach to the pink cardstock as seen in the picture above. Attach "youre my" to the first piece of twine, "sweet" to the second, and "heart" to the third.
5. Take a piece of white Bazzill cardstock and stamp the cupcakes and stands from the Sweet Cakes stamp set. Cover the tops of the cupcakes (think frosting!) with Glossy Accents and sprinkle pink glitter while it is still wet. Allow to dry then attach to either side of the "heart" phrase.


6. Cut out the word "LOVE" to size and set aside the "O". Cut out a heart shape to size to use instead of the "O". Using any glue adhesive, paint over each of the letters and sprinkle black glitter onto the glue. Allow to dry, then attach to the pink cardstock.  

Happy crafting!


Youtube How-To Contest

Wednesday, January 18, 2012

We're having a YOUTUBE contest!
How To Enter:
Go to our Youtube Channel, subscribe, and find the video called "Imaginisce i-rock Tool." After watching the video, leave us a comment about why you liked the video tutorial! One lucky person will be selected to win the amazing i-rock bundle below!

Contest Starts: January 18th, 2012
Contest Ends: January 19ths, 2012

Good luck and happy crafting!

Top 10 Reasons to Love Mister Huey's

Tuesday, January 17, 2012

The Top 10 Reasons to Love Mister Huey's Color Mists
By Maggie Holmes

1. Mix a little Mister Huey with white paint, it makes an amazing chalk effect.
Tip: You can literally create your own custom paint colors by adding the spray ink to white paint and mixing it up.

2. The precious bottles look adorably handsome all lined up for display.
3. Clean up is easy with a baby wipe or warm soap & water.
4. Stamping with Mister Huey gives a whole new life to your stamps or masks.
Tip: You can apply Mister Huey to foam stamps with a brush or you can also use the Studio Calico masks as stamps like I did here. I sprayed the mask with the ink, then lifted it carefully up, turned it over and pressed it down onto my page to create this stamped look. It is best if you spray a lot of ink onto the mask.

5. Mister Huey's ink based mist does not warp paper and does not clog.
6. Grab a border punch or even alphabet stickers to create a mask then spray with Mister Huey mist for an awesome effect.

7. Mister Huey Stretches all of your supplies by making them the colors you want!
Tip: You can spray the ink on our plain wood veneer pieces to turn them any color you want. You can also alter the color of other products like stickers and alphabets to get a custom color that works perfectly on your layout!

8. Add a subtle touch of bling to any project with a little Mister Huey Shine.
9. A few squirts can dye neutral color fabric to coordinate with any project.
Tip: You can die fabric, ribbon, trims, etc. To speed up the drying time use a heat gun. 


10. Mister Huey takes the guess work out of choosing a color - the color of the label is always the exact color of the mist!

Happy crafting!

My {re}Purposed Life and Oh My Crafts Vinyl

Monday, January 16, 2012

We recently contacted Gail over at My {re}Purposed Life to see if she would give a review on our Oh My Crafts Vinyl. We're happy to say that she accepted and we want to share her thoughts on OMC Vinyl as well as some of her project ideas!

The first project we want to feature is Gail's mirror that she vinyled using Grape Vinyl. She wrote out a phrase, cut it out, and used transfer tape to apply the Vinyl to her mirror.

Gail noted that she first place all the words around the mirror to make sure that the phrase would fit nicely.

Take a look at the finished product! What a great way to add a little something extra to object you already own.

Here is another quick and easy project. Gail wanted to give her phone a little something extra, so she used Turquoise Blue Vinyl to create a Damask for the back cover! Vinyl is a great way to add a personal touch!

The next project she completed was this repurposed cupboard door. Gail designed and cut these designs out using her Cameo. She used Cherry Red, Kelly Green, and Lemon Drop Vinyl!

Another holiday project Gail created was this wood board with Vinyl. She used Cloud White Vinyl and her Silhouette to cut out the image. Once attached to her green board, she covered the entire thing with DecoArt Glamour Dust. The glitter sticks to the vinyl as well as the background which really makes the whole project pop!

Gail used Emerald Green Flake Vinyl for this last project. She downloaded this image off the Silhouette as well. It makes a great piece of home decor for the holidays.
 

We want to send our thanks to Gail for sharing her review and her projects with us!

Here are the links for Gail's original posts:

More Christmas Vinyl with DecoArt & Cameo

Happy crafting!


Valentines Mini Book

Saturday, January 14, 2012

Valentines Mini Book
Created by OMC Designer Lindsey

Supplies Used:
Lifestyle Crafts : Yearbook Collection - Folder with Insert
Echo Park : Yours Truly Collection Kit
Echo Park : Yours Truly Element Stickers
Echo Park : Yours Truly Alphabet Stickers
Tim Holtz : Distress Ink Pad – Black Soot
We R Memory Keepers : Sew Easy Fancy Floss Bakers Twine - Neutrals
EKSuccess : Heart Layering Punch
Oh My Vinyl : Ebony
3L Foam Squares - White
Black Glitter

Instructions:

1. Select the prints you like out of the Yours Truly Collection Kit, cut them out with the Lifestyle Crafts die. Assemble the folders and ink the edges with the Black Soot ink pad.
2. Cut the Ebony vinyl ½" wide and to the length of the pages. Attach to the binding of each folder. This will reinforce the edges of the pages. The edging also adds a polished look to your project, giving it the look of an old fashioned composition notebook. Use a hole punch tool such as the Crop-A-Dile and punch two holes in each folder and insert. String a piece of grey twine through the holes and tie together to bind the mini book together.  

3. Add stickers and embellishments from the Yours Truly Collection to each of the pages as desired. Try using the 3L Foam Squares to enhance certain images as well. To finish the book, add pictures and personalized messages.


Happy crafting!

Random Thoughts of a Supermom & Oh My Crafts Vinyl

Friday, January 13, 2012

We recently sent Kelli over at Random Thoughts of a SUPERMOM a package of Oh My Crafts Vinyl to review for us. She gave us a great review and we want to share some of her thoughts and ideas with you!

Kelli enjoyed the fact that OMC Vinyl comes in flat 12" x 24" sheets as well as rolls. She found that they loaded into her machine easier than she expected. Another positive was the OMC Vinyl Squeegee Tool. She said, "It made applying my vinyl so much easier!"

Here is one of the crafts Kelli made with Ladybug Red Vinyl. She made 13 of these cute little treat buckets and only used about half a sheet of vinyl!

For her boy's class party she created these absolutely adorable Snowman Juice Boxes! She used Ebony Vinyl for the eyes and mouths of the snowmen.

Last but not least, Kelli made this target for her window. Her boys received bows and arrows for Christmas and this Vinyl target was much easier to maintain than dry erase markers. She even made it out of the Ruby Glitter Vinyl so that it would really stand out well.


We want to thank Kelli for the great review and for the fabulous project ideas she's shared with us.

Click HERE! to view Kelli's full post and review of Oh My Crafts Vinyl.

Happy crafting!

Tell Us More Contest WINNER!

Thursday, January 12, 2012

WOW!
 

Thank you all for the wonderful comments! We passed your comments on to the designers and are definitely going to be adding more and more to the blog.

The winner of this contest is Doris P!

Doris said:
I haven't been to your blog in a long time.. time to revisit and stay. I would LOVE to learn more on learning to use all the sprays, glitters, spritz's and would love to see more on home decor and vinyl! I have ordered vinyl from you a lot and love it!! tfs a chance to win a gift.. (can't wait.. fingers crossed) I have many embossing folders and would to know if there are any more tricks /tips to using them! thank you been a customer for a looong time now. already a follower :) have vinyl projects on my blog that I'd love to share here.. Doris

Thanks again for all the suggestions and happy crafting!

It's All About You & I

You & I Book
Created by OMC Designer Lindsey

Supplies Used:

Studio Calico : Mister Huey's Color Mists
Studio Calico : 4" x 6" Huey's Mask - Ampersand Memoir Mask
Studio Calico : Classic 4x8 Journal - Woodgrain
Studio Calico : Memoir Fabrips
Tim Holtz : Distress Ink Pads - Brushed Corduroy
Sticker Letters

Instructions:
1. Place the letters "You" and "I" as well as the ampersand mask where you want them to appear on the front cover.
2. Spray the Mister Huey's color mists over the masks until you get the desired color and look you want. Allow to dry completely, then carefully pull off the letters and the mask.
3. Ink the edges of the book with the Brushed Corduroy ink pad. 

4. Adhere the Fabrips to the book binding and cut to size. Add any other embellishments to the front cover such as flowers or buttons. 


Happy crafting!

Tell Us More!

Wednesday, January 11, 2012

It's time for a BLOG contest!

How to Enter: 

Follow our blog and take a look around at the variety of projects and ideas we have posted.  Leave a comment on this blog post about what you'd like to see more of on our blog. Do you like project ideas? Or perhaps the step-by-step instructions? Or do you like product tips and information on how to use things such as vinyl or misting sprays? Let us know and you'll be entered for a chance to win a crafty prize packet from OMC!

Contest Starts: Wednesday, January 11th, 2011
Contest Ends: Thursday, January 12th, 2011


Good luck and happy crafting!

Happy as 2 Pigs in Love

Monday, January 9, 2012

"Happy As 2 Pigs In Love" Valentines Card
Created by OMC Designer Lindsey

Supplies Used:
Bazzill Basics : 12" x 12" Smoothies Cardstock : Kraft
Echo Park : Yours Truly Collection Kit
Tim Holtz : Distress Ink Pad - Spun Sugar, Black Soot
We R Memory Keepers : Sew Stamper - Cross Stitch Head
EKSuccess : EK Tools - Heart Layering Punch
Sizzix : eclips Cartridge - Decorate Your Life
3L Foam Squares - White
Faber-Castell : Essential Pitt Artist Pens - Black
Lifestyle Crafts : Embossing Folders : Floral
Doodlebug : Doodle Twine - Cupcake
EKSuccess : Powder Tool 

Alphabet Die-Cut

Instructions:
1. Cut the Kraft cardstock card to size: 5½" x 4½".

2. Cut the sheet of pink and white patterned paper 5¼" x 4¼". Ink the edges with the Black Soot ink pad. Adhere to the front and center of the Kraft cardstock card. On the
4¼" sides, use the Cross Stitch Head Sew Stamper tool and stamp from top to bottom.

3. Take the Doodlebug Cupcake twine and wrap it around the card near the top three times. Tie a bow on the right side of the card.

4. Cut the sheet of polka dot patterned paper 4" x 4". Emboss using the Floral embossing folder from Lifestyle Crafts. Ink the edges with the Spun Sugar ink pad.

5. Using a paper towel, lightly ink the raised, embossed edges of the paper with the
Spun Sugar ink pad. Attach the polka dot patterned paper to the center of the pink and white patterned paper so that you can see the stamped Cross Stitches on either side.

6. Using the alphabet die-cut of your choice cut out the word, "HAPPY". Mount on a piece of the Kraft cardstock and cut to size. Ink the edges of the Kraft cardstock with the Black Soot ink pad.

7. Using the black sticker letters in the Yours Truly collection kit, attach "AS" next to “HAPPY”. Cut out a number “2”, mount on the Kraft cardstock, and cut to size. Mount on an angle underneath "HAPPY".

8. Use the EKSuccess Powder Tool on the back of the red sticker letters for "PIGS". Add 3L Foam Squares the back of the letters and attach next to the number "2". Using the black sticker letters, place the word "IN" underneath the number "2" and "PIGS".

9. Take a piece of light colored patterned paper and punch out three hearts with the EKSuccess Heart Layering Punch. Use the three hearts option.

10. Find the three smallest, full hearts. Fold two of the hearts in half.  Adhere one side of each of the folded hearts to the last smallest heart so that the inside pieces stick up.

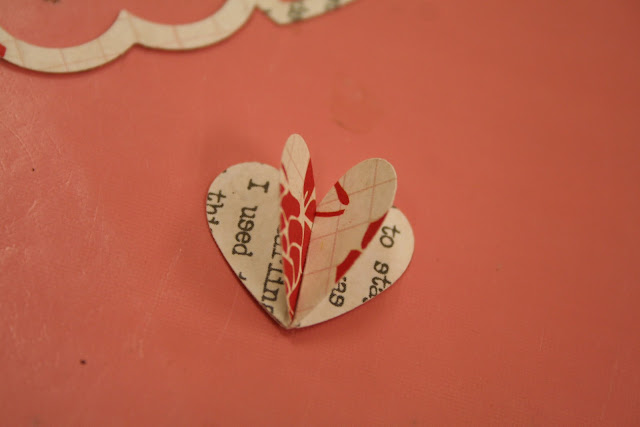
11. Ink the edges of the heart with the Black Soot ink pad and write "love" across the center of the heart. Attach the heart piece to the card to the right of the "IN" sticker letters.


Happy crafting!


LinkWithin

Related Posts with Thumbnails