Mom's Gift Bag

Saturday, October 30, 2010

Don't you just love the projects that come from Sizzix?  Well we do! So many cute things, so little time!  

Well, we loved this gift idea so much that we wanted to share it with you: Mom's Gift Bag!


To see more projects and tips from Sizzix, check out their blog: Sizzix Blog

Also, have you seen what's new at OMC from Sizzix?  We have Textured Impressions, Textured Fades, Bigz Dies, Sizzlits, and more!  Check it out!

Happy Crafting!

We're Having A Robotic Good Time!

Friday, October 29, 2010

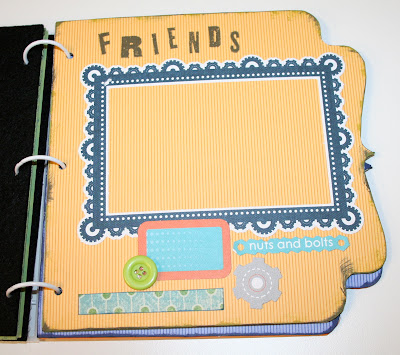
Things are getting interesting here at OMC.  Our OMC designer Lindsey is hard at working creating all sorts of fun projects for us to share with you!  The latest creation is this adorable Robotz Mixed Media Book.  Take a look!


This book contains all sorts of fun materials to work with: felt, chipboard, and transparent sheets.  Lindsey used all sorts of fun papers and embellishments for this book.  Not to mention the In Stitch'z kit and new Jenni Bowlin Dabbers! The cute robots you see featured throughout the book were made using the Cricut Robotz Cartridge.  Each robot has its own unique personality - you'll love them all! 


Here's the full Supply List:

Doodlebug - Petite Prints Daisy Stripe Assortment Pack:
     - Ladybug Stripe 
     - Blue Jean Stripe
     - Tangerine Stripe
My Mind's Eye - Lil' Robots Paper and Accessories Kit
Fancy Pants - Rough and Tough Paper
Scenic Route - Garden Grove
Jenni Bowlin - Paint Dabber:  
     - Chili Powder 
     - Stick Candy
Jenni Bowlin Dye Ink Pad: Spice Tin
American Crafts - Thickers foam letters in black
     - Bahama 
     - White 
     - Mexican Poppy 
     - Festive 
     - Black
American Crafts: Stamp Letter Alphabet
Bazzill - Buttons
Bazzill - In Stitch'z: Primary

If you have any questions about this album, feel free to contact Lindsey at lindsfill@gmail.com.  Please put "Robotz Album" as your subject.  

Happy crafting!


Autumn's in the Air

Wednesday, October 27, 2010

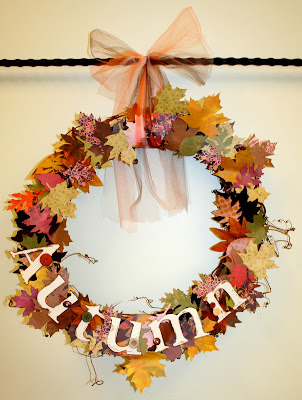
Check out this gorgeous Autumn Wreath that OMC designer Lindsey created!  Plus, we have instructions!


SUPPLIES:

Sizzix Bigz Die - Tattered Leaves by Tim Holtz
Tsukineko Versafine Ink - Vintage Sepia
Tattered Angels Glimmer Mist - Tattered Leather, Copper, Pumpkin Pie, and Black Magic
Tim Holtz - Grungeboard 
Cricut - Plantin' Cartridge 
Bazzill Cardstock - Vanilla
12x12 Print paper in fall colors & tones
Wicker wreath
Glue gun

INSTRUCTIONS:

1.    Cut 12x12 print paper into 4 equal squares.  Cut the squares with the Tattered Leaves die to make leaves.
2.    Using the Glimmer Mist, ink the edges of the leaves to give them a more realistic look.
3.    Using the glue gun, glue the leaves onto the wreath in all angles and directions


4.    Cut letters on cartridge size 4 using the vanilla cardstock.  Trace the letters onto the chipboard and cut out. Glue the paper letter cut outs on top of the chipboard cut outs. Ink the edges of the letters.  Glue varying buttons onto the edges of letters.
5.    Glue the letters to the bottom of the wreath


If you have any other questions about this wreath or any of Lindsey's projects, feel free to contact her at lindsfill@gmail.com.  Just put the name of the project as your subject line. 


Happy decorating!


'Tis the Season to be Jovial!

Tuesday, October 26, 2010

Holiday ideas from the Basic Grey Newsletter for September 2010! These projects are made with the Jovial Collection.

Basic Inspiration
by Kelly Goree
 
Basic Grey supplies:
  • Jovial Flannel Pajamas
  • Jovial Crushed Velvet
  • Jovial Shopkeeper
  • Jovial Snowball Fight
  • Jovial Naughty
  • Jovial Mini Mono alpha stickers
  • Jovial Pops
Other supplies:
  • 1 – 4”x6” horizontal photo
    Favorite adhesive
    Dimensional adhesive
    Scallop border punch
    1½” circle punch
    Corner rounder
    Label punch or template
    Trimmer or cutting mat/craft knife
    Black journaling pen
    Sharp fine-tip scissors
    Coordinating chalk Ink (optional)
    Ruler/straight edge
The holidays will be here sooner than you know it.  This layout and card by Kelly Goree are sure to get you in the holiday spirit!


Layout Instructions:

1. Locate sheet of Flannel Pajamas (deep red side up).  This is the base. 
2. Locate 3½”x12” strip of Shopkeeper (cream floral). Adhere vertically down the left side of the page.
3. Locate 3”x12” strip of Crushed Velvet (green quilted). Using a 1½” circle punch, punch a partial circle along the left edge approximately 1” down from the top then adhere strip vertically along the right.
4. Using a ruler and black journaling pen, draw a dashed line along the inside edges of the vertical strips.
5. Locate the 6¼”x5½” piece of Snowball Fight (cream). Using the scallop border punch, punch along one long edge. Adhere the piece horizontally, scallops down, so that it is 2” from the right side and 1½” up from the bottom.
6. Locate a 12”x½” strip of Naughty (green stripe) and trim a 6¼”piece from it. Adhere the strip horizontally along the top of the scalloped edge of the cream piece as shown.
7. Using a ruler and a black journaling pen, draw a dashed line along the bottom of the striped strip.
8. Locate three 4”x½” strips of cream paper and adhere horizontally as shown in the deep red section of the page above the large cream photo mat.
9. Locate the four ornament stickers in the Pops sheet. Adhere three of them along the journaling strips at the top of the page as indicated.
10. Tie a small piece of brown jute in the final ornament sticker. This sticker will be the “O” for the chosen title (hope, joy, love, etc.).
11. Using red alpha stickers, spell out desired title using the ornament for the “o” along the base of the striped strip.
12. Remove the floral piece from the one of the “gift” stickers from the Pops sheet to accent the title.
13. Trim thin strips of scrap paper to form the “strings” for the top ornaments and adhere in place.
14. Using a scallop border punch, punch a small section of cream paper approximately 3” long and ¾” wide. Adhere along the top of the page, just above the ornaments.
15. Add a 3” piece of striped paper over the cream scalloped section so that just the scallops are visible.
16. Add desired photo and journaling.

Card Instructions:

1. Locate 5”x10” strip of Crushed Velvet (green quilted). Fold in half, quilted side out, to form a 5”x5” card. This card will open from the bottom.
2. Round bottom two corners.
3. Locate the 5”x3½” piece of Shopkeeper (cream floral) and adhere horizontally across the center of the card.
4. Locate the 5”x1½” piece of Flannel Pajamas (red stripe) and adhere horizontally across the center of the card.
5. Using a scallop border punch, punch a 5”x½” strip of Snowball Fight (cream). Adhere scallops down along the bottom edge of the floral piece.
6. Using a ruler and a black journaling pen, draw a dashed line along the top of the cream strip and along the top and bottom of the striped strip as shown. 
7. Locate cream label. Using a black journaling pen, draw a dashed line around the perimeter and then adhere it to right side of the card as shown using dimensional dots.
8. Locate green gift sticker from Pops sheet. Trim to size to fit the label as desired. 
9. Locate 4”x½” strip of cream paper. Add any desired sentiment with black pen and then adhere to card front as shown.

Happy jollying!


Pink Giveaway Winner!

Monday, October 25, 2010


Can we just say wow?  There are some truly inspirational women in this world.  We absolutely loved reading all of your stories.  It is amazing how much the human spirit can go through and still be so strong!  

We want to thank all of you for helping raise awareness and for being supportive of those who have or have had breast cancer.  We want to continue to do all we can to help find the cure!

The winner of our pink album contest last Friday is Jamie!

"My story is about my Momma. She was diagnosed with breast cancer at age 54. She is now 56. I remember the day she told me she had breast cancer. I have never felt my heart ache so much in my life. I felt so helpless! My family and I were determined to help her get through this the best we could. We relied on the Lord, friends and a lot of prayers. We were a close family before her diagnosis, but now we are much closer. My Dad and I participated in the Breast Cancer 3 day the first year she was diagnosed. My husband and I did it last year together. As I write this today, the Breast Cancer 3 day is going on in Atlanta. Instead of doing it this year, I am taking a trip with just my Momma to the mountains. We will, in a way, be celebrating all that she has been through. She is my hero and my inspiration! She is now cancer free and enjoying life to the fullest. My family and I are doing all we can to MAKE PINK JUST ANOTHER COLOR!!!"

Jamie, please send your shipping address to contest@ohmycrafts.com so we can send you the pink album.


Let us all strive to make pink just another color and help find a cure!


Who Wants Something PINK!

Friday, October 22, 2010

Remember the pink album created by OMC designer Lindsey that we showed you a few weeks ago?  Well to finish off our week of Breast Cancer Awareness giveaways, today we are giving away this album!  Here's a little reminder of what it looks like, just in case you don't remember.


Lindsey left lots of space for pictures as well as for writing throughout the album.  


There are even pockets for momentos and other small things you might want to save. It is ready for all the memories you have to be placed inside.


Lindsey also used lots of embellishments from all different vendors on this album - we have Prima, American Crafts, Basic Grey, Jenni Bowlin, and much, much more!


Want to know more details about this fabulous little album?  Watch our YouTube video!  Lindsey explains all about this album and what kind of products she used.


Now, on to the contest details...

For this contest we want to hear about your breast cancer story (it doesn't have to be about you personally - it can be a friend or a family member).  Leave us a comment on this post about your story.  What happened, who was involved, where you are now, etc.  

This contest will run through the weekend, and the winner of the album will be announced on Monday, Oct. 25th. 

Thanks to everyone who participated in our contests this week and for helping to promote Breast Cancer Awareness!

So Fantastic!

Alphabet Soup.  I'm not talking about the kind you used to eat as a kid when you were learning how to read and write- I'm talking about the new My Mind's Eye Accessory/Paper kit.  It's pretty great, but don't just take my word for it, see for yourself!

Here's a layout Lindsey created with Alphabet Soup


On this layout, she also used (click on the pink words to view the product from our website):

Walnut Stain Distress Ink for the edges of the paper
Prima Lace Lime Green
Doodlebug Limeade Jewels for a little extra pizazz
Basic Grey buttons pack
Bazzill Pom Poms- large navy
Prima E-line Flower Green
Foam Dots to give the layout some more dimension


Here's a closer look at all the embellishments on the bottom corner:


These paper flowers are so easy to create- just cut out cirles (each one smaller than the one before), scrunch them up, punch a small hole through the centers, and then attach the center brad.  You've gotta love it!

And that's not all, Lindsey has also brought you an amazing card idea for that best friend of yours.  Think how good you would feel if somebody gave this card to you- so give that joy to someone else.


We can tell you are already excited to begin creating this, so here is a list of what you will need:

American Crafts: Enchanted Paper Kit
Unity Stamp: One of a Kind
Jenni Bowlin Ink: Stick Candy
Prima Flowers:  Roosevelt Missus
Basic Grey Ribbon
Bazzil Cardstock: White
Bazzil Grommets: Dark Brown
Distress Ink: Walnut Stain


Lindsey used the ribbon (you can see it on the front of the card as well) to go all the way around and then tied a bow in the back.  So creative.

There will always be more to come, so check back!  Until next time,

Happy Crafting!

To Be Thankful For

Wednesday, October 20, 2010

Don't we all love this time of year- it is seriously so beautiful outside with all the gorgeous fall colors, and this is the time when people begin to realize how much there is to be thankful for.  And when you think about it, there really is so much to be thankful for.

 With that in mind, Lindsey created the following projects to express her gratitude.  She used one of our newest items- the Graphic 45: Kraft Envelope Album.

On the cover, she used Prima Bronte Blooms to give this vintage-looking album a touch of elegance.  They are easy to use but give your project that much more.


This album comes with the string tie closure as shown, and depending on how you decide to decorate it, it  can be perfect for journaling.


Lindsey also made a card to go along with the holiday.   She used My Minds Eye: The Spider's Web paper.  It is perfect for Halloween, Thanksgiving, and Fall projects.  She also used the Unity Stamp Company: Harvest of Memories stamp.  


Lindsey's tip for these projects is to use Tattered Angels; she used Pine Cone, Copper, and Hot Chocolate.  Tattered angles are easy to use, and you can get such a different and fun look if you use more than one on a project.


Lindsey has many more tips and tricks to help make your scrapping more enjoyable.  Please email her at lindsfill@gmail.com if you have any questions about it; put the project title as the subject.

Happy Crafting!


Halloween Spooks

Tuesday, October 19, 2010

Have you seen the new Tim Holtz Sizzix dies?  They are to die for! 

Lindsey designed this Spooky Night card to give you a small glimpse of the possibilities with these dies.  This would be really fun to use for that Halloween Party you've been planning.


This card features Tim Holtz Sizzix Branch Tree die and On the Fence die.  To view Tim Holt's Sizzix products click here.


Glitter Ritz were used on the tree to give it a smooth sparkly finish; Glitter Ritz are so nice because once the glitter is applied, it does not come off (so you're not covered in glitter every time you touch your card).

Tattered Angels were used on the fence to give it that shine.  Tattered Angels great because they make the paper more pliable- giving the fence a more spooky feel.

Lindsey is happy to give you instructions or little tips and tricks to making this card, so email her at lindsfill@gmail.com if you have any questions. Please put the name of the project as your subject title.

Happy Card-ing!
Monday F-U-N

Monday, October 18, 2010

If you want a good way to start this amazing week that you're about to have, then read on.  Joy from


has been doing so many fun projects this month. Today she's doing a Halloween post using the Happy Hauntings Cricut cartridge (which we  ALL love) to create some little gift bags.  Something extra special is also going on.   I'll give you a hint:  GIVE-A-WAY!!  So hop on over to Joy's blog and join the fun!  What a good way to start your week, right?! 

Happy Give-A-Way!

Dino-R-R-Roar!

Sunday, October 17, 2010

One of the great things about this time of year is crafting.  It's not quite warm enough to be outside, the kids are in school, and there is a lot of catching up to do from all of that summer fun.  And doesn't it feel so good when you finish your project, take a look at it, and realize that you have just created something amazing?  One of the best feelings ever, right?  Of course!

To help keep you excited about everything, we wanted to show you a project created with one of this week's top selling items: the Imaginisce Dino-Roar Paper Pack.    It's super cute, easy to use (because the colors go so well together), and the designs are fun.  Lindsey really enjoyed creating these layouts, and we know you will enjoy creating and crafting with this paper pack too. 


On this layout, Lindsey stressed the Journaling card with ink and then attached it with brads. Oh My Crafts has a huge selection of brads; click here to view them. 


What a great idea for a simple embellishment- just cut a few long strips of paper from your pack, fold them back and forth, lay them out so they are mostly flat, and then attach just the ends to the layout.  You could glue it down, or use brads to help keep it in place. 


Here is the second page to the layout.  The same techniques are used to help tie everything together, but it doesn't feel like you are looking at two of the same page.


Lindsey free-handed the brown paper jagged-edge.  It doesn't have to perfect- in fact, when it isn't perfect it actually looks better. 

Buttons are a great embellishment because they can be used in so many different ways.  On this layout Lindsey left them just the way they were, but you could also tie ribbon or string through the holes, or stack them.  Oh My Crafts also has a huge selection of buttons; click here to view them.


So what are you waiting for?  Create something amazing, and feel great when you are done.

Happy Scrapbooking!

Breast Cancer Awareness/Girl Power Blog Hop

Friday, October 15, 2010

In support of National Breast Cancer Awareness month, we have teamed up with Shana from www.dsjmdesigns.blogspot.com to bring you a Go Woman/Girl Power/Breast Cancer Awareness blog hop!!!  The contest will begin Saturday, October 16th at 8am and end Sunday, October 17 at 11:30 PM.

There will be 10 designers participating in this blog hop. How awesome is that, right?  And for the best part of all---Oh My Crafts will be donating 5 $5.00 gift certificates and 5 2x2 pink ribbon die cuts for the winners!

Wondering how to be a part of this awesome contest?  Go to www.dsjmdesigns.blogspot.com Saturday and/or Sunday and follow the instructions from Shana.  Good luck and

Happy Blog-Hopping!

It's Pumpkin Time!

Tuesday, October 12, 2010


Remember the Paper Pumpkin from our email ad last week?  Well, we had so many requests for the directions on how to make it that we decided to blog about it!  Enjoy!

Paper Strip Pumpkin
Created by: Lindsey Miller


Product List:

Cuts:
  • 25 strips of paper (1" x 12")
        - 5 strips of each style of paper
  • 1 Circle 3 ¾"
  • 1 Circle 1 ¾"
  • 10 leaves from Sizzix die
  • 1 Cardstock strip: 2 ½" x 10"
  • 3 Strips ¼" x 12" black/cream vine floral print  

Directions:
1.    Separate the 1" x 12" paper strips into 5 piles (one pile for each paper design).
2.    Starting with the first pattern, line up the strips along the edge of the 3 ¾" circle. The strips will overlap each other.  Rotate through the piles to make the pattern of the pumpkin.
2.     Staple the strips around the edge of the circle. When completed, it should look like a sun with beams.
3.     Staple the other side of the strips together, three strips at a time.  Staple them so that they have some give and curve in a “C” shape. Repeat around the entire pumpkin, then staple all stapled sections together. When finished, you should have the basic shape of a pumpkin. 
4.    Using all the Tattered Angels Glimmer Mist, mist the 1 ¾" circle and glue it to the top of the pumpkin.  You want to cover the staples where the strips are joined.
5.    Mist the 2 ½" x 10" cardstock strip in the following order: Pumpkin pie, Copper, Tattered Leather and Black Magic. When the strip is dry, twist it into a coil. Glue the paper to hold its coil shape, and staple it at the bottom. This will be the stem.
6.    Glue the stem down in the center of the top of pumpkin, covering the staples.
7.    Using all the Glimmer Mist colors, mist all 10 leaves.
8.    Wrap the ¼" strips around a pen to make them coil.  Next, glue a leaf to one end of each coil.  Glue the other end of the strip to the base of stem. 
9.    Glue remaining leaves to the ¼" strips, and around the base of the stem to hide the glue circle.  


If you have any further questions, feel free to email Lindsey directly at lindsfill@gmail.com

Happy pumpkin making!


LinkWithin

Related Posts with Thumbnails