Showing posts with label From the Craft Room-Jill. Show all posts

Snowflakes Wood Decor

Tuesday, December 18, 2012

Snowflakes Wood Decor
Created by OMC Designer Jill

Supplies Used:

OMC Snowflake Wood Shapes
Tim Holtz : Distress Stain - Walnut
Tim Holtz : Distress Ink Pad - Walnut
Martha Stewart : Acrylic Craft Paint - Pearl Jet Stream, Mother of Pearl, and Wedding Cake
Ranger Ink : Stickles Dry Fine Glitter - Waterfall and Diamond
Mod Podge
Large File for sanding
BoBunny : Snowflake paper
May Arts : Net Ivory and Net Brown

Instructions:
1. Trace the shape of your snowflake onto your paper and cut out.
2. Stain the edges and back of the snowflakes that you will cover with paper.

3. Paint the sides, front and backs of the snowflakes that you are not covering with paper. Apply a base coat of plain white and plain blue before you apply the pearl colors. The paint will cover better. Let dry.
4. For the paper snowflake, glue your paper to your snowflake with mod podge. Apply enough to help the paper adhere well, but not too much! Press down firmly with a brayer. If you don’t have a brayer press very hard with your fingers, making sure everything is secure. Let dry. Sand the edges of the paper to distress the wood and to take off any excess paper that might be hanging over the edges.

5. For the painted snowflakes, sand the edges and the front of the snowflake with a large file to heavily distress the paint.
6. Ink the edges of all the snowflakes. Ink the front of the distressing on the painted snowflakes.
7. Apply a coat of mod podge to the sides and front of each snowflake. Before moving onto the next snowflake, sprinkle glitter from up high to the fronts and sides before the mod podge dries.
8. Drill holes into the sides of one point on each snowflake to have a place to tie a piece of net to hang it.

9. The large snowflake should have the smallest hanger.
10. Staple the smaller snowflakes net to the back of the large snowflake so that they hang from behind at different lengths.
11. Display!
 

Happy crafting!

Elf Shoe Wood Block

Friday, December 14, 2012

Elf Shoe Wood Block
Created by OMC Designer Jill

Supplies Used: 

Making Memories : Glitter Stripe Twinkle Paper
Doodlebug : Polka Dot Paper
Stickles Glitter Glue : Lime Green, Christmas Red
Tim Holtz : Distress Ink Pad - Vintage Photo
Martha Stewart : Acrylic Craft Paint - Habanero
Red Craft Wire
Mod Podge
Foam Brush

Instructions:
1. Trace the shape of the shoe onto the Doodlebug paper. Cut out.
2. Trace the heel of the shoe and the cuff of the shoe with the glitter stripe paper. Cut out.
3. Hand draw a scalloped edge on the heel and the cuff and cut out.
4. Ink the edges of the heel and the cuff.
5. Paint the edges and back of the shoe with Martha Stewart Habanero paint. Let dry.
6. Glue the shoe paper onto the wood with Mod Podge. Press firmly to make sure all edges are down.
7. Glue the heel and cuff onto the wood with Mod Podge.
8. Ink the edges of the show with the Tim Holtz Vintage Photo
Distress Ink
 9. Add extra Stickles to the stripes and add Stickles dots to the dots on the Doodlebug paper. Let dry.
 
10. Drill a small hole into the tip of the show and twist the red craft wire through. Add a jingle bell and bend the wire over to make the bell hang in the air.
11. Display!

Happy crafting!

Noel Necklace Gift Box

Tuesday, December 11, 2012

Noel Necklace Gift Box
Created by OMC Designer Jill

Supplies Used:
Bazzill Cardstock : Black, Green, Dark Red,and Kraft
Martha Stewart Punch : Pine Needles Trim
Tim Holtz : Distress Ink Pad - Vintage Photo, Fired Brick, Mowed Lawn
Tim Holtz : Stampers Anonymous - NOEL
Oh My Crafts : SVG Cut - Necklace Box
Stickles Glitter Glue : Diamond, Cinnamon 


Instructions:
1. Cut out a necklace box with Bazzill Black Cardstock. Put the box together. You will need a small amount of adhesive.

2. Punch out 2 strips of Pine Needles Trim and glue together to give you one long band.
3. Wrap the band around the box and glue the ends together to make a belly band for your box. This is a band that has the ability to slide off your box.
4. Once the band is on your box, very carefully use the Cinnamon Stickles on the branches and let dry!
5. Stamp the word NOEL onto a piece of Bazzill Kraft paper using a blend of Fired Brick, Mowed Lawn and Vintage Photo Distress Ink.
6. Freehand cut around the stamped image.
7. Adhere this to a Red piece of cardstock with 3D foam and free hand cut around this.
8. Now attach this to your belly band on your box and carefully use the Diamond Stickles on the word and decorative edge. Let Dry!
9. Once everything is dry you can slide the belly band off and on your box….add a beautiful necklace and give to someone special!

Happy crafting!

Snow Day Wood Blocks

Tuesday, November 20, 2012

Snow Day Wood Blocks
Created by OMC Designer Jill

Supplies Used:
Adams and Co. blocks
Embellishing tag from BoBunny Snow Day Paper

Tim Holtz Distress Ink Pad: Vintage Photo and Faded Denim
Stickles Glitter Glue: Diamond
Mod Podge

Foam Paint Brush

Instructions:
1. Cut out the tag that says “There's No Day Like A
Snow Day”.
2. Ink the edges with Tim Holtz Distress Ink.

3. Glue the tag onto the block with Mod Podge 
4. Use the Diamond Stickles on the snowflakes to make them pop. Let dry.
5. Ink the edges of your photos, and adhere to the other blocks. Add cute embellishments!
6. Display!
 

Happy crafting!

12 Days of Christmas - Day 2 Snowflake CD Box

Friday, November 9, 2012


Oh My Crafts' 12 Days of Christmas - DAY 2!


 Snowflake CD Box
Created by OMC Designer Jill 


Supplies Used:
Sizzix : Bigz CD Box
BoBunny : Mistletoe Paper - Santas List
Martha Stewart : Deep Edge Snowflake Trim Punch
EK Success : Angular Snowflake Garland Punch
EKSuccess : Snowflake Large Punch
EKSuccess : Snow Flurries 2in1 Edge Punch
My Pink Stamper : Itty Bitty Happy Holiday
Inkadinkado : Snowflakes Inchie Bundle 

Ranger Ink : Adirondack Denim Ink Pad
Tim Holtz : Distress Ink Pad - Vintage Photo
Ranger Ink : Stickles Glitter Glue - Stardust
Glue Glider Pro

Instructions:
1. Cut out a CD box using the Sizzix die and the Bo Bunny Mistletoe Santas List Paper
2. Put your box together with a Glue Glider Pro Gun.
3. Ink the edges of your box with Adirondack Denim Ink (Heavily) and Tim Holtz Distress Ink: Vintage Photo (lightly)
4. Punch out a Belly Band of snowflakes using white cardstock and the Martha Stewart Deep Edge Snowflake Trim Punch
5. Cut out single snowflakes using white cardstock and the EK punches.

6. Ink the edges of the snowflakes with the Adirondack Denim Ink
7. Stickle the Snowflakes with Stickles Stardust. Let Dry Completely


8. Attach all the snowflakes and the Belly Band to your box.
9. Make a tag out of Bazzill Kraft Paper, Ink the edges with Tim Holtz Distress Ink: Vintage Photo
10. Stamp a snowflake and a nice holiday sentiment onto the tag.

11. Hang the tag from the Belly band with twine.
12. Add your CD gift and give to your favorite friend!


Happy crafting!

12 Days of Christmas - Day 1 Poinsettia Take Out Box

Thursday, November 8, 2012


Welcome to the Oh My Crafts 12 Days of Christmas! We want to help you use your scraps to wrap up your Christmas in style. For the next twelve days, we'll have great ideas for boxes, gifts, and gift toppers. We hope you enjoy!

Poinsettia Take Out Box
Created by OMC Designer Jill


Supplies Used:
Sizzix : Bigz - Box, Take Out Carton
Sizzix : Flower #2 Die
BoBunny : Rejoice Paper - Jubilee
Bazzill Basics : 12x12 Cardstock - Kraft
Tim Holtz : Adirondack Color Wash - Cranberry
EKSuccess : Snowflake Punch
Inkadinkado : Winter Fun Inchie Bundle Stamp
We R Memory Keepers : Glitter Brads - Neutral

Inkssentials: Glossy Accents
Ranger Ink : Stickles Glitter Glue - Diamond
Tim Holtz : Distress Ink Pad -Vintage Photo
Floss / Jute / Twine
Fiskars: Crimping Tool
 

Instructions:
1. Using the Bo Bunny Rejoice Paper, cut out a Sizzix Take Out Carton. Fold and glue together. Ink the edges of the box with Tim Holtz Distress Ink Vintage Photo.
2. Using the Bazzil Kraft Paper, cut out 2 flowers with the Sizzix Flower #2 die.


3. Send the cut out flower through a crimping tool.

4. Color the paper with Tim Holtz Adirondack Color Wash Cranberry. Let Dry.

5. Cut into the center of the flower slightly to give the petals more movement.
6. Paint the glossy accents onto the front of your flower with your finger. As it is drying, bend the ends of the petals inward to curl them.

7. Place your two flowers on top of each other and secure together with the large brad from the We R Memory Keepers Neutral Glitter Brad Collection. I pulled the pollen off an old flower to give the brad a more realistic look
8. Punch out large snowflakes using the EK Snowflake. Punch out the small snowflakes with EK punch Snow Flurries. Ink the edges and slightly glitter with Stickles.

9. Tie the box up with jute.
10. Attach the snowflakes onto the sides of the box
11. Adhere the flower securely with Inkssentials Glossy Accents.
12. Cut out a small square tag and stamp with the Inkadinkado Winter Fun Inchey stamp.
13. Tie the tag onto your box.
14. Share with a friend!

Happy crafting!

Autumn Wood Blocks Display

Friday, October 12, 2012

Autumn Wood Blocks Display
Created by OMC Designer Jill

Supplies Used:
Adams and Co. : 8 Piece Block Set
BoBunny : Apple Cider Collection Paper
OMC : Brown Vinyl
Stickles Glitter Glue : Lime Green, Cinnamon, Paprika
Mod Podge
Tim Holtz : Distress Ink Pad - Vintage Photo
Inksenntials Blending Foam Tool
 

Instructions:
1. Measure your paper slightly smaller than the length and width of your block. Cut out a piece of paper for each block.
2. Ink the edges of each paper with the distress ink and the foam blending tool.
3. Very carefully apply Mod Podge onto the block where the paper will go. Try hard not to go over the edge. On this project I wanted to keep the muted look of the block and not apply Mod Podge over the entire front of the paper. Depending on the look you want you could cover the paper with a coat of Mod Podge.
4. Apply your paper and press down firmly. Let dry
5. Cut out the letters you want using a font of your choice. I cut my letters out so that they would fill the space of the block.
6. Apply the letters to each block.
7. Find a small pattern in your paper and apply the Stickles to enhance and bring out the pattern in the paper. Let dry!
8. Now display!

Happy crafting!

EEK Wood Blocks

Monday, October 8, 2012

EEK Wood Blocks
Created by OMC Designer Jill

Supplies Used:

Adams and Co. : Wood Block Set
Tim Holtz : Mini Halloween 3 Stamp Set
Versamark : Dazzle Frost Ink Pad
American Crafts : Zing Embossing Powder - Silver
Ranger Ink : Stickles Dry Fine Glitter - Paprika, Black
Vinyl Lettering
Stickles Gliitter Glue : Purple, Lime Green, Black, Red
EKSuccess : EK Tools - Tarantula Spider Large Punch

Instructions:

1. Using the Versamark ink pad and the Tim Holtz stamp, stamp on the corners of the block with the spider web and apply the embossing powder. Tap off the excess and emboss using a heat gun. I carefully removed any excess embossing powder with a tiny paint brush in places it should not be!
2. Cut out vinyl lettering the size and font you want to use. Pull out the letters and use the negative vinyl as a stencil! I applied the stencil with transfer tape as it was much easier than trying to apply it without it.
3. Press down firmly on the vinyl to make sure all edges are secure.
4. Paint a coat of Mod Podge over the vinyl and onto the cut out part of the letter. Be very careful not to coat over the sides at all, as you will be dumping glitter onto this and you don’t want to glitter on the sides.

5. Pour glitter on top of your block and press down into the Mod Podge. Let dry!
6. Once dry, carefully lift up your stencil and the glittered letter should be there!
7. Use the Stickles around the edge of each letter to add dimension.
8. Coat the front of the blocks with a matte clear coat to secure the glitter.
9. Punch out a few tarantula shapes, Use the black Stickles on their legs and backs and sprinkle some black dry fine glitter onto them. Use the red Stickles on the fangs. Let dry.
10. Display!

Happy crafting!

Cook Together Wood Blocks

Thursday, October 4, 2012

Cook Together Wood Blocks
Created by OMC Designer Jill

Supplies Used:
Patterned Paper
Martha Stewart : Laurel Leaf Punch
Ranger Ink : Stickles Glitter Glue - Cinnamon
Mod Podge
Tim Holtz : Distress Ink Pad - Vintage Photo
OMC Vinyl : Ebony Black
Adams and Co. : Wood Blocks
Sizzix eclips and eCAL program

Instructions:
1. Choose a paper that will coordinate with your kitchen.
2. Cut 2 pieces of paper 5 ½" x 2 ½", and 2 pieces 3 ½" x 2 ½" and a coordinating piece of cardstock 5 ½" x 1 ¾".
3. Punch the left edge of one of the 5 ½" x 2 ½" and 3 ½" x ½" Then punch the right side of the other two and the top of the 5 ½" x 1 ¾" paper.
4. Ink the edges with the distress ink.
5. Glue the paper down on its coordinating block with Mod Podge. Let dry.
6. Use stickles on the leaf punch. Let dry.
7. Cut out a "C" and a "K" that will fit on the 5 ½" x 2 ½" paper , 2 of the letter "O" that will fit on the 3 ½" x 2 ½" and the word together that will fit on the 5 ½" x 1 ¾" paper.
8. Apply each letter to a wood block.
9. Embellish with cut outs from the paper that you used!


Note: The eCAL software that you can get to use with your Sizzix eclips is a wonderful way to be able to letter your projects to the exact dimensions of your project!


Happy crafting!

Coffin Box Halloween Decor

Thursday, September 27, 2012

Coffin Box Halloween Decor
Created by OMC Designer Jill

Supplies Used:
Small Wooden Coffin - Purchased from a local craft store and embellished with fun things from OMC!
Martha Stewart : Acrylic Craft Paint - Beetle Black Sizzix : elips Cartridge - Basic Shapes
My Minds Eye : Lost and Found - Halloween Paper
Martha Stewart : Double Embossed Large Punch - Pumpkin
Martha Stewart : Glittered Spider and Bat Stickers
Deco Wire - Black Craft Wire
Orange Glitter Paper


Instructions:

1. Paint the entire coffin box black. Let dry.
2. Cut out a skeleton and glue it inside one side of the coffin. Be careful to not lose any of the bones!

3. Punch a pumpkin out of the orange glitter paper. Attach to the inside of the coffin box, opposite the skeleton.
4. Drill a small hole in the top of the coffin.
5. Punch out a circle with the witch on it to make it look like a moon. Add some bats and glitter to the sides of the circle. Let dry. Punch out a black circle and glue the two circles together with some of the black making a shadow on one side of the circle to make your moon pop!

6. Curl some black craft wire around a small paint brush and attach it to the inside of your two circles. Thread the wire through the hole in the coffin box and bend to keep in place.
7. Embellish your coffin with the glitter spiders.
 

Happy crafting!

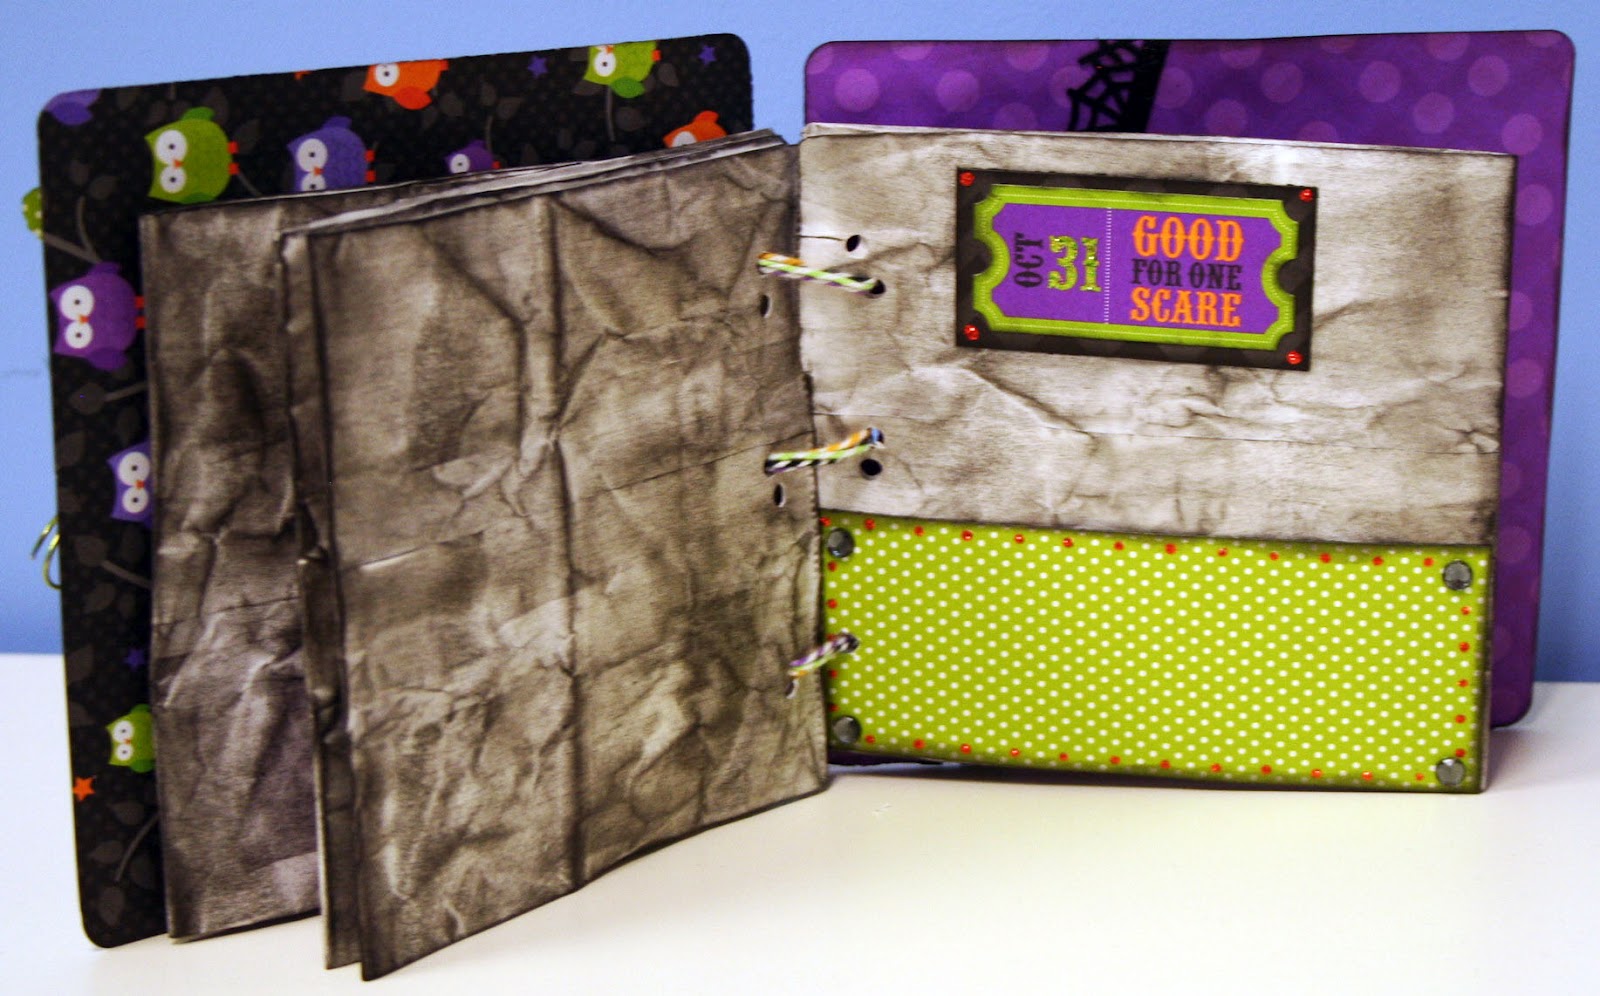
Halloween Paper Bag Booklet

Friday, September 21, 2012

Trick or Treat Booklet
 ...
Created by OMC Designer Jill


1. Cut out 4 pieces of paper 6x6 and adhere two together with Extreme Tac Glue Arts  to make them thicker. Round the corners. Ink the edges with Versafine Black Onyx Ink.

2. Cut out a 5 inch scalloped cutout using Lifestyle Crafts inverted scalloped circle.

3. Adhere the scallop to the front cover of your booklet.

4. Embellish with the punch outs from the Doodlebug Haunted Manor Paper Pack. This is where I used the two black brads and twisted the green craft wire around the brads.

5. Stickle the words on the punch out. Let dry!

6. Crumple the four white bags and then ink the entire bag with Versafine Black Onyx ink. This will give it an old weathered look. Fold the bags in half to make pages for your book. 

7. Cut out four pieces of paper 5 inches long and 2 inches high. Adhere these to the fronts of each paper bag page to make a pocket to drop a picture in!


8. Embellish each page with the pre-made punch outs from the paper pack. I like to stickle the on the punches to really make them pop! I also added the doodlebug Halloween jewels.
9. Punch out 3 round holes on each page and tie the book together using the Doodlebug Halloween twine!
10. Use the pockets to place pictures inside and use the blank pages to adhere pictures of your favorite Halloween spooks!
11. Enjoy!

Happy crafting! 


The Witch Is In Sign

Wednesday, September 19, 2012

The Witch Is In Sign
Created by OMC Designer Jill

Supplies Used:
Adams and Co. : 10.5 Black Blank Wood Block
Martha Stewart : Spider Web Punch
Lifestyle Crafts : Inverted Scalloped Rectangle
Doodlebug : Haunted Manor Paper Pack
Sizzix : eclips Cartridge - Happy Shapes Alphabet
Versafine : Black Onyx Ink Pad
Mod Podge


Instructions:
1. Measure a piece of the Haunted Manor Paper to fit the Adams&Co. wood block.
2. Ink the edges with Versafine Black Onyx Ink
3. Adhere to the wood block using Mod Podge. Pressing firmly to get any bubble out! Let dry completely!
4. Punch out 2 black spider webs using the Martha Stewart Spider Web Punch. These will be slightly less that 6" long. You can cut the excess off. Adhere these to the block with Mod Podge as well.
5. Cut out the words "The Witch Is In/Out" with the Sizzix Eclips cartridge Happy Shapes and Alphabet. 1.5" for the words "Witch, In, Out" and .75" for the word "The". I used coordinating papers from the Doodlebug Haunted Manor Pack.
6. Cut out a shadow of the words as well.
7. Ink the edges of the words and adhere them to the wood block using modpodge.
8. Cut out a 1 ½" circle with the Lifestyle Crafts Scalloped Circle. Adhere with Mod Podge.
9. Adhere the word "The" to this circle with Mod Podge.
10. Cut out a 4 inch tag using the Lifestyle Crafts Inverted Scallop Rectangle
11. Ink the edges with Versafine Black Onyx ink. Add the letters for In on one side and Out on the other. Embellish with bats from Martha Stewart.
12. Punch holes at the top and twist some black craft wire to hang it with,
13. Glue 2 black Doodlebug brads on the wood block to hang the In/Out sign on.
14. Mod Podge over the entire block except for the In/Out sign.
15. Use Stickles glue on all of your lettering and key spots on the spiders web. Let dry.
16. Hang the In/Out sign on the brads.
17. Display!

Happy crafting!

LinkWithin

Related Posts with Thumbnails