

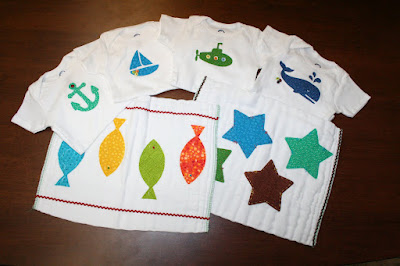
We often get questions about whether or not you can cut fabric with the Cricut. Or what about the Big Shot or Big Shot Pro? Well, today we'd like to offer some great tips for cutting fabric with these machines. One of our designers, Katie, recently created these baby onesies and burp clothes (out of fabric diapers), using fabric, and the Cricut.
A few tips for cutting fabric
• When using the Cricut, make sure your designs are SIMPLE. Use solid pieces, no designs with pieces cut out of the middle, etc. (If the blackout of the design is available on the cartridge, choose that.) If you want an intricate design, it is recommended that you for sure use a Big Shot, which is made to cut all mediums—including fabric.
• Cut your designs out of paper first to make sure it is the correct size. It is a lot easier (and cheaper) to keep cutting different sizes out of paper than to ruin a piece of fabric and have to prep another piece of fabric for cutting.
• Like any sewing project, make sure you pre-wash and iron your fabric to make sure it doesn't shrink after you've applied it to your article of clothing (in this case, the onesie). If you are making burp clothes out of cloth diapers, wash and dry at least twice before applying any designs.
• Using Freezer paper makes this project so much easier and yields better results and don't worry, it doesn't leave any residue on your fabric when you take it off.
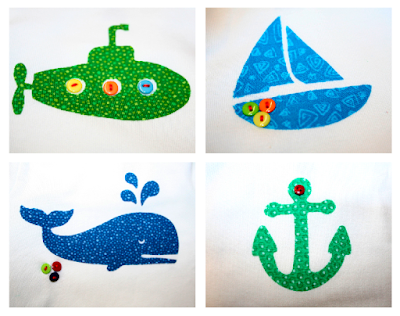
• If you are embellishing with buttons, glue them onto the fabric with Fabritac first, then secure with embroidery floss. If the item you choose to make is for a baby, make sure there is no way the baby could somehow tear buttons off and choke on it. With the burp cloths that Katie made, she did not put any buttons anywhere, since burp cloths go right in a baby's face. They are embellished with stitching. You can also embellish with rick rack, secured with Fabritac. Or, you could also use a sewing maching to stitch ribbon through. The possibilities for cuteness are endless!
Okay, here's how she did 'em.
Supplies
Cricut Machine
Onesies
Cloth Diapers
Fabric (fat quarters)
Fusible Backing (Steam a Seam 2)
Blue Painter's Tape
Small Buttons from the Lime Rickey kit by Basic Grey
Embroidery Floss
Iron and ironing surface
Deep Cut Blade
Scissors
Fabritac
Freezer paper (optional—make sure it's freezer paper and not wax paper)
Cutting with the Cricut
Step 1
Prep the fabric to be cut—Assuming you know the size of the shape you'll be cutting, cut a piece of fabric the correct size for your design. Cut your fusible backing to the same size as your fabric. Iron on your fusible backing to the wrong side of your fabric. Katie used the Steam a Seam 2 because it has the paper on the back, which makes it work with the Cricut. If your fusible does not have a paper on the backside, use the paper you too off the front of the fusible backing and place it on the back, however this doesn't yield as good of results. don't try to cut the fabric without any paper over the fusible backing; the Cricut needs paper to cut through or the blade gets stuck. Freezer paper is helpful because it becomes stiff after you iron it onto the fabric and makes it easier for the Cricut blade to cut through in clean lines and it keeps the fabric from bunching up and creating a mess. If you choose to use it, iron the Freezer paper to the right side of your fabric.
Place your fabric on your Cricut Mat. If you are using Freezer paper, place fabric on the mat freezer paper side up. If you are not using it, place the fabric on the mat fusible backing side up. When you have your fabric positioned on the mat, take your blue painter's tape and tape all sides down to the mat. You can use regular masking tape, but it doesn't come off the mat so easily and might pull up the sticky from your mat, so always use the blue painter's tape. Now your fabric is ready to be cut.
Step 2
Load your mat into your machine. Make sure the pressure is on max and your speed is on minimum. Cutting fabric with a regular blade can be done, but it's probably best to use a deep cut blade. IF you are using a regular blade, at least make sure it's brand new or nearly brand new. If you cut fabric with a dull blade you might regret it.
Choose your design and size, press cut. Stay by your machine and watch it cut, just in case the fabric comes up and snags on the blade. If you're right there you could save the design by pulling the fabric back down so it can finish cutting.
After your design is finished cutting, unload your mat and take your fabric off. Remove the freezer paper and the paper from the fusible backing. Place your design on your onesie or burp cloth and iron on.
Embellish with buttons, embroidery floss, or whatever you fancy. Enjoy!
Cutting with the Big Shot
Step 1: Cut your fabric and fusible backing to the right size, iron on the fusible backing.
Step 2: Set up your fabric and die, just like you were using paper. Put through the Big Shot.
Step 3: Iron your cut design onto your onesie or burp cloth. Embellish and enjoy!
Any questions just give Katie a holler! katie @ ohmycrafts . com.

6 comments:
Great tutorial! Thanks for sharing. I plan on making some onesies for my coming little one.
I am so glad you had this tutorial. I was curious how to cut fabric with my cricut. Thanks so much!
Thanks! I am going to try this for Christmas gifts. I love my Cricut more each day :)
Thank you! I have been planning a project and needed these instructions!
I'm soooo glad that I stumbled upon this. Thank You soooo much for all of the info.
Thank you for the tutorial. I have been wondering how to cut with the the heat n bond on the fabric! Heading to the store for freezer paper!!!!
Post a Comment